Brisk Breakfast · Easy LunchBox Series. · Snacks & Tiffin Items

Onion Ragi Rava Dosa – Healthy & Tasty Tiffin Options.

Ragi Rava Dosa
Ragi Rava Dosa

Rava Dosa is always my husband`s most favourite breakfast/tiffin/dinner entree. Any day is Rava Dosa day even if I am not able to make his favourite coconut chutney to go with  it. Add  a dash of finely chopped onions and his day is made. Last night I was pretty much stumped on what to make for dinner and when I was rummaging in the pantry I saw the unopened packet of Ragi Flour that my husband had bought from the Indian Store. I gave him an option of Rava Dosa adding ragi flour for health and he welcomed the idea. I had some shallots that I had peeled earlier so I chopped them in to tiny pieces and set them aside. Ragi Rava Dosa with onions was a great healthy dinner/tiffin option. With Molagapodi or Chettinad Onion Tomato Chutney, it was simply divine.

INGREDIENTS:

1 cup Roasted Rava.

1/2 cup Ragi Flour.

1/2 cup All Purpose Flour.

1/2 cup Rice Flour.

1/4 cup of Sour Buttermilk if available.

Approximately 4 cups of water.

2 spoons of Jeera.

1 spoon of Whole Black Pepper .

4-5 Green Chillies finely chopped.

Curry leaves.

1 Tsp finely grated ginger(Optional).

Curry Leaves.

Hing.

Salt.

PREPARATION:

  • Mix all the dry ingredients – the flours in a wide mouthed vessel. Add salt and set aside.
  • Add requisite water and the sour buttermilk(if available) and use a whisk to mix it in to a smooth watery batter in pouring consistency.
  • Keep a seasoning kadai on the stove and add 2 spoons of oil. When its hot add jeera, black pepper, ginger, curry leaves and hing.
  • When this is well roasted in the oil add this to the  watery batter and mix well.
  • Put the Dosa tava on the stove and pour requisite oil.
  • Now sprinkle a little bit of the onions and then pour the dosa batter over it.
  • The dosa cannot be spread as in the case of a regular dosa. The ends should be poured first in a circle and the rest of the dosa filled in by pouring.
  • Add oil around the edges and slowly turn over to the other side after a few minutes.
  • When the dosa is flipped allow a couple of seconds to cook on this side.
  • Fold and serve on the plate with Chettinad Tomato Chutney or Coconut Chutney.
Brisk Breakfast · Easy LunchBox Series. · No Need of Onions!!! · Snacks & Tiffin Items

Quick & Easy Idli Upma.(Upma snack made from idlis and seasoning with spices.)


IMG_6562


In my school days when I was a little girl, one of the things I used to hate was Idlis. I guess, I always felt that the Idlis by themselves have no taste whatsoever and derive the overall effect, by what goes on the side. Even today I feel its true. So whenever Amma used to pack idlis for lunch, some how she would find that the would come back completely untouched,with a nice sprinkling of sand on them!!! Whenever she would ask me, It seems I would tell her that when my friends were playing, the sand got in to the box!!! Now when I think about it, I realize how naive I must have sounded. Did I assume her also to be so naive??? This would happen ever often, that finally she stopped giving me Idlis for lunch.

Much later, when I was at the hostel for my post graduation, I realised how heavenly  Idlis can be!!! There used to be this “Mobile” Idli Shop near my college hostel. He would simply take a plastic plate, grab a piece of banana leaf and place three piping hot idlis on them and serve them with a side of sambar and coconut chutney. My joy knew no bounds and I was so tired of the hostels spicy greasy food, I welcomed simple Idlis. I knew that they could never upset my stomach. It was always a safe bet. Many days,we would pack a few extra idlis and bring them to the hostel to make Idli Upma the next day. As I was making them for breakfast this morning, I remembered lessons that life had taught me , with the humble “Idlis” over the years….

INGREDIENTS:

3-4 Leftover Idlis.

1/2 Onion Chopped fine.

Salt

1/2 spoon of Red Chilli Powder.

1 1/2 – 2 spoons of Idli Gunpowder or Idli Molagapodi.

1/4 spoon of Karuvepalai Podi or Curry Leaves Powder.

Seasoning:

A spoon of oil, mustard seeds, broken urad dhal, curry leaves, hing.

PREPARATION:

  • Crumble the Idlis in to little bite sized pieces and set aside spread out on a plate. If you feel that the Idlis are a little dry and rough, sprinkle a teeny bit of water and pop it in the microwave for 2 minutes.
  • When the Idlis are still hot, sprinkle a tad more of salt, red chilli powder and hing.
  • In a kadai, add a spoon of oil and when its hot, add the urad dhal, mustard, hing and curry leaves.
  • When the mustard splutters, immediatelyadd the chopped onions and give it a quick stir and allow to slightly become a pinkish brown.
  • Add the  the crumbled and spiced  pieces of Idlis.
  • Allow to stir well and let the powders mix well.
  • After a few minutes, add the spoon of Idli Molagapodi as well as the Karuvepalai Podi and mix in it.
  • Allow 2 minutes for them to mix well and switch iff heat.
  • Serve Hot garnished with curry leaves and a dollop of ghee for the kids!!!

HINT:

Another version is to saute onions after seasonings, before adding the crumbled Idlis. Personally, I dont prefer it as I add the Molagapodi to it. But that gives a completely different tryst to the taste.

Easy N Tasty Idli Upma being sent to Divya`s Show Me Your Breakfast Event at her blog.

Kerala / Palakkad Recipes. · No Need of Onions!!! · Snacks & Tiffin Items

Sevai – (Steamed Rice Noodles made from scratch)

Delicious Home Made Sevai.

Just the name conjures up so many memories of my childhood and of my grandmother and mother toiling in the kitchen, on saturday afternoons to make delicous sevai for all of us for the evening as well as for the night.  Sevai was always thought as “labourious” as we were in a lovely joint family of 8 and cooking anything for all of us would mean laborious. But on the other side, it would be a joyous moment for me to sit and help my grandmother in the preparation and more particularly, in the partaking, which we would do all together.

My daughter had never seen me making fresh sevai as I would never attempt it when she was smaller. On  one such vacation in Madras, amma had asked me what I wanted for dinner and I promptly told her “Sevai” and we thought , “well why not? ” As we were extruding the steamed balls in the “Sevai Nazhi” or “Sevai Press”, my daughter S, who was sitting near me, doodling on a piece of paper stopped short in complete awe. She couldnt believe that some thing so beautiful could come out of the Sevai Press. She immediatly wanted to taste the freshly pressed Sevai. My mom gave her a bit, and from then on she was hooked!!!

I had tried making Sevai at home last week, sans the Sevai Press. I used the traditional ones that we normally use for making Ribbon Pakoda etc and it looks like this:

Regular Press for making Ribbon Pakoda, Mixture etc.

INGREDIENTS:

2 cups of Boiled Rice.

Salt

Pinch of Hing

A spoon of Coconut Oil.

Sevai Press or Regular Nazhi or Press.

PREPARATION:

  • Soak the boiled rice for 3 hours ahead. You could soak it even at 8 Am in the morning if you plan to make it for lunch. With the help of a grinder, grind it to a smooth paste adding enough salt . Use only as much water as is necessary.
  • Since this involves extrusion etc, it is important that the rice is ground to a smooth paste.
  • From here there are actually two methods – one which my mom in law uses and one that we have been traditionally using in my grandmother`s home. One option is to simply transfer this ground batter in to greased idli plates and steam then for 15 mins just as you would do for idlis.

(OR)

  • Transfer the contents of the grinder in to a kadai, add a pinch of hing and a spoon of coconut oil and switch on the stove on medium low flame. Keep stirring it until the water is used to cook the batter and it comes together as one. It should look like this:
Batter cooked to make soft dough.
  • Immediately shape this dough in to rough balls and place them on  greased idli plates. Steam these balls for about ten minutes just like you would steam the idlis. This double cooking where we cook it once over the stove and once in the cooker,makes it much more easily digestible for old people and for kids alike. If you are out of time simply follow the earlier method of directly steaming the raw batter in the idli plates.
  • Once you have steamed the batter/prepared dough balls you have to start the process of sevai extrusion.
  • Briskly add the balls in to the sevai maker and press to get steaming hot noodles of rice sevai. Keep the unused balls tightly closed inside the pressure cooker as the heat is what helps in the easy pressing. Once they get cold, it would become very difficult to press.
  • As the prepared sevai is pressed on to a plate, allow to cool before adding it to a wide mouthed bowl.
  • Delicious home made Sevai is ready to be eaten plain or after seasoning as  Pulikachal Sevai. Lemon Sevai or Coconut Sevai.
Sevai.
Sevai.

TIP:

When using the regular press, to extrude the sevai, the body of the press would be very hot and so I use a kitchen mitt to hold it with my left hand and then rotate the lever with my right.

Steaming hot oodles of noodles being sent to Monthly Mingle Ravishing Rice started by Meetha.

Easy LunchBox Series. · Kid Friendly Recipes. · Snacks & Tiffin Items · Travel

Soft Fluffy Pooris – Comfort Foods!!!

Poori with Madras Masal.

Pooris are a favourite everywhere. My husband loves pooris and would welcome the idea If I could fnd a way to make it for him everyday!!! Pooris are a part of my childhood, as they are special sunday tiffin preps. Sunday evenings, with piping hot pooris and masal and a cup of coffee….They were also an easy day-ahead preperatory travel foods. Mom would make soft fluffy pooris and wrap them up in a layer of banana leaf and insulate them by wrapping them n newspapers – Just like in the hotels. Pooris are great with channa, masal, pickle and hey even sugar, when I was a little girl! My little one has it with Nutella or Apple Butter….

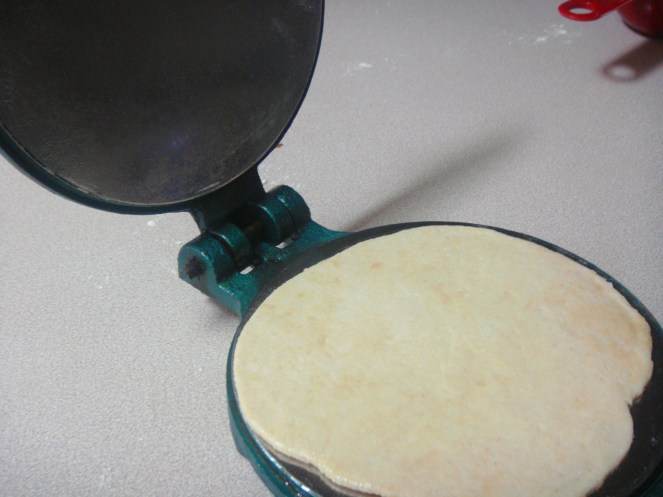
I am guessing the secret to make soft fluffy pooris is in the making of good dough thats well knead. And there is also this frying technique….Let`s go over it here. I also use a Poori Press that I bought from the Patels in Devon Avenue, Chicago for a mere 8 bucks. The best part of using the Poori Press is that even after frying 40 pooris, ,the oil stays clean and without a speck. Kneading the dough well, would anyway render soft pooris on using the manual belan or rolling pin.

Poori making in the Poori Press.

INGREDIENTS:

2 cups of Whole Wheat Flour

1 1/2 spoons of salt

Water as accordingly.

Oil to fry the Pooris.

PREPARATION:

  • Pour only sufficient water and knead the dough well to make a smooth ball.
  • The dough should not be sticky and not too dry too.
  • Cover and  keep for at least ten minutes, and roll in to small lime sized balls.
  • Use the Poori Press and make pooris which are uniform in texture and shape.
Rolled out Pooris ready to be fried.
  • Pour out the oil in to the kadai, and allow it to heat. The oil should be hot but not smoke.
  • Gently slip in the poori and allow a second for it to cook. Gently press the poori with the back of the ladle and allow it to fluff.
  • Now turn over and allow to cook on the other side.
  • Drain out the excess oil and place the fried pooris in a container lined with kitchen tissue to wear out the excess oil.
  • Serve Hot with Madras Poori Masal.

dsc00733

This is my entry for JFI-Wheat which is a brainchild of Mahanadi and hosted by RomaSpace.

wheat_logo_bordered