Cakes / Pastries / Cookies/ Bread/Muffins. · Kid Friendly Recipes.

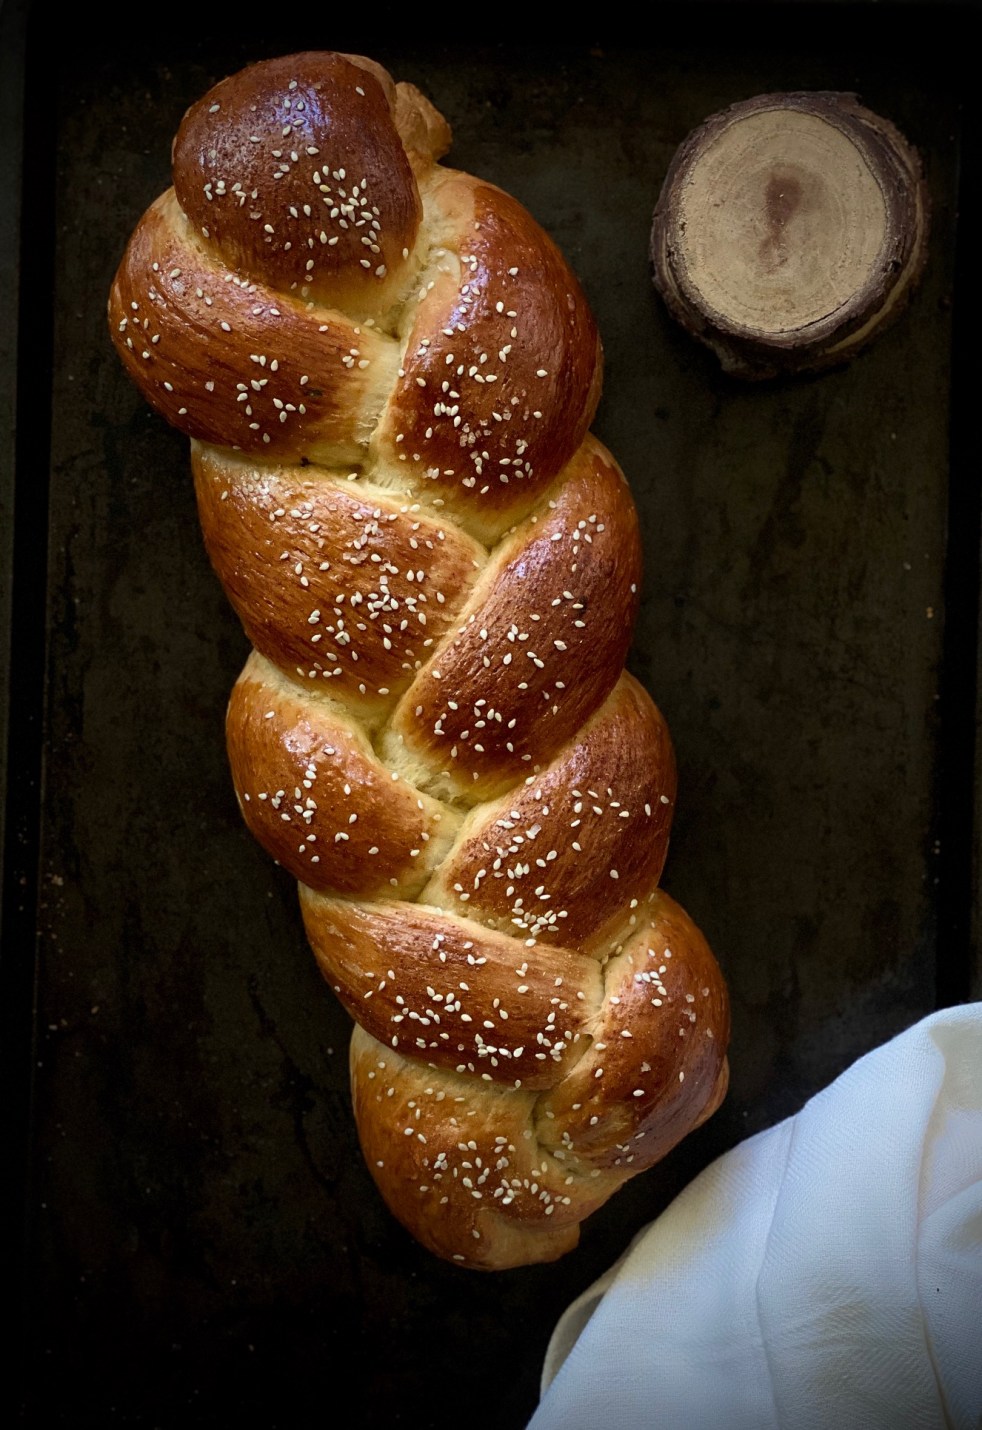
Spongy Challah Bread

Soft , warm Challah Bread topped with sesame seeds


Challah is a Jewish plaited bread that is eaten with the first course on the sabbath eve. It’s also eaten the next day at breakfast and lunch. When we saw all social media grids flooded with all kinds of freshly baked bread, we knew that this was something I wanted to try. All the staying at home during the pandemic made us excited to lay our hands on yeast baking. We loved the soft soft pillowy texture and this could stay perfect for almost 5 days…that is if you manage to not eat it for that long!

Ingredients:

3.5 cups (500g) Flour

1 tbsp (10g) instant dry yeast

3.5 tbsp (42g) white sugar

1 Egg for Baking

1 Egg for brushing

¼ cup (50g) canola oil

1 cup – 2 tbsp (200ml) warm water

1 tsp (6g) salt

Directions:

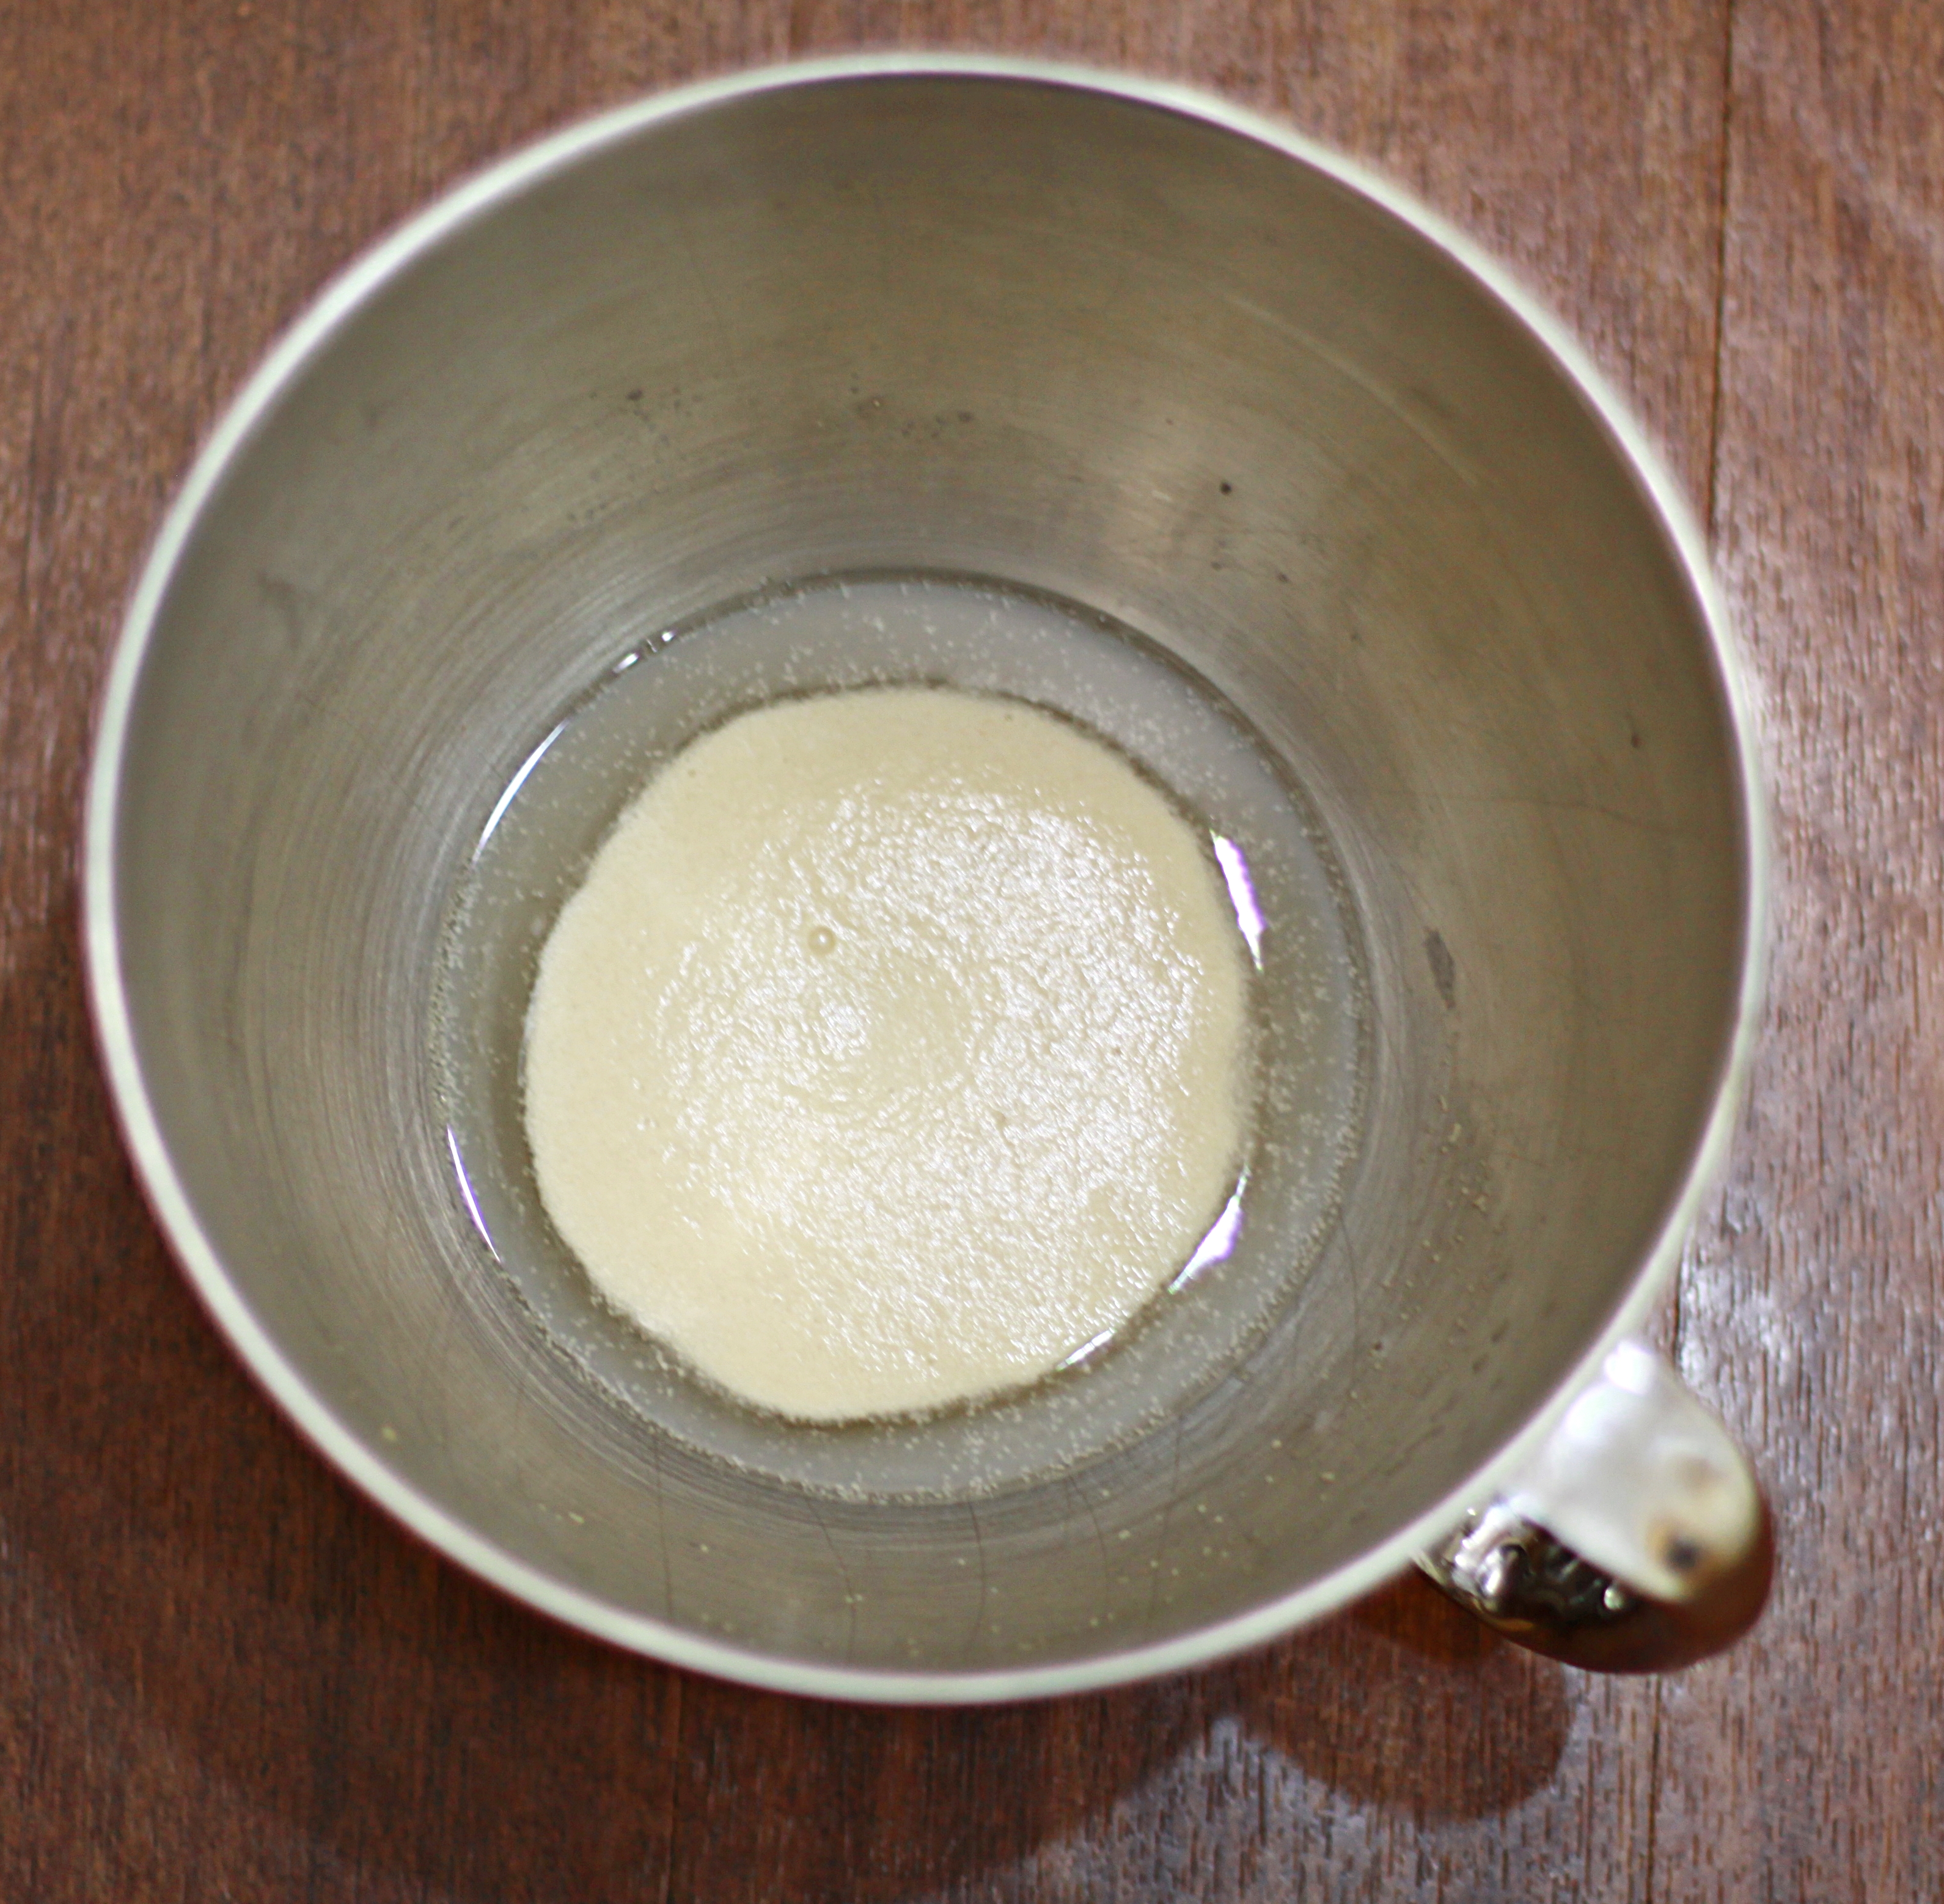
1.In a large mixing bowl sift all-purpose flour, add yeast, sugar and mix. Add 1 egg, warm water and oil.

2.With a dough hook attachment, knead the dough on low speed for 2 minutes, then add the salt and knead 5-6 minutes more.

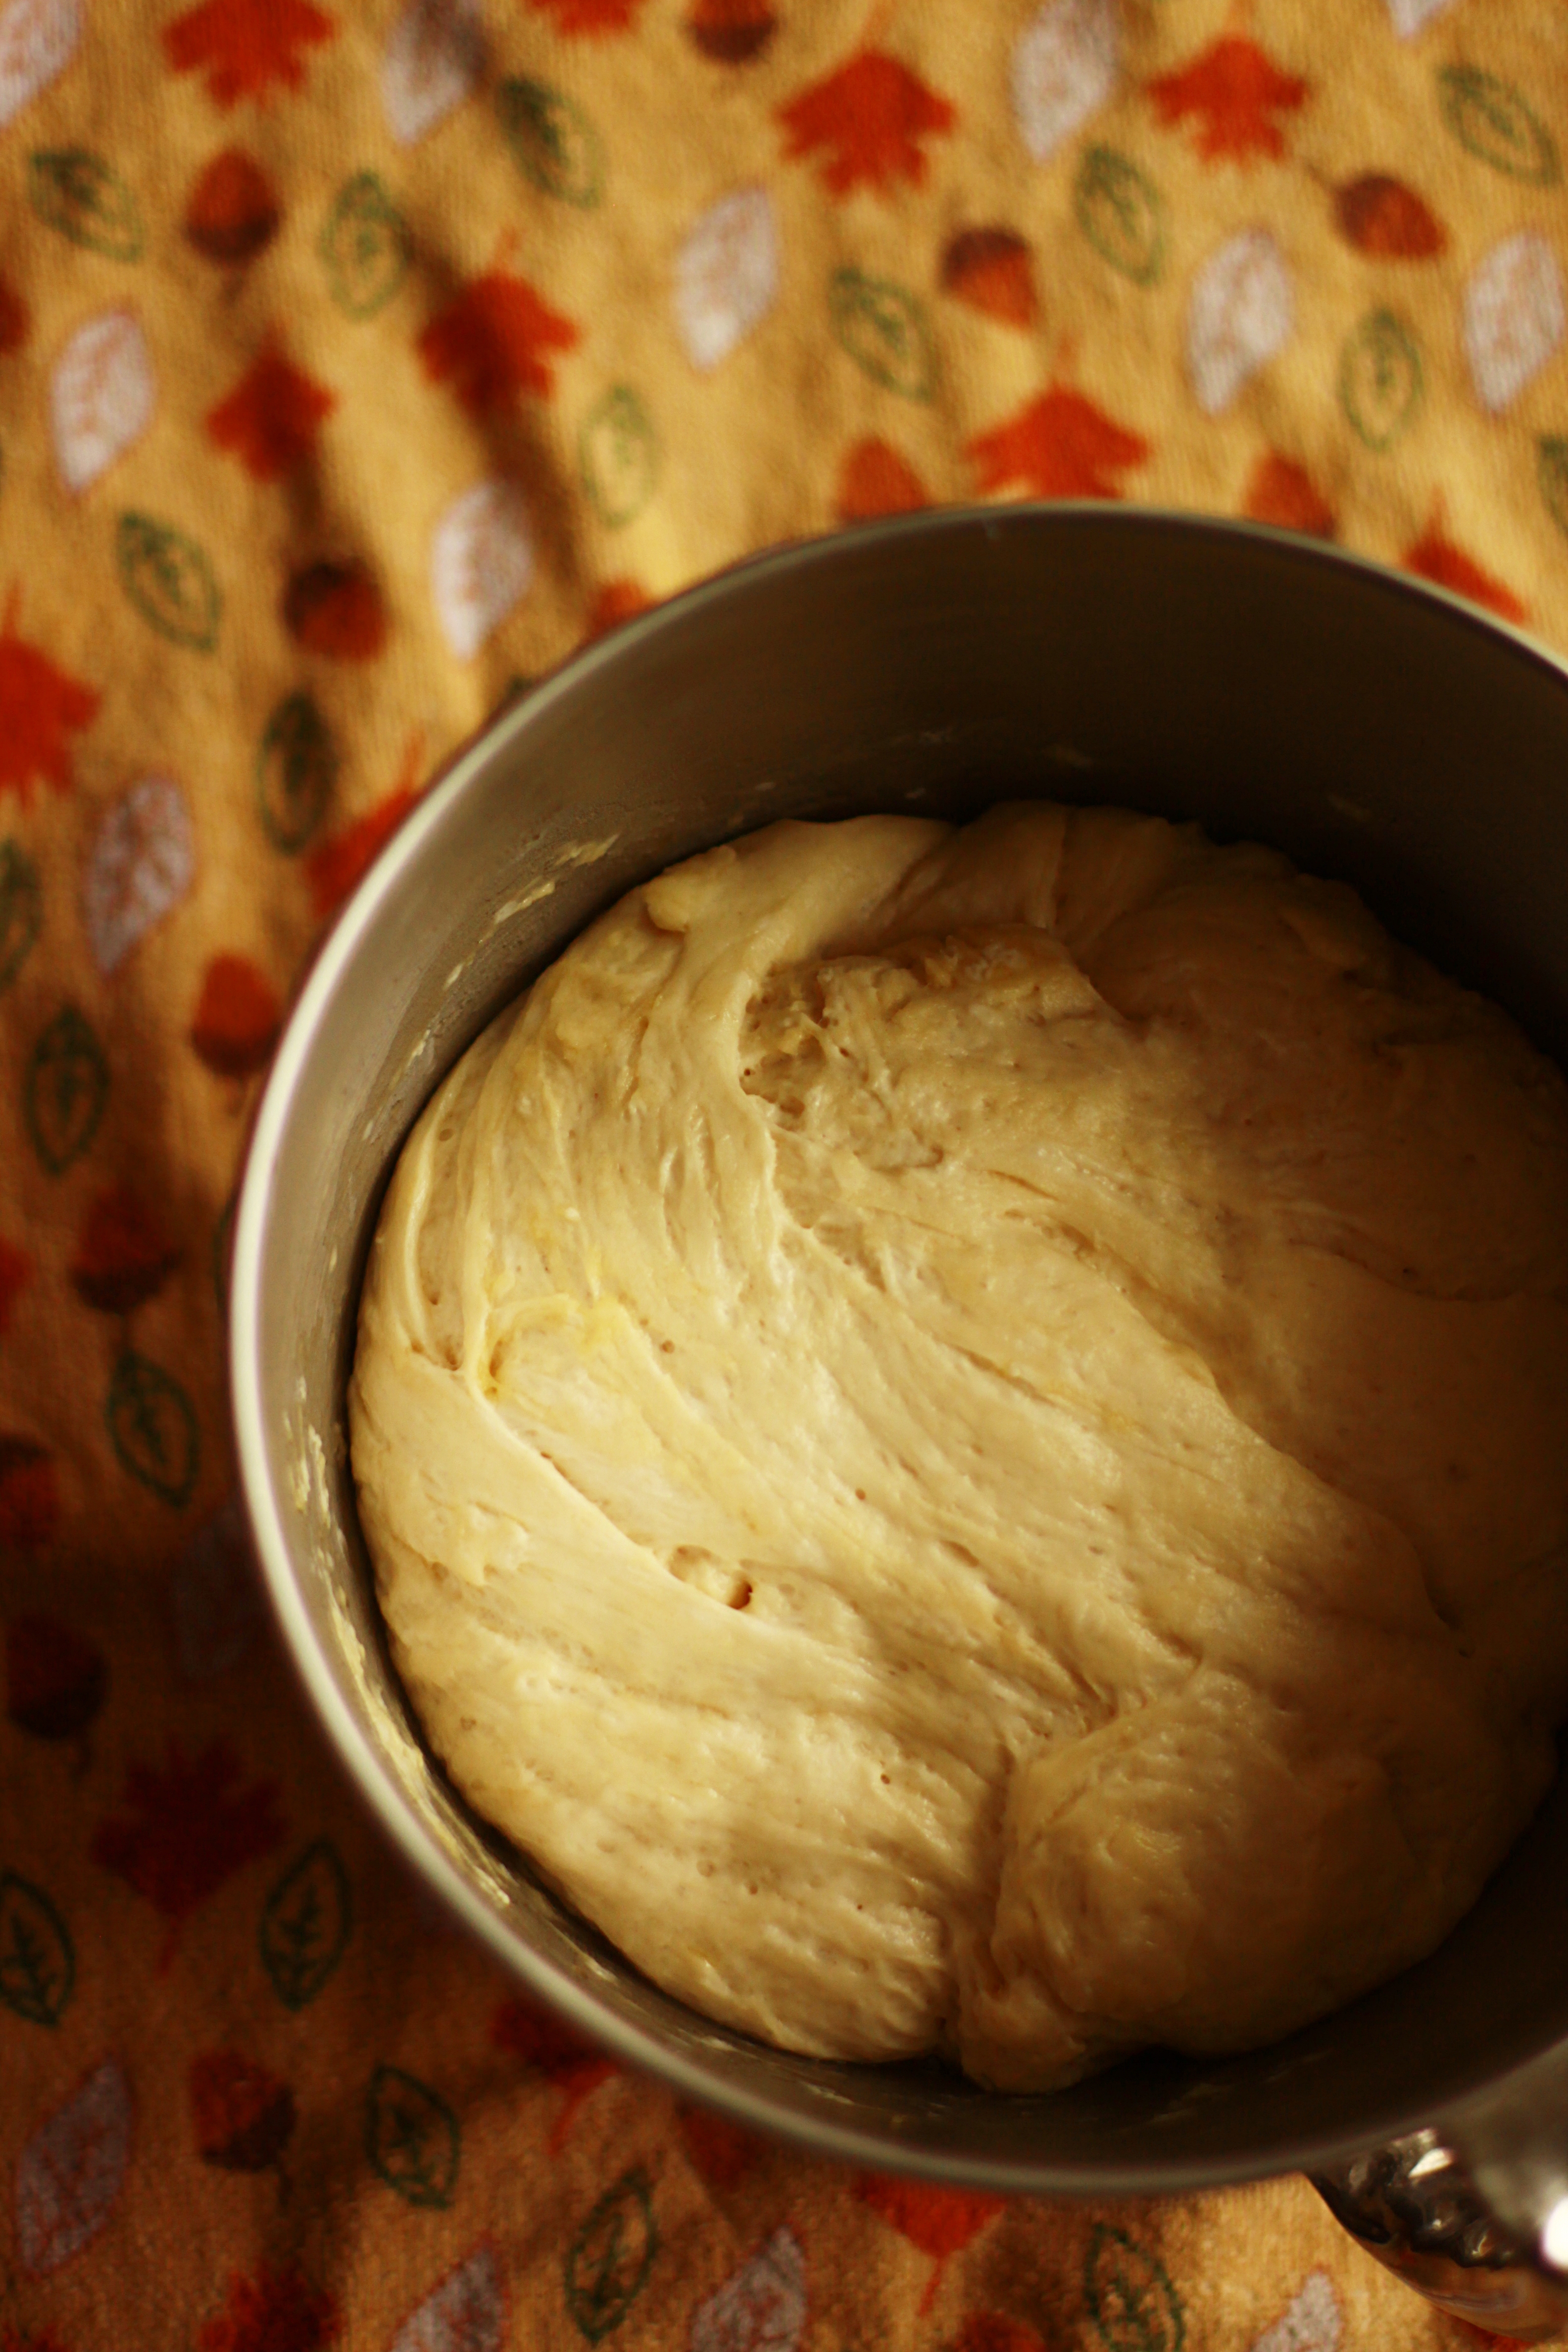
3.Shape a ball from the dough and place in an oiled bowl, cover with a towel or plastic wrap. Let the dough rise about an hour (until double in size) in a warm place. (This is Rise 1)

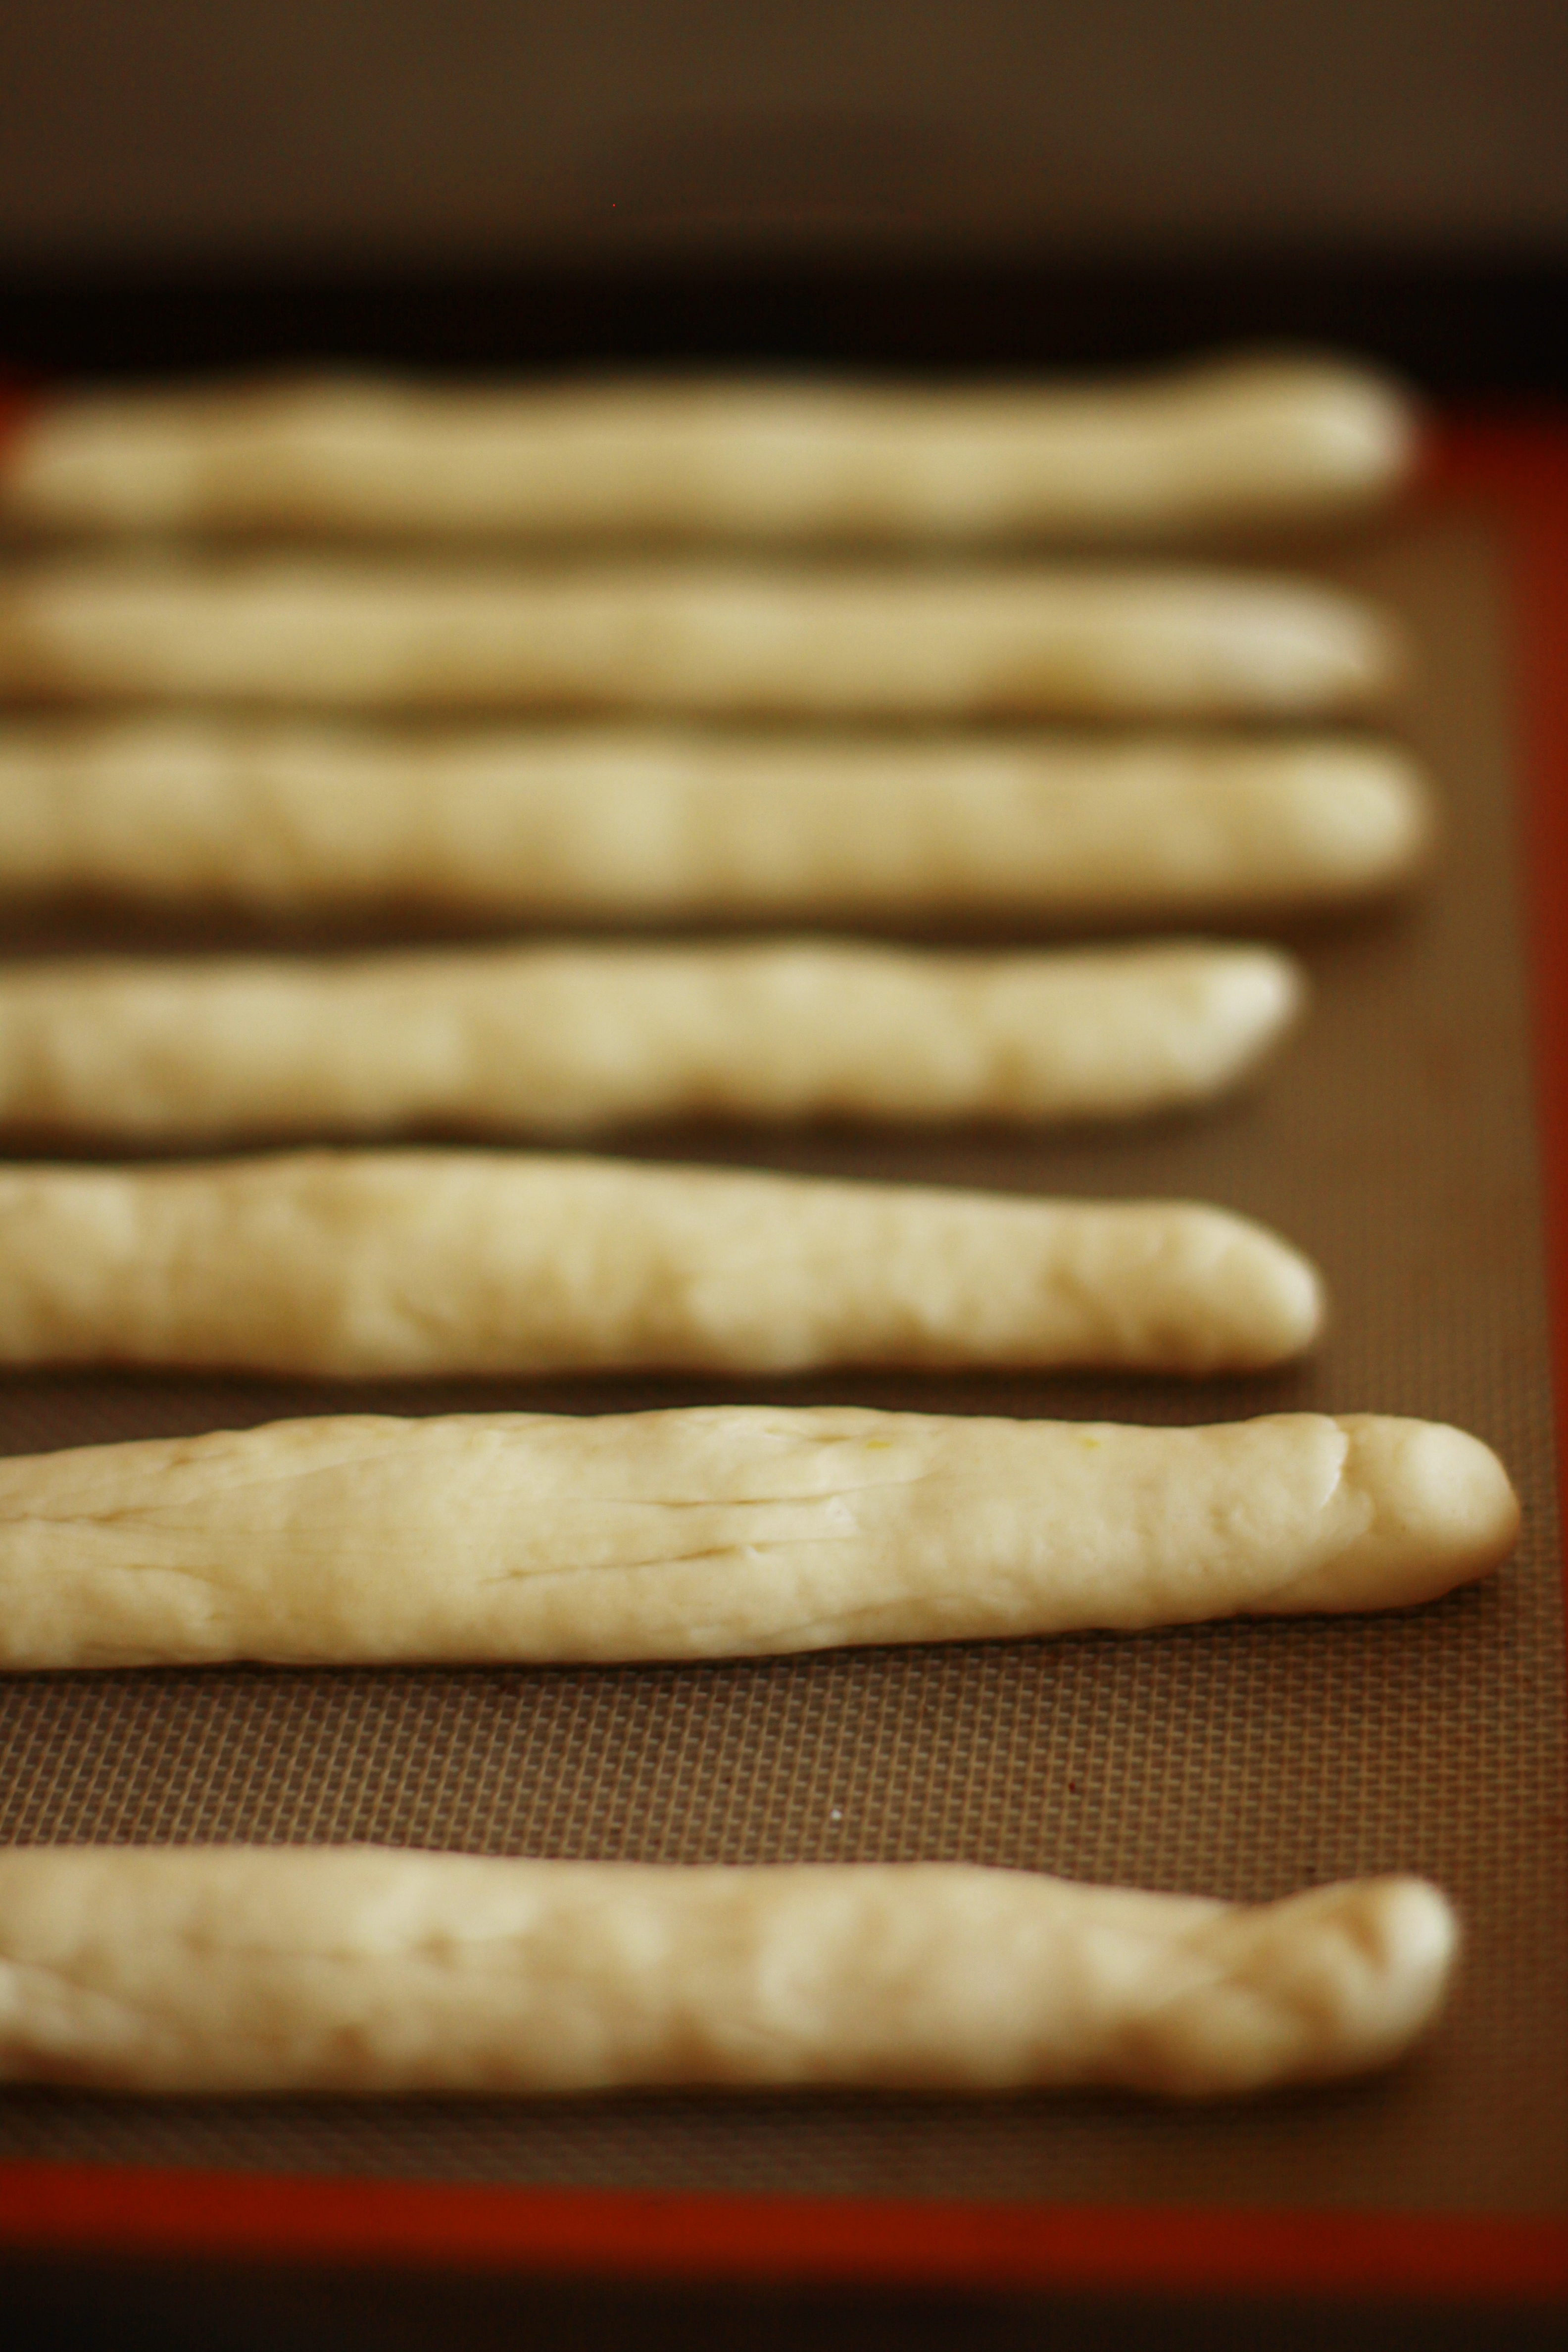
4.Cut the dough into 3 pieces (if you want 1 large challah).

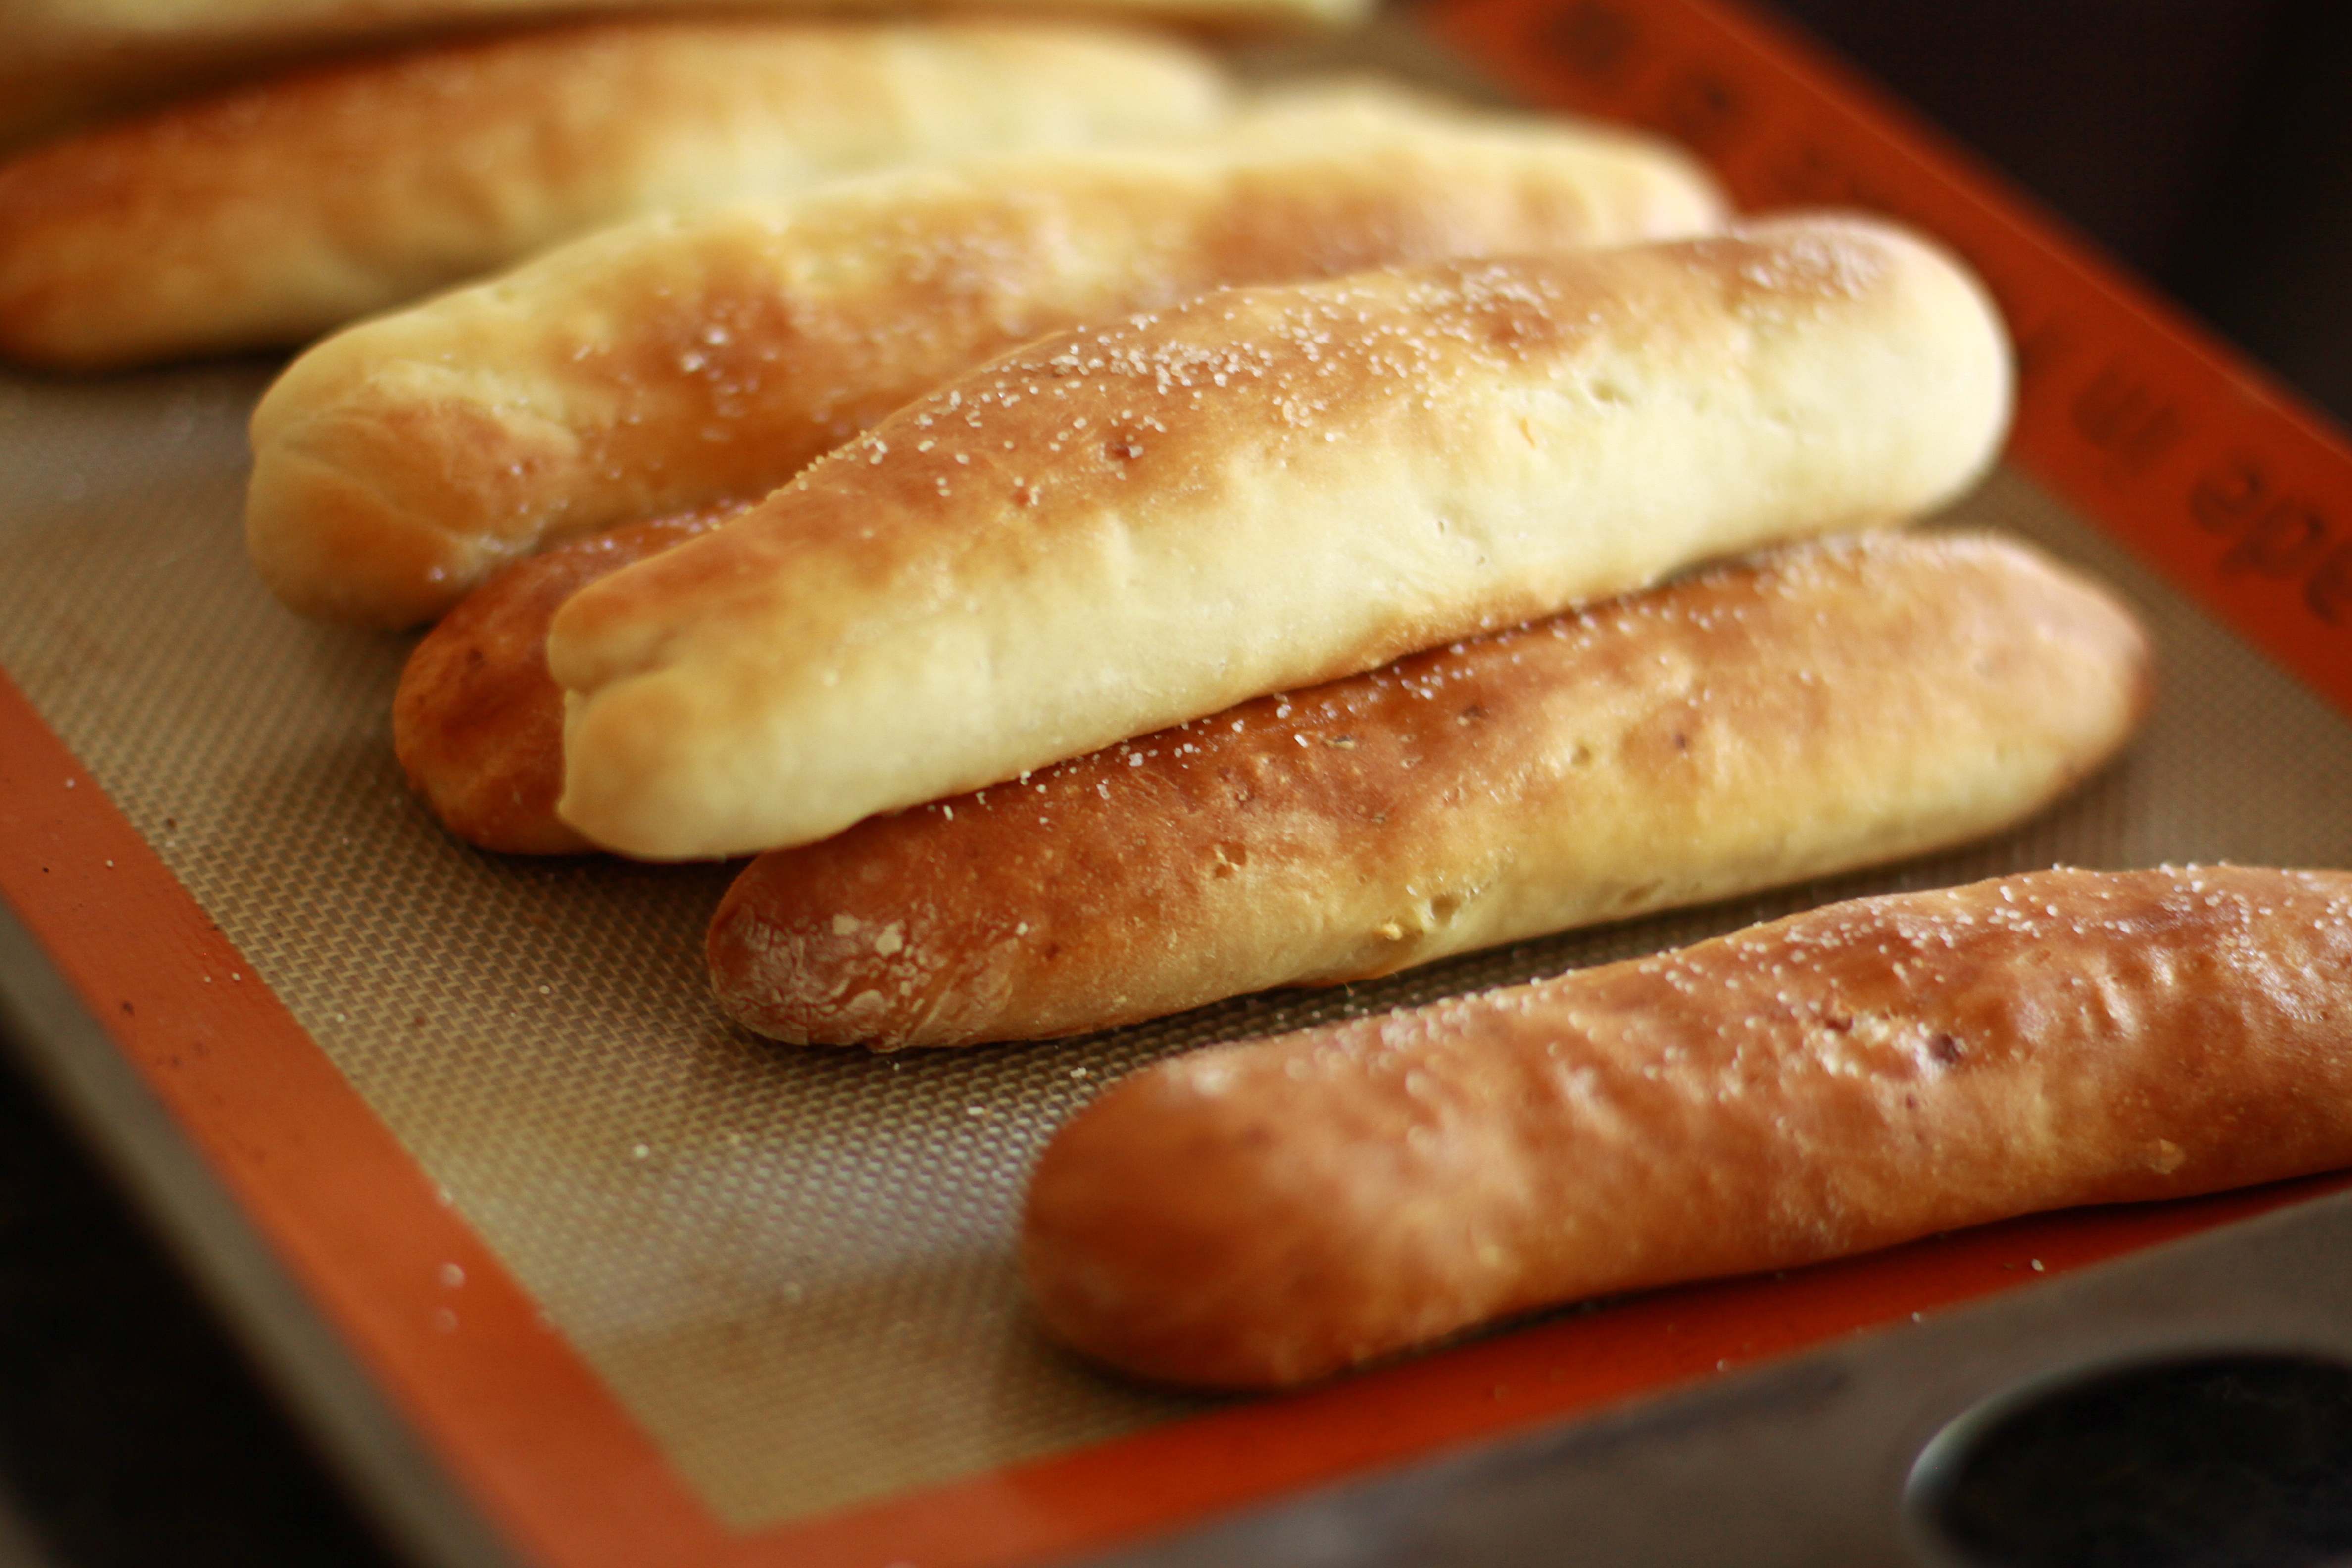
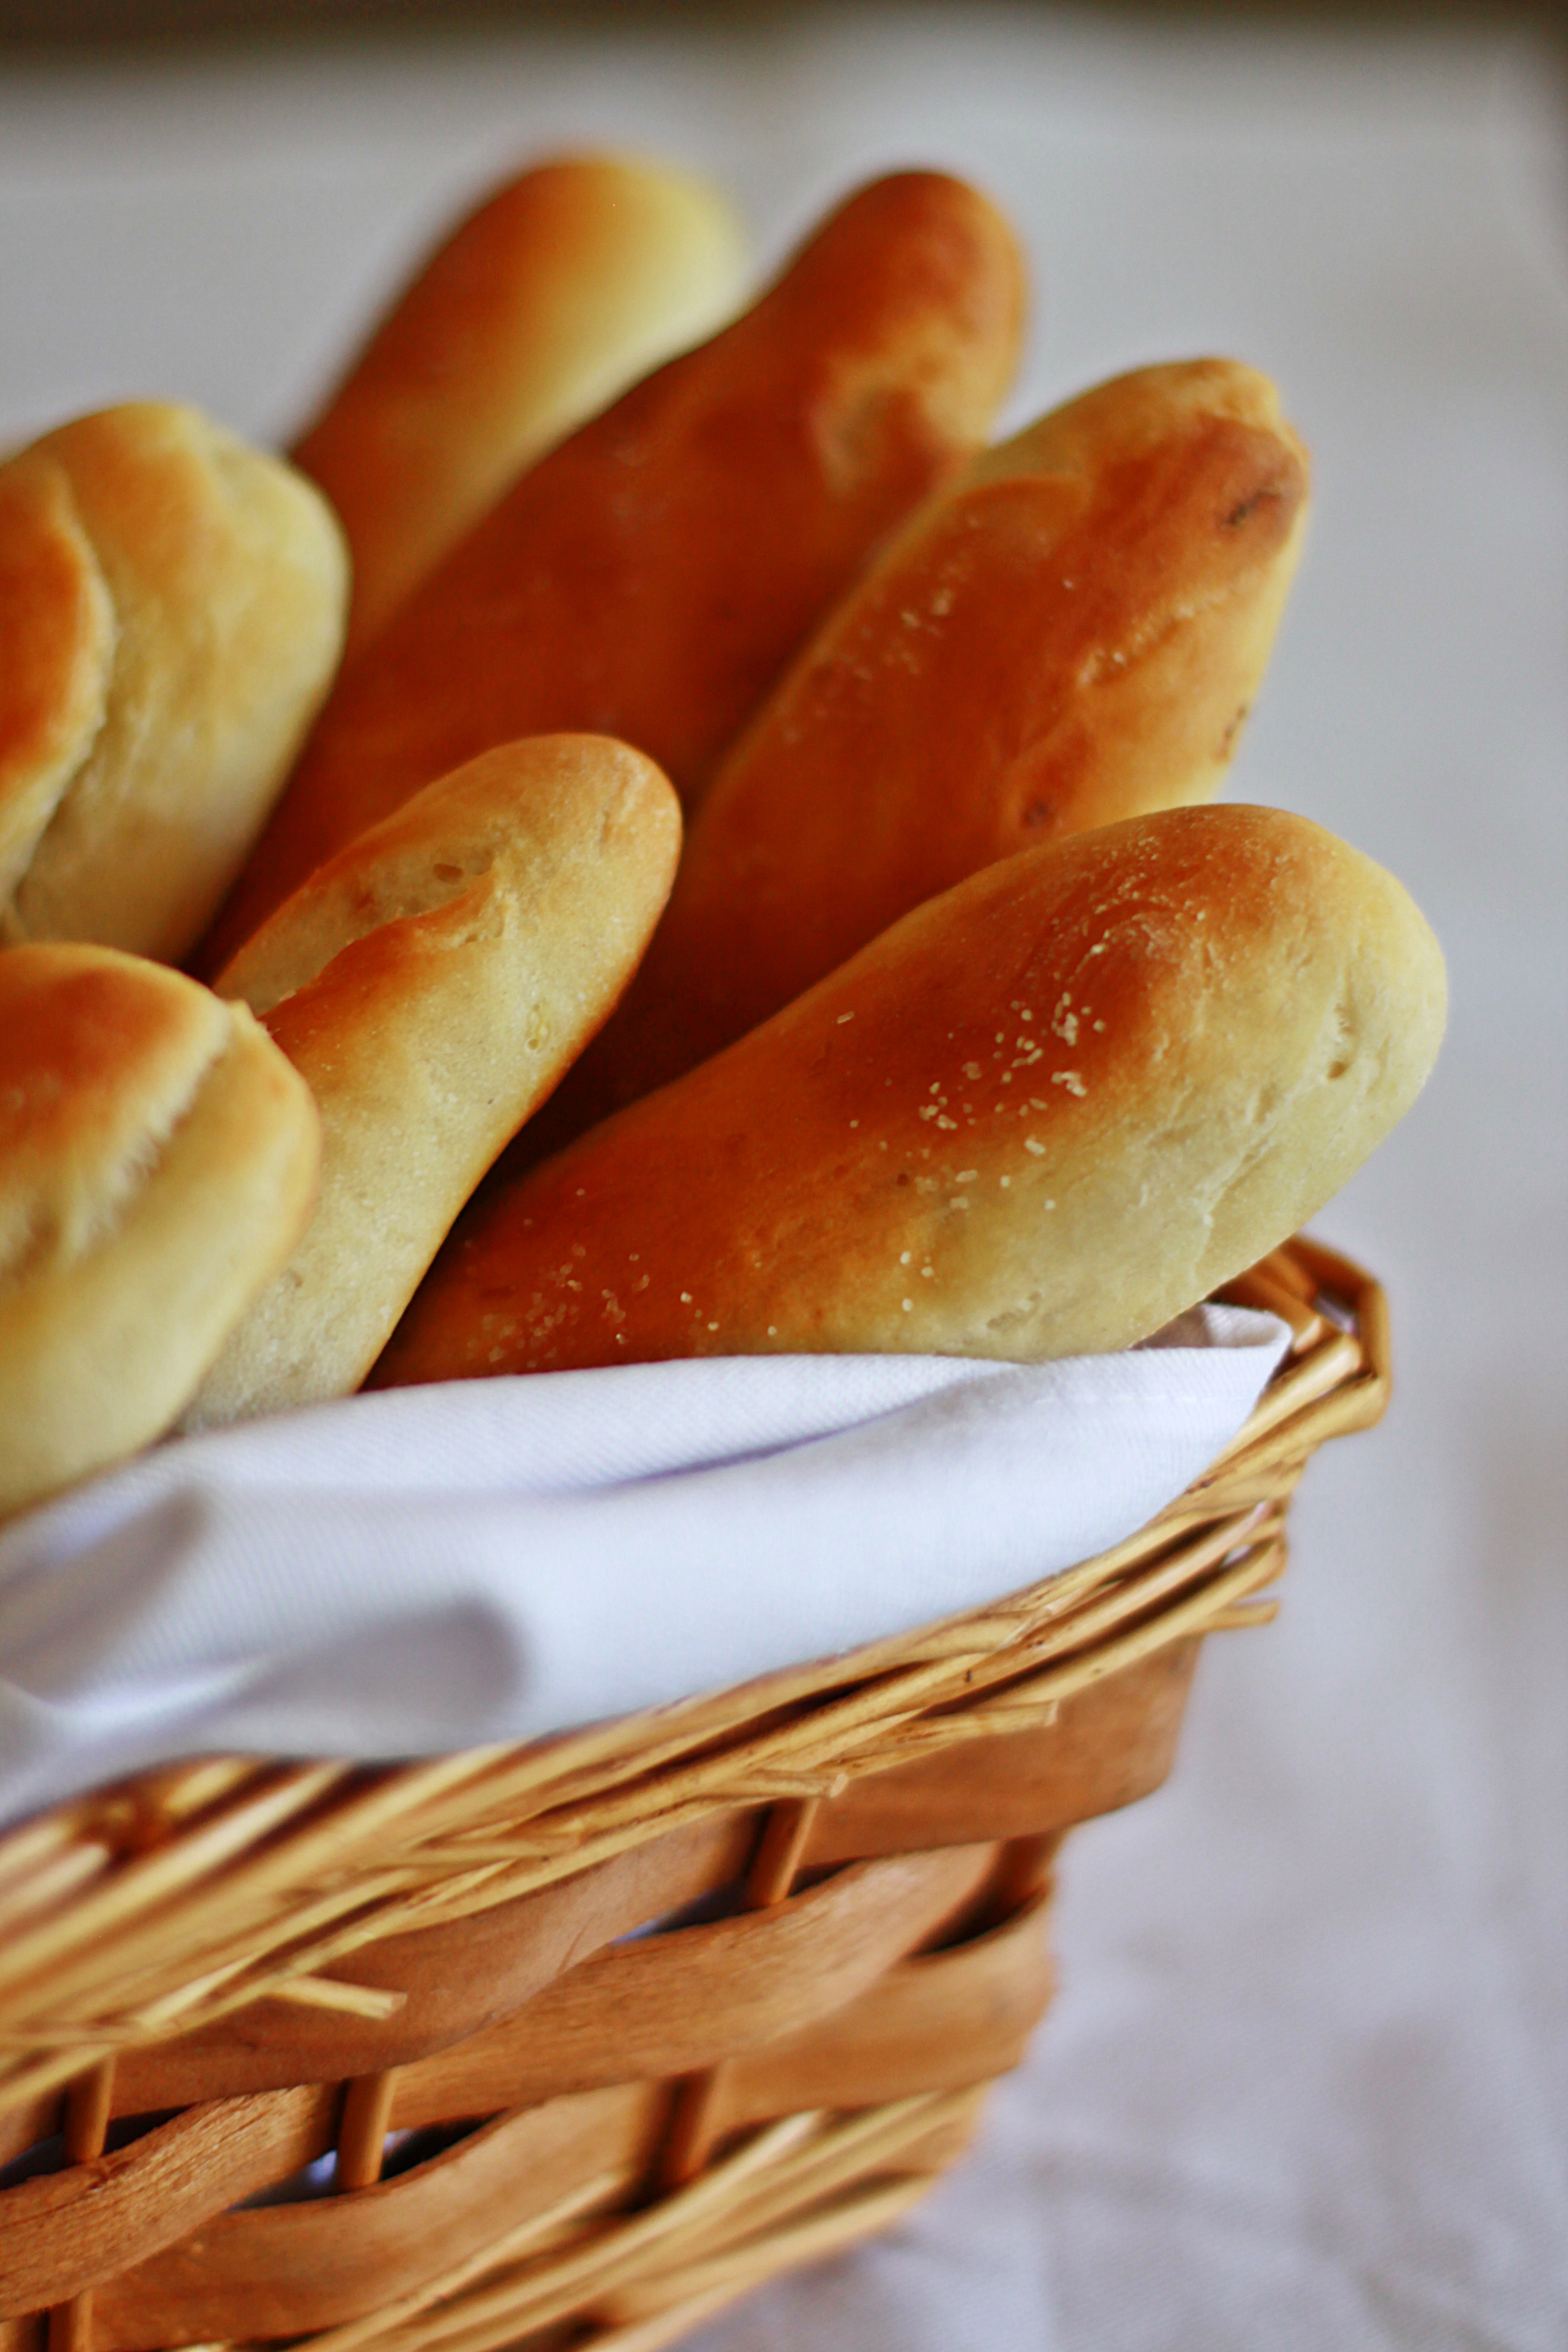
5.Roll each piece of dough into a long rope roughly 1-inch thick and start braiding the dough

6.Line a baking sheet with parchment paper and carefully life and put the loaf on top, cover with towel and let rise about an hour. (This is Rise 2)

7.Preheat oven to 360F / 180c .

After Rise 2.

8.Brush with beaten egg or warm milk and sprinkle with sesame seeds (optional).

9.Bake 20-30 minutes until the top browns to a rich golden color (depends on loaf size/ Oven Capabiliy/ Humidity).

10.Let cool at least 30 minutes.

Notes:

Please document rising times/ baking times in your location as there are various small factors that might cause differences.

I used king Arthur unbleached All Purpose Flour. Please try recipe as is and make modifications and substitutions.


Easy LunchBox Series. · Kid Friendly Recipes. · Snacks & Tiffin Items

Aloo Kathi Roll / Tibbs Frankie -Bombay Street Food.

IMG_5106


“Brilliant!!!” was the first word that came to my mind when I saw the Tibbs Frankies Counter right outside the Globus Store in Chennai. It was everything packaged in to one tiny roll of goodness. When I bit in to the hot veggie frankie, I attained instant nirvana. It was a combination of sorts – spicy, tart, chunky and crunchy. It was a match made in heaven. Since that day it has been something that makes me go weak in the knees. I confess to even choosing Globus over some of the other stores, simply with the knowledge that we would have the frankie. When we moved to the US, it was one of those things that I missed the most…well, apart from Woodlands Pongal, Sangeetha`s Pineapple Kesari, Madras Bhel Puri House Bhel Puri, Hot Chips Samosa Chat, Saravana Bhavan Parotta Kurma, and Mainland China`s Dumplings to say the least! I had to make my own version and the first step was getting the Frankie Masala. On my last trip to India, I got the Kapol`s Frankie Masala and I must say its a keeper.  My version is inspired by many on the internet and of course my own spin to it. Hope you enjoy it!

INGREDIENTS:

1 Medium Onion.

1 Tsp Frankie Masala.

1 Cup Wheat Flour.

1 Cup Unbleached Organic All Purpose Flour.

Salt to taste.

For the Stuffing:

2 Medium Sized Potatoes boiled with salt and mashed.

1 Tsp Cumin Powder.

1 Green Chilli Chopped.

1/2 Tsp Red Chilli Powder.

1/2 Tsp Chat Masala.

1/2 Tsp Garam Masala Powder.

Salt if needed.

1/2 Cup Bread Crumbs.

1/2 Tsp Sugar. (Optional).

For The Green Chutney:

2 Tbsp Thick Curd.

1 Green Chilli.

2 Tbsp Roughly Chopped Ginger.

1/2  Cup Packed Cilantro Leaves.

3-4 Mint Leaves. (Optional).

A few drops of lemon juice or 1/2 Tsp Kala Namak.

PREPARATION:

  • Prepare the outer dough just like you would for rotis. Add the all purpose flour,  maida and salt and using just enough water roll in to a pliable dough. Smear a thin layer of oil and cover tightly until use. You can also use whole wheat flour completely if needed.
  • Chop a medium onion in to thin long slices. Squeeze half a lemon on the onions and top with 1/2 Tsp Chat Masala. Set aside.
  • In a kadai add a tsp of oil and add the green chillies and the mashed potatoes. Follow up with all the dry spices – Cumin Powder, Red Chilli Powder, Chat Masala and Garam Masala Powder and give it a quick saute.
  • Remove from the kadai, trasfer to a bowl and add more salt if needed after tasting. Add about 1/2 cup  of bread crumbs and gently mix.
  • For bread crumbs just add one loaf of bread to the mixie jar and quickly pulse.
  • At this point the stuffing should have a thick cutlet dough like consistency. Roll in to cylindrical pieces and shallow fry until browned on all sides.
  • IMG_5092
  • Puree the curd, cilantro, green chilli, mint leaves and ginger to a smooth consistency. If you don’t want to use curd, just add a few drops of water.  Season with a pinch of kala namak (black salt) or lemon juice. Transfer to a bowl.
  • Kathi Rolls are pretty much assembled just before serving them so they dont get soggy.
  • Arrange all the ingredients required – Stuffing, warm rotis. green chutney, chopped cilantro, seasoned onions and optionally chat masala powder or frankie masala powder.
  • Lay out the roti and place two of the potatoe rolls on one side.

IMG_5101

  • Top with green chutney, chopped cilantro, and onions and sprinkle chat masala.
  • Gingerly roll tightly and pack one end in to a small sheet of aluminum foil.
  • Serve fresh!

 HINTS:

  1. You can sunstitute half the boiled potatoes and replace it with paneer instead.
  2. You can marinate the panneer / aloo in achari masala and then sear it to make Achari Panneer Kathi Rolls.
  3. Leftover stuffing can be easily reused the next day for kids lunchboxes in the form of sandwiches.


Kid Friendly Recipes. · Rice Varieties. · Salads/ Recipes for the Calorie Conscious.

Millet Spinach Khichdi.

IMG_4936


Food is the most primitive form of comfort” 

Comfort Food for me is almost always food that’s traditionally made at home , mingled with a gazillion  memories  of partaking it with my sisters. Everyting seemed a lot more fun with them around. Even a simple meal of Vethakuzhambu, Alu Fry, and Pepper Rasam would feel almost like nectar. Eating out was almost a rarity and when it does, my staple order would definitely be Restaurant Style Vegetable Fried Rice and Gobi Manchurian.  Most recently since we have started having Gujarati Thali at  Saravana Bhavan Gujrathi Restaurant at T.Nagar, Chennai, we are a big fan of their Gujrathi Khichdi. Its almost a replica of mushy dal rice, simply seasoned with cumin seeds and a glob of ghee. Try it piping hot, and its instant comfort food. This Khichdi is made with millets and spiced with spinach ground with cilantro leaves to give it that zing., This is my entry for the Shhh Cooking Event for the month of October 2014.

INGREDIENTS:

1/2 Cup Brown Rice.

1/2 Cup Millet.

1/4 Cup heaped Moong Dal.

5 Cups Water.

1 Tsp Ghee.

Salt to taste.

Grind to a Paste:

1 Cup Spinach chopped and cleaned.

1 bunch cilantro cleaned.

2 Green Chillies.

1 Red Onion roughly chopped.

Seasoning:

2 Tbsp Ghee.

2 Tsp Jeera.

1 Cinnamon Stick.

10 Curry Leaves torn.

PREPARATION:

  • Wash the brown rice , millet and moong dal  a couple times and allow to soak for about 30 minutes.
  • Measure out the ground paste. The paste + Water must roughly add to about 5 to 51/2 cups of liquid.
  • Add the ground paste+ water, salt to taste, a tsp of ghee and give it a quick mix.
  • Pressure cook the rice-millet- dal mix for  1 whistle and reduce the flame to sim for 10 minutes and switch off.
  • When the pressure is released, mash the rice/millet well.
  • Take a wide mouthed pan and add ghee, and when hot, the seasonings.
  • Pour out the khichdi on to the pan and mix and serve HOT with Mango pickle or Rajma Gravy.
  • Mouth watering, simple, healthy yet tasty Spinach Khichdi is ready.
  • Substitute Brown Rice for Basmati Rice/ Sona Masoori/ Cracked Wheat etc.

IMG_4925


Cakes / Pastries / Cookies/ Bread/Muffins. · Kid Friendly Recipes.

DIY – Olive Garden Bread sticks.

IMG_0330

I remember the first time ever that I had dinner at Olive Garden at their location near Ahwatukee, Az. I was awestruck by the soft, simple pillows of salty bread sticks and their famous piping hot minestrone soup filled with red beans, green beans, tomatoes and baby pasta shells.  We always loved the salad that came with the entree and many times I remember feeling almost full with just the pre-starters. Another all time favourite at Olive Garden is their Eggplant Parmigiana which Th loves and which I make at home pretty often. I had always wanted to try out the soft bread sticks at home earlier, It’s now a regular after school snack but  I have never been able to have a basket of them left, enough to style and shoot!!!  Try these pillows of salty niceness at your home and enjoy it with a dip or by itself!

INGREDIENTS:

3 1/4 Cups All Purpose Flour.

1  Cup + 2 Tbsp  Warm Water.

1 1/2 Tsp  active dry yeast.

3 Tbsp Butter / Olive Oil.

2 Tbsp sugar.

1 3/4 Tsp  – 2 Tsp Salt levelled.

Garlic Herb Topping:

1 Tsp Garlic Powder.

1 Tsp Salt.

1/2 Tsp Basil/  Oregano/ Herbs De Provence. (Optional)

Mix the salt, garlic powder and herbs and set it in a dry place.

PREPARATION:

  • In a bowl add 1/2 Tsp sugar, the water which is slightly warm and mix it well before adding the yeast. Allow the yeast to proof and make sure its active. (Else, throw this mix and restart with fresh yeast.). Let is sit for about ten minutes.

IMG_0251

  • Now add the remaining 1 Tbsp + 2 1/2 Tsp Sugar, 1 3/4  Tsp Salt,  the 3 Tbsp Olive Oil or Canola, and 1 1/2 Cups of the flour. Use the paddle attachment in the stand mixer and incorporate all the ingredients together.  If you do not have a stand mixer, use your hands.
  • Now use the dough hook attachment and pour in the remaining 1 1/2 Cups of flour and mix until the dough pulls away from the sides of the bowl, but is still a wee bit sticky.  If you need to, add a little of the 1/4 cup of flour to achieve the desired consistency.
  • Oil the insides of a large bowl and place the ball of dough and smear oil on it. Cover with a dry kitchen cloth and fasten a rubber band to hold it in place.
  • Set aside for about 1 1/2 hours undisturbed until the ball doubles in size.

IMG_0257

  • Grease two cookie sheets with oil and keep ready.
  • Punch the dough to remove all the air and divide in to twelve parts of all similar size.
  • Lightly flour the work surface and roll in to thin rope of about 8-9 inches.
  • Arrange on the cookie sheet and preheat the oven to 425F (roughly 220C).

IMG_0313

IMG_0320

  • Bake for 11-13 minutes until you see a golden crust on the bread sticks.
  • Remove from the oven and brush it with a stick of butter or margarine and immediately sprinkle the salt/garlic powder/herb mixture on the bread sticks.
  • Serve warm bread sticks with a steaming hot bowl of tomato soup.
  • Enjoy!!!

IMG_0331

Cakes / Pastries / Cookies/ Bread/Muffins. · Kid Friendly Recipes.

(S)Cream Cheese Swirl Brownies!!!!

IMG_7251

Brownies are a welcome dessert treat at my home and there seems to be always room for brownies right after dinner!  It`s a favourite for my older daughter to have the home smelling of chocolate brownies as she returns form school. But some how i always end up making them a little before dinner so ends up that their appetite for dinner is mysteriously lost!  I have recently started slightly modifying my weekly kitchen prep plans a little based on the produce on sale at the local farmers market or at Sprouts. I had two packages of cream cheese for a buck and I thought it was really high time I try the Oreo Cheesecake that I have eyeing for quite some time and the Cream Cheese Brownies Swirls. It was very flavorful and moist and chewy yet deliriously chocolatey with the hint of sweet salty from the cream cheese swirls. Try it and there`s really no looking back!

INGREDIENTS:

1 1/2  Sticks of butter (3/4 Cup).

2/3 Cup Cocoa.

1 2/3 Cup Sugar.

1/4 Tsp Salt.

2 Eggs at room temperature.

1 Tsp Oil.

1 Tsp Vanilla Essence.

1 Cup All Purpose Flour.

1/3 Cup Semi Sweet Chocolate Chips ( Could be substituted for any good quality chocolate).

Cream Cheese Filling:

4 oz softened cream cheese.

4 tbsp Sugar.

1 Tsp Vanilla Essence.

PREPARATION:

The best part of this batter preparation is that its completely fool proof AND its all done in one go – one vessel over the stove, a whisk and some measuring and adding!

  • Take a deep dish with a strong base, and add the 1 1/2 sticks of butter to it. Place a whisk in to the dish and allow the butter to  melt slowly on low flame.
  • Meanwhile butter an oven proof dish and preheat the oven to 350F/180C. I always like to line by dish with parchment and allow it to hang on either side so there is no messy clean up.
  • Lay out all your ingredients in an assembly line  on the counter so you can reach to them when they are needed.
  • Beat the cream cheese, sugar, vanilla and a little egg white until its nice and smooth. Set aside. ( I used a little egg white from the 2 whites reserved for the brownie itself).
  • Measure out the 2/3 Cup of cocoa powder and slowly dunk it in to the melted butter.
  • The cocoa laps up the butter happily and glistens.
  • Continue whisking and add the 1 2/3 Cup pf Sugar, and the 1/4 tsp of salt.
  • Whisk and at this stage it gets a little gritty with the sugar crystals. Keep going!
  • Add the eggs one at a time and whisk them in. This stage gives the brownie batter all the body it needs. You are still on low flame so make sure you keep whisking.
  • Flavour the brownie with the vanilla essence and mix it all in.
  • Now measure out exactly 1 cup of flour and add it to the pot. Slowly fold the flour it to the silky batter.
  • At the last stage add the 1/2 cup of chocolate chips and let them melt in.
  • Pour this brownie batter in to the baking dish.
  • Empty out the cream cheese filling on to the top of the brownie batter and using a butter knife cut out marbled swirls.
  • Bake for about 35-40 minutes depending on the capacity of your oven. Do keep an eye on them and do not let them burn.
  • Remove and allow to cool for a good hour or so before attempting to slice in to little squares.
  • Makes a a great return gift for a kids birthday party!

IMG_7253


Cakes / Pastries / Cookies/ Bread/Muffins. · Kid Friendly Recipes.

Oreo Truffles – 3 Ingredients, 30 Minutes.

IMG_6803

It`s already Feb 14`th and I had a really crazy week, running errands, kids, homework and classes and little did I realise the d-day was already around the corner! When I did a rough pantry check, I was mortified that I had no butter!!! That really gives me a panic attack. One never knows when the drive to bake assumes ginormous proportions and I had to be ready. No butter on Valentine`s eve and there was really no way I could run to the grocers. I had  been wanting to try out any form of chocolate  truffles for a very long time and I remember seeing many blogs with this quick version and what better way than to make them today.  They dont need any butter or eggs and no baking either. Try them out and tell me how they were!!!

IMG_6818

INGREDIENTS:

18 Oreo Cookies.

4 Oz Cream Cheese softened.

4 Oz Chocolate blocks/chips.

PREPARATION:

  • Prep up a baking tray and line  it with parchment paper. Keep aside.
  • In a food processor, pop in the oreo cookies and give them a quick pulse. Add the softened cream cheese and pulse until well combined to form a soft dough.
  • The fat in the cream cheese combines with the butter cream icing in the oreos and the mingling creates pure magic.
  • If you do NOT have  a food processor, simply crumble the oreos in the mixer and then mix in the cream cheese and mix it until the heat from your palms brings them all together.
  • Transfer to a dish and seal with cling wrap. Refrigerate for over an hour.
  • Remove from refrigerator and scoop out balls of oreo cookie dough and smooth them in to balls of the same size. Set them on the parchment paper. Return back to the refrigerator.
  • Take a clean deep vessel and fill it with water. Set the flame on medium low.
  • Now place a dish with the chocolate/chocolate chips over the vessel containing water. This is a double boiler. We dont want to introduce any direct heat on the chocolate and we use the steam from the water to slowly melt the chocolate.

IMG_6758

IMG_6762

  • Stir with a rubber spatula to aid in the uniform melting. When the chocolate is melted its silky smooth and shiny.
  • Using a fork/spoon gently pick up the oreo ball and drop it in to the chocolate.
  • When its coated with the chocolate, spoon it on to the parchment sheet again. Repeat and continue until all the balls are coated.

IMG_6772

  • When the truffles are still wet, sprinkle with toppings of your choice – Nuts/ Sprinkles / Candied Sugar/ Confetti/ Colored Sugar Crystals.
  • Refrigerate until the chocolate hardens.
  • Enjoy decadent Oreo Truffles . Make them as gifts for your valentine!!!
  • IMG_6825
Indo-Chinese Cooking. · Kid Friendly Recipes. · Snacks & Tiffin Items

Chappati Chowmein (Wheat flatbread sliced and spiced in to stir fry!)

IMG_5944

All the forces in the world are not so powerful as an idea whose time has come!!!

Victor Hugo

One of my most popular posts that tops the hits on Anubhavati everyday, is the Restaurant Style Indo Chinese Fried Rice, and I am sometimes overwhelmed at the comments posted on the blog. So many people also e-mail me saying that it thrills them that they can make something so close to a restaurant taste – sans the grease! This keeper recipe is simply a rehashed version of the Fried Rice. Only we make it all the more interesting by playing with the textures  – Remove the rice, replace noodles – Remove the noodles replace Chappati Slices.

INGREDIENTS:

2 Chappatis.

1 Inch Ginger julienned.

2-3 Elephant Garlic pods sliced thin. (Use 4-5 of the thin variety).

1/2 Cup thinly sliced Cabbage.

1/2 Cup thinly sliced Carrots.

1 Capsicum sliced thin.

2 stems of green onions chopped fine.  – (Seperate the white parts and the green leafy parts.)

3/4 Tsp Pepper Powder.

1 Tsp Soy Sauce.

Salt to taste.

PREPARATION:

  • Its always been on my mind to fashion leftover chappathis from dinner in to chowmien the next day, but my little one always liked to smear fresh fruit jams on them and roll them up and enjoy the burst of sweetness after the bite in to the flatbread. I never had any leftover chappatis!
  • This time I went ahead and make a couple extra just to try out the chowmien. My pantry co-operated with the right ingredients and I made it for lunch for S.
  • Roll up the chapattis and slice them lengthwise. Now cut  away thin slices with your kitchen shears. Set aside.

IMG_5935

  • Heat up a kadai and add the required amount of oil. Pop in the sliced ginger and garlic and allow a minute or two for them to get fried in the oil. Do not hasten this step as this is what provides the flavour to the chowmien!
  • Now add the white portion of the spring onion and give it a quick saute.
  • Nice, now dunk in all the veggies in to the pan and give it a quick stir.
  • Add salt, pepper powder and soy sauce and allow to saute. DO NOT allow to cook enough to get mushy, as the veggies need to retain their crunch.
  • Now toss in the sliced chappati slices and mix in well.
  • Garnish with the green portion of the spring onion.
  • Serve hot with tomato ketchup! Kids love this for lunch!

IMG_5976


Italian Cuisine. · Kid Friendly Recipes.

Lemony Dill Pesto.

Dill has been a relatively new herb to me as I have never tasted it growing up. There are certain fruits and vegetable that we have always kept away, never knowing why. I am guessing dill was one such herb. I do remember seeing bunches here and there in Chennai, some years back, but I have never tried to cook with it!  In the US, dill is pretty much a common addition to dips and sauces. Last year when I went to India, my sister made this amazing Dill Dhal, and I was a sucker for it. When I came back I pretty much started finding ways to add it to my weekly grocery shopping. When I had to decide on a lunch menu for my 9 year old, I decided to make a pesto with the dill, almost similar to the one we make with basil. Well, and why not?  I didnt have pine nuts and I was always looking for excuses to sneak in walnuts in my little one food, so I decided to use the walnuts instead. ..Yes, you could never make out! The pesto was aromatic, flavourful, lemony, garlicky and yummy!  I used cheese ravioli as the base and dressed it pretty with the green pesto! Go on and try it!

INGREDIENTS:

2 Cups Dill.

12 Almond Pieces/Walnut Pieces.

1/4 Cup Olive Oil.

6 Garlic Pods.

Salt to taste.

1/2 Lemon Juice.

1 Tsp Lemon Zest.

PREPARATION:

  • Take a food processor jar and pop all the walnuts/almonds and the garlic pods in to the jar. Give it a quick pulse.
  • Now add the chopped dill, salt, lemon zest and pulse again.
  • Continue pulsing until roughly chopped and slowly add the olive oil until the desired consistency is reached.
  • Refrigerate for at least 2 weeks.

TO USE LEMON DILL PESTO AS A SAUCE:

  • Cook the desired pasta until its al-dente and save a little of the salted pasta water.
  • In a wok, add some extra virgin olive oil, herbs de provence, and then the dill pesto.
  • After a light saute, add the cooked pasta and the pasta water.
  • Swirl in and toss.
  • Serve hot with a garnish of your favourite shredded cheese.

TO USE LEMON DILL PESTO AS A DIP:

  • Combine lemon dill pesto with a spoon of cream cheese/ mascarpone cheese and some sour cream/hung curd.
  • Adjust salt to suit your taste.
  • lemon Dill Pesto makes an earthy  dip filled with tons of flavour and zest.
Chutneys / Thogayals & Podis. · Kid Friendly Recipes.

Make your own Peanut Butter at home – Preservative Free and Fresh!

Home made Peanut Butter

There are really only two ways one can feel about peanut butter – To Love it and and Love it not !  My love with peanut butter started when I came to the US when I was newly married and tasted the reese`s peanut butter cups. It was heaven all rolled up and pressed in to a little cup sized wonder and I couldnt help but enjoy the sweet and salty taste all rolled in to one goodness. The sweet of the chocolate hits you and then the palates sit back and savour the mild saltiness cutting through the chocolate coming  from the goodness of the peanut butter. Needless to say the kids love them a lot and S loves her PBJ sandwich twice every week to school. Since the store bought  versions are filled with hydrogenated vegetable oil or other times with  palm oil to stabilise it and prevent oil seperation and mild amounts of dextrose etc to sweeten the peanut butter. I felt it is best for my readers to see the health concerns as put forth by wikipedia..

HEALTH CONCERNS:

For people with a peanut allergy, peanut butter can cause reactions, including anaphylactic shock, which has led to its being banned in some schools.[7]

The peanut plant is susceptible to the mold Aspergillus flavus which produces a carcinogenic substance called aflatoxin.[8] Since it is impossible to completely remove every instance of aflatoxins, contamination of peanuts and peanut butter is monitored in many countries to ensure safe levels of this carcinogen. In 1990, a study showed that average American peanut butter contained an average of 5.7 parts per billion of aflatoxins, per the U.S. Food and Drug Administration guidelines of 20 parts per billion.[9][10]

Some brands of peanut butter may contain a small amount of added partially hydrogenated vegetable oils, which are high in trans fatty acids, thought to be a cause of atherosclerosis, coronary heart disease, and stroke; these oils are added to prevent the peanut oil from separating. Natural peanut butter and peanuts do not contain partially hydrogenated oils. A U.S. Agricultural Research Service (ARS) survey of commercial peanut butters in the U.S. showed the presence of trans fat, but at very low levels.[11]

At least one study has found that peanut oil caused relatively heavy clogging of arteries. Robert Wissler of the University of Chicago reported that diets high in peanut oil, when combined with cholesterol intake, clogged the arteries of Rhesus monkeys more than butterfat.[12]

Peanut butter can harbor Salmonella and cause salmonellosis, as in the Salmonella outbreak in the United States in 2007.

As always, its better to moderate whatever we eat and balance it with healthy alternatives.

INGREDIENTS:

1 Cup Salted Roasted Peanuts.

1/8 Cup Olive Oil.

2-3 Tbsp Honey.

PREPARATION:

  • I used the salted roasted variety as I had tonnes of them in my pantry. Feel free to use unsalted roasted, or unsalted unroasted, with or without the skin.
  • If you are using unroasted, use a dry kadai and lightly roast them until you smell the aroma.
  • You might want to remove the skin by crushing the roasted cooled peanuts and blowing the skin away.
  • Transfer to a food processor. Add the oil and give it a quick pulse.  When its a little smooth and ground, add the honey.


  • Now give it a a quick pulse and you will see creamy smooth and shiny home made peanut butter with the sweet and salty kick to it!
  • Spread it over your bread with Blackberry Jelly for a great lunch option for kids! Use it with rotis and roll it up for a sweet and salty snack.
  • As a healthier alternative use it with a thinner and it will double up as a gret sauce over your paste or your salads.
  • Add a spoon to your health drink or your fruit juice and it will work wonders for you.
  • Combine it with sauteed veggies and thai green sauce for another rocking healthy entree.
  • When you buy peanut butter in the stores, watch the labels for hydrogenated oil and trans fat. Simply buy the organic version that has only salt and peanuts. Even better make your own at home!


  • !


Cakes / Pastries / Cookies/ Bread/Muffins. · Kid Friendly Recipes.

The best brownies ever – A brownie recipe you cant go wrong with!!!

The Best Brownies Ever!!!!

There is always a search for the best recipes for all of our favorites – Hyderbadi Biriyani, restaurant style Veg Pulav, Fried Rice, or a favorite sweet….my search was for the best brownie recipe ever. …It has to be simple , measurable, chewy, moist , yet slightly crusty and finally EASY!!! This recipe is borne out of multiple research attempts out of so many recipes over a few months. One video on Youtube helped my immensely with the procedure. One pot over a stove!!! and the rest fell in place…Try it and there is really no looking back….6 Basic ingredients, one pot over a stove, and 30 minutes in the oven!!! Go ahead and give it a try and the best brownies made at home,  would never be store bought again!!! The next search is for the best eggless brownie recipe ever!!!!

Level : Easy.

Time Taken : Under 45 minutes.

Makes : 16 Medium Sized Brownies.

INGREDIENTS:

1 1/2  Sticks of butter (3/4 Cup).

2/3 Cup Cocoa.

1 2/3 Cup Sugar.

1/4 Tsp Salt.

2 Eggs at room temperature.

1 Tsp Oil.

1 Tsp Vanilla Essence.

1 Cup All Purpose Flour.

1/3 Cup Semi Sweet Chocolate Chips ( Could be substitued for any good quality chocolate).

PREPARATION:

The best part of this batter preparation is that its completely fool proof AND its all done in one go – one vessel over the stove, a whisk and some measuring and adding!

  • Take a deep dish with a strong base, and add the 1 1/2 sticks of butter to it. Place a whisk in to the dish and allow the butter to  melt slowly on low flame.
  • Meanwhile butter an oven proof dish and preheat the oven to 350F/180C.
  • Lay out all your ingredients in an assembly line  on the counter so you can reach to them when they are needed.
  • Measure out the 2/3 Cup of cocoa powder and slowly dunk it in to the melted butter.
  • The cocoa laps up the butter happily and glistens.

  • Continue whisking and add the 1 2/3 Cup pf Sugar, and the 1/4 tsp of salt.
  • Whisk and at this stage it gets a little gritty with the sugar crystals. Keep going!
  • Add the eggs one at a time and whisk them in. This stage gives the brownie batter all the body it needs. You are still on low flame so make sure you keep whisking.

  • Flavour the brownie with the vanilla essence and mix it all in.
  • Now measure out exactly 1 cup of flour and add it to the pot. Slowly fold the flour it to the silky batter.
  • At the last stage add the 1/2 cup of chocolate chips and let them melt in.

  • You are left with soft silky brownie batter. Pour this in to the  oven proof tray and smoothen.
  • Bake for 30 – 35 minutes. Allow the brownies to cool considerably and then cut them in to little squares.
  • Transfer to an air tight cannister and enjoy soft, chewy brownies again and again!

HINTS:

  1. You can line the oven proof dish with parchment paper to cut down on the mess and the grease! Simply topple it upside down when the brownie cools and cut them in to desired shapes!
  2. Keeping the flame on LOW is very important to the whole procedure.  Baking is a science, and and art, and rules must be followed else you would be left with chocolate omlettes!
  3. The baking time largely depends on the make of the OTG oven, temperature fluctuations, size of the oven, nad of course, the quantity of the brownies made! If you have doubled this recipe, time taken would definitely be more.
  4. Try these delicious brownies and let me know your reflections, observations and any suggestions!!!