Sweets

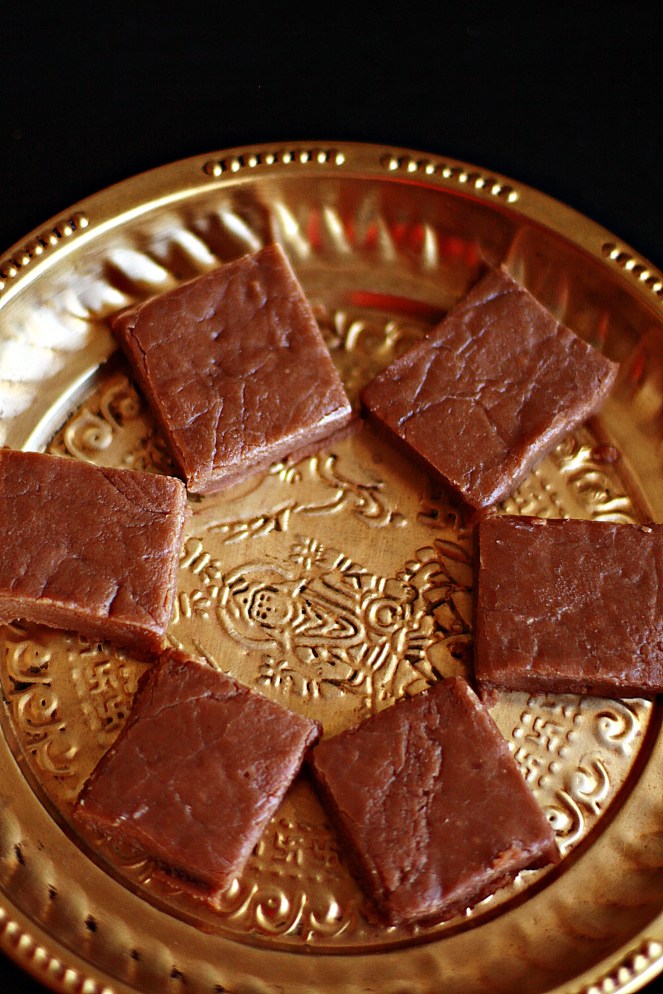
Almost Fudge Like Chocolate Burfi in 15 Minutes or less!

IMG_0939

Chocolate Burfi is one of the easiest, most amazing, kid friendly Diwali Sweets that I have ever made. Although I make Boondhi Laddoos, Badushah, Badam Halwa, and Kaju katli, the kids all time favourite is the Chocoalate Burfi,  the most simplest, most easiest sweet of all. Of course I have no doubts that this is because of a certain ingredient – Cocoa Powder with a capital C! I have tried different versions of it, as its mostly influenced by the Bournvita Burfi! I love the creaminess of the burfi, and sometimes I add tuitty fruity, or rice krispies just for the added crunch! This version is made by my friend Raji from Raks Kitchen and its my all time favourite too! The best thing that it uses the items available in your pantry at all times.

INGREDIENTS:

1 Cup Maida / All Purpose Flour.

1/2 Cup minus 2 Tsp Ghee / Vanaspathi.

2 Cups Sugar.

2 Tbsp Cocoa Powder.

1/2 Tsp Vanilla Essence.

1  Cup Water.

PREPARATION:

  • Grease a tray/ springform cake pan/ stainless steel plate  and keep it ready. The entire sweet takes hardly 15 minutes from start to finish so its easier and prudent to keep all your ingredients ready.
  • Heat a heavy bottomed kadai and add the measured ghee to it.  When its hot, add the all purpose flour/ maida and fry it briskly for a couple minutes. The maida soakes up the ghee and gets fried. Add the cocoa powder and mix. Set aside.

IMG_0911

  • In another heavy bottommed kadai, add the 2 cups of sugar and the 1 cup water. Keep boiling on medium flame until the sugar solution reaches SINGLE STRING consistency.
  • This means that when you lift the ladle and allow the syrup to drop, it will drop to the kadai below in short strings. Another option is to slightly cool the index finger on an ice cube, and deftly swipe the back of the ladle for the syrup, and check the string between your index finger and the thumb. If a string forms, the syrup is done.
  • Switch off the flame and add the fried chocolate maida and a few drops of vanilla essence(optional).
  •  Stir for about 2-4 minutes and you will see that the mixture slowly thickens.

collage1

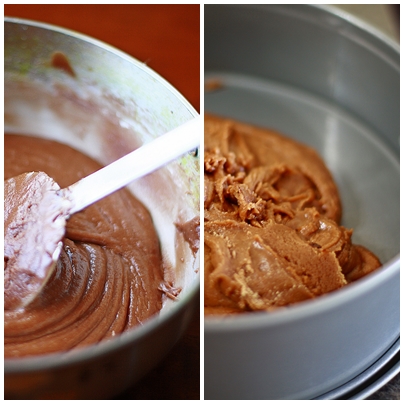
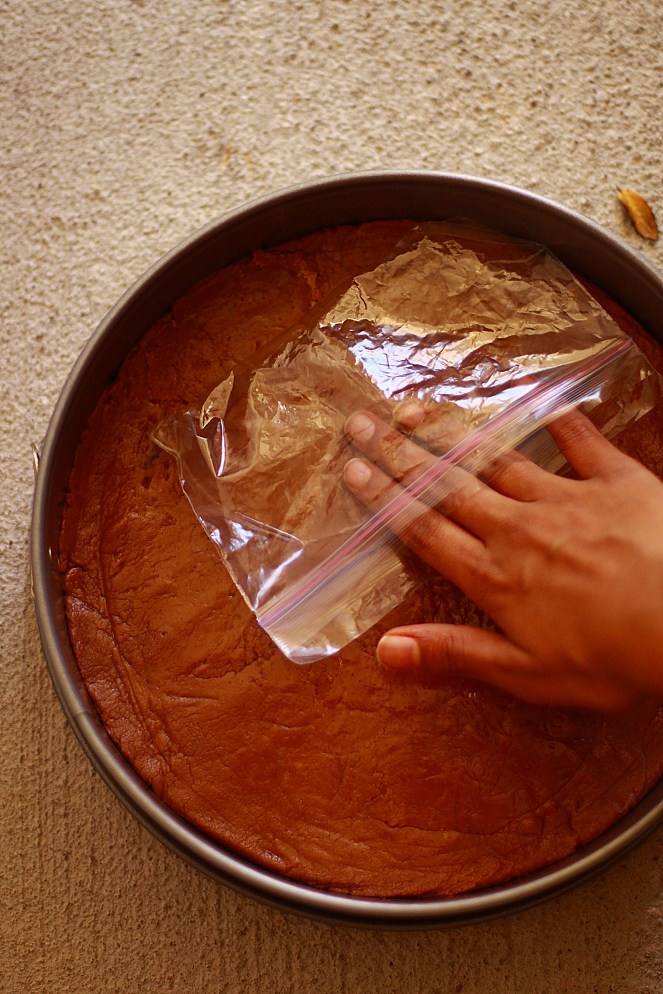
  • When its resembles a soft chappathi dough, pour on to the greased spring form cake pan/ brownie pan/ stainless steel plate and smoothen with a ziploc cover as shown.
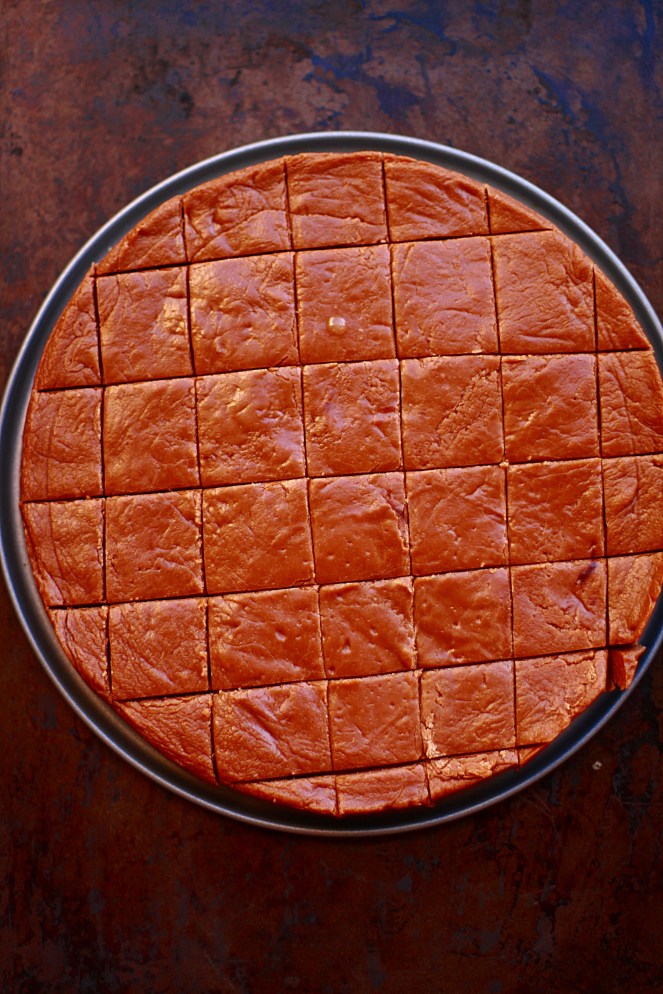
  • Allow it to set for a couple minutes and then cut in to squares.

IMG_0927


IMG_0931

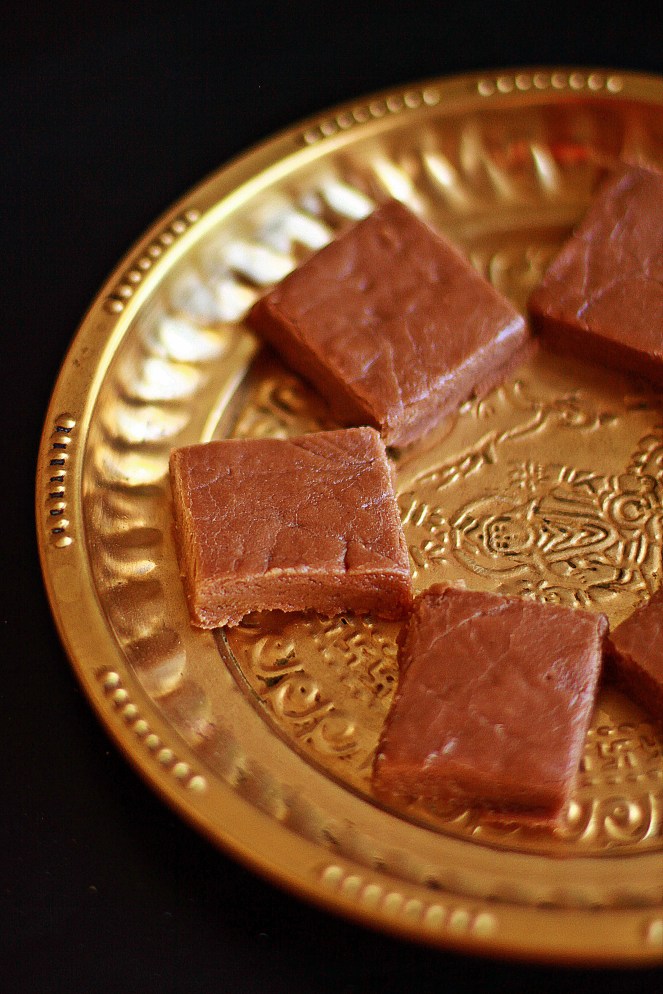
  • Decorate with a cashew/ pista/ walnut.
  • Easy Fudge Like Chocolate Burfi is ready!

IMG_0941

HINTS:

  1.  The same sweet can be made by making it completely Plain Vanilla or splitting it Half Chocoalte and Half Vanilla. One Halloween, I simply used orange food colour on the Plain Vanilla portion that made it look very festive over the brown chocolate layer.
  2. Achieving single string consistency is very important as if you dont reach the right consistency, the burfi would never harden. In case that happens, simply put the whole batter on the gas for a couple more minutes and then transfer to the brownie pan.
  3. If you go over the single string consistency, the batter solidifies very very fast. The best thing would be to see how the consistency of the dough is, and based on that to transfer to the plate.
  4. Keep a timer to see what time it takes on your stove on a medium flame for this quantity of sugar solution to reach single string. If your burfi comes out perfect, note down the time taken and the setting on your stove for future use. We use single string consistency for so many sweets – Badushah, Boondhi Laddoo, Motichoor Laddoo, Kaju Katli etc.
Sweets

Easy Kaju Apples – Elegant & Appealing Desserts!

IMG_4967

Deepavali is always a wonderful time to spend with family, relax and be thankful for all the blessings that we have in our life. It`s a celebration of good over evil and one which is celebrated in all parts of the world.  I remember the times we used to pitch it and help with my grandmother to prepare all kinds of swweets and savouiries. I always had the role of rolling the boondhi in to Boondhi Laddoo balls. I also had the job of cutting out the diamonds for Special Madras Mixture. It was awesome to be able to partake all the festive feeling in the home. Now, far away from Madras, albeit only in spirit, I try to relive those moments with my kids. My daughter S helps me with rolling Laddoo Balls, and with making Kaju Katli. I had been wanting to make this Kaju Apple as a slight change from the regular Kaju Katli. You pretty much do the same thing, except that you shape these in to beautiful little apples, and involve the kids in painting them red and placing the cloves as the little stalk. Your own Deepavali DIY Project! Cute yet elegant!

INGREDIENTS:

1 Cup Cashew Nuts.

1/2 Cup Sugar.

1/4 Cup Water.

1-2 Drops Apple Essence(Optional)

1 Tsp Ghee to grease your hands before kneading .

1 Tbsp Saffron/ Yellow Food Colouring.

A few drops of Red Food Colouring.

A few drops of Green Food Colouring.

Handful of Cloves.

One Paint Brush.

PREPARATION:

  • The first step is to pulse room temperature  cashews in to a fine powder. In many places, people store all their nuts in the fridge or freezer to prevent it from becoming rancid. When you plan to make Kaju Katli or the Kaju Apples etc,  keep the cashews out for at least 1-2 hours so they come down to room temperature. When they are ground cold, the heat from the mixer causes them to stick together and the powder is not as free flowing and fine.
  • Take the measured quantity of cashew nuts and pop them in the mixer jar. Grind them steadily until it becomes a fine powder.
  • Take two small glass bowls and add a few drops of red food colouring in one, and a few drops of green food colouring in the other.
  • Soak the saffron strands in the 1/4 cup water required to make the sugar syrup.
  • The next important step is bringing the sugar solution to “single string” consistency. This is needed for Boondhi Laddoos, Kaju Katli, Badushah, Mysore Pak  and many other sweets.
  • Take a wide mouthed heavy bottomed kadai and add a heaped 1/2 cup of organic/ regular white sugar. Top it with 1/4 cup of water( filter out the saffron or if you dont prefer the smell of saffron simply add just a few drops of yellow food colour) and set it on the stove on medium flame. Keep stirring the mixture on and off and after about 5 minutes you should see it bubbling and frothing. Slowly the sugar solution moves to a single string consistency.  To check if the sugar solution has reached the required consistency, take a little of the syrup in the back of your ladle and try stretching it between your index finger and thumb. If this forms a fine string, then the required consistency is reached. This is a very important step and the coming together of the katli rests on the single string consistency.
  • Add a few drops of the sugar syrup on to the cup with the red food coloring. Add about a tsp of canola to it and mix.
  • Lower your flame to SIM and tip the ground cashew powder in to the kadai and keep on stirring until it reaches a slightly thicker mass. It would be still a little sticky but will the sugar will start hardening rapidly, so do not worry. It should look like sticky chappathi dough.
  • Switch off the gas and remove from the heat. Wait for about 4-5 minutes.
  • Clear a clean surface to work on and grease it with a little ghee.
  • Now transfer the cashew dough to the greased surface and knead it gently with greased palms. This step is important to get a shiny smooth pliable dough. It just needs a little time to work on the dough. If you feel its still sticky, try adding a few drops of ghee and continue working on it. You could use disposable gloves if you feel its too hot to handle.
  • The dough should get smooth and shiny on the outside and get in to a pliable round ball.
  • Keep the following ready near your work station: – Cashew Dough Ball, Red Food Color Syrup, Green Food Color mixed with a few drops of oil, cloves, ghee, a skewer and a greased plate to set the “apples”.
  • Shape the cashew dough in to round smooth ball and set aside on the plale. Continue and complete the dough by shaping them in to balls.
  • Press a small depression on the head of each apple.

IMG_4947

  • Pick up an apple with the skewer and paint the red food colour all around the apples saving the depression on top.
  • Colour the depression with a hint of the green food colour.
  • Gently stick the cloves on to the hole created by the skewer.
  • Just before serving, brush them all with melted ghee/ oil for a natural shine.
  • Easy Kaju Apples are ready and make an excellent dessert for a Diwali party, or a birthday party.

HINTS:

  1. There are little tips and tricks that are part of any cooking process and they sometimes can make or break the dish. In this case, having room temperature cashews are important.
  2. For first timers, the sugar solution sometimes can get tricky, Its better to make this over a medium low flame when there is more time to check and react.
  3. If you have gone over the single string, there is less time to work on the dough as the sugar in the cashew dough solidifies very fast.
  4. The last tip is to make sure that the dough gets smooth and pliable. IF the sugar solution is single string then this should not be a problem. Knead the dough well with a few drops of ghee when its still warm.
  5. Keep all ingredients ready by your work station ass the whole process is done when the cashew dough is still warm.
  6. Please leave your comments on this post, with your observations and here`s to wishing you a Happy Deepavali.

IMG_4964

Kid Friendly Recipes. · Rice Varieties. · Salads/ Recipes for the Calorie Conscious.

Millet Spinach Khichdi.

IMG_4936


Food is the most primitive form of comfort” 

Comfort Food for me is almost always food that’s traditionally made at home , mingled with a gazillion  memories  of partaking it with my sisters. Everyting seemed a lot more fun with them around. Even a simple meal of Vethakuzhambu, Alu Fry, and Pepper Rasam would feel almost like nectar. Eating out was almost a rarity and when it does, my staple order would definitely be Restaurant Style Vegetable Fried Rice and Gobi Manchurian.  Most recently since we have started having Gujarati Thali at  Saravana Bhavan Gujrathi Restaurant at T.Nagar, Chennai, we are a big fan of their Gujrathi Khichdi. Its almost a replica of mushy dal rice, simply seasoned with cumin seeds and a glob of ghee. Try it piping hot, and its instant comfort food. This Khichdi is made with millets and spiced with spinach ground with cilantro leaves to give it that zing., This is my entry for the Shhh Cooking Event for the month of October 2014.

INGREDIENTS:

1/2 Cup Brown Rice.

1/2 Cup Millet.

1/4 Cup heaped Moong Dal.

5 Cups Water.

1 Tsp Ghee.

Salt to taste.

Grind to a Paste:

1 Cup Spinach chopped and cleaned.

1 bunch cilantro cleaned.

2 Green Chillies.

1 Red Onion roughly chopped.

Seasoning:

2 Tbsp Ghee.

2 Tsp Jeera.

1 Cinnamon Stick.

10 Curry Leaves torn.

PREPARATION:

  • Wash the brown rice , millet and moong dal  a couple times and allow to soak for about 30 minutes.
  • Measure out the ground paste. The paste + Water must roughly add to about 5 to 51/2 cups of liquid.
  • Add the ground paste+ water, salt to taste, a tsp of ghee and give it a quick mix.
  • Pressure cook the rice-millet- dal mix for  1 whistle and reduce the flame to sim for 10 minutes and switch off.
  • When the pressure is released, mash the rice/millet well.
  • Take a wide mouthed pan and add ghee, and when hot, the seasonings.
  • Pour out the khichdi on to the pan and mix and serve HOT with Mango pickle or Rajma Gravy.
  • Mouth watering, simple, healthy yet tasty Spinach Khichdi is ready.
  • Substitute Brown Rice for Basmati Rice/ Sona Masoori/ Cracked Wheat etc.

IMG_4925


Snacks & Tiffin Items

Kunukku – Leftover Adai Batter gets a makeover!

IMG_4624


“Memory is a way of holding onto, the things you love, the things you are, and the things you never want to lose”!!!

Many of the dishes that I make are all associated with some random part of my childhood that I wildly clutch on to…There was a lot of pain, there was sorrow, but there was loads and loads of happiness too. All those times, I never knew that those were the moments I was going to think back on, reminisce, and wish I could go back to, over and over again. My sisters made my life so worth it, then, now and forever, I am sure. There are so many people who influence so many little things about all of us, our thinking, our values, our ideals and definitely our approach to life. My grandmother was all that and more…She taught me the principles of reuse, recycle and reduce almost 20 years ago!  Everytime there is leftover Adai Batter we almost always make Kunukku and have it with spicy tomato ketchup! Sometimes I use the Abel skiver Pan/ Appam Pan to make them!

INGREDIENTS:

2 Cups Adai Batter.

2 Tbsp Fine Rava.

1 Tsp Rice Flour.

1 Red Onion sliced fine.

Handful Curry Leaves.

Chopped Cilantro.

Hing as needed.

PREPARATION:

  • Take the leftover adai batter and add rava, finely chopped red onions, handful torn curry leaves, and chopped cilantro.
  • If the consistency of the batter is too watery, simply add a spoon of rice flour and mix it in.
  • Heat the oil and pop in small balls of the batter in to the oil and fry on medium heat until the outside is crisp.
  • Remove from oil and drain on to a paper napkin.
  • Serve with Sweet Dates Chutney or Tomato Ketchup.


Sweets

Aval Laddoo / Poha Laddoo ( Beaten Rice Laddoo flavoured with cardamom and nuts.)

IMG_4783

Deepavali, is one of the most important festivals all over India and every community have a different way of celebrating the festival of lights. It signifies new beginnings for many in the northern part of India. In the southern part, Deepavali is celebration, new clothes and of course so many many varieties of sweets and savouries. Families make sweets and share it among their friends and relatives. I always make Madras Mixture as its a family favourite.  Boondhi Laddoo, Jangiri, Badushah , Kaju Katli, Badam Halwa and Gulab Jamuns almost always figure on our list to make for Deepavali. This time I am adding a very simple easy sweet thats super easy and quick to make. It`s a great idea to make it for potlucks and dinner gatherings during Deepavali.

INGREDIENTS:

1 Cup Beaten Rice/ Poha/ Aval Thick.

1/2 Cup Sugar.

2 Tbsp Broken Cashews.

2 Tbsp Pistachios.

6-7 Cardamom Pods.

1/4 Cup Tuitti Fruiti.

To Fry:

1/4 – 1/3 Cup Melted Ghee.

6-8 Dried Raisins.

4-5  cashews broken in to small pieces.

PREPARATION:

  • Measure out the poha and make sure it has no impurities. These days packaged Poha comes quite clean and without much impurities.
  • Dry roast the poha for a few minutes on medium low flame until the poha turns a dull golden colour. Allow to cool.
  • Add sugar, cardamom seeds, cashew, and pistachios and grind to a powder. Transfer to a bowl.
  • Powder the roasted poha finely  and add to the bowl.
  • Add the tuitty fruity and the raisins to the ground powder.
  • The powder would smell heavenly because of the addition of cardamom seeds.
  • Add melted ghee to the ground powder and shape in to balls.
  • Add a few drops of ghee to your hand to help shape the balls.
  • Do not add too many raisins and cashews as this might make shaping the laddoos difficult.
  • Easy Aval Laddoos can be made in a flash and they are very delicious.

collage

Naivedhyams/ Festival Offerings. · Poriyals / Kootu Varieties. · Salads/ Recipes for the Calorie Conscious.

Nilakadalai Sundal / Kadalai Sundal/ Peanut Sundal ( Steamed Raw Peanuts tossed in quick seasonings)

IMG_0719

Navarathri is a celebration of the Goddesses that protect us and are the very epitome of power and knowledge. I have already a detailed post explaning the significance of this beautiful festival. Celebrating Navarathri also brings with it beautiful visions about Golu Dolls, celebrations,  rustle of silk sarees, little girls decked in beautiful silk pavadais, excitement of visiting friends and families, singing songs in praise of Devi, and of course Sundal! When we were in college, it was even more exciting as we got to visit our friends every evening, for “vethalai paaku”. For the uninitiated, this is the customary practice of calling married women and unmarried girls to  their homes for Golu – the festival of dolls. These women are offered the daily “prasadam” , and along with that “thamboolam” consisting of betel leaves, betel nuts, kumkum, sandalwood powder, turmeric, and many times a small gift.

As kids , it was always interesting to get all decked up and visit our friend and families for Golu. One of my aunts always made it a point to gift me glass bangles for Navarathri. She is not with us anymore, but I can never forget the little things that she would do for me on these special days. Of all the sundals that we make at home, TH and my kids love Nilakadalai sundal hands down. I love the fact that its so easy to make with no prior soaking and no fuss at all.

INGREDIENTS:

`1 Cup Raw Peanuts.

1 Tsp Salt.

1 1/2 Tsp Idli Molagaipodi.

Seasonings:

2 Tsp Coconut Oil.

1 Tsp Mustard Seeds.

1 Tsp Urad Dhal.

Curry Leaves.

Hing as needed.

PREPARATION:

  • Wash the raw peanuts and transfer to a cooker vessel. Add just enough water to cover the peanuts, add salt and steam cook it for about 2-3 whistles. It should be soft and well cooked, but not mushy.
  • Drain the excess water but save it as you could use it in rasam, sambar etc.
  • Take a shallow kadai and add the coconut oil.
  • Add seasonings when hot and allow to fry in oil.
  • Once the mustard seeds have crackled. add the cooked peanuts.
  • Swirl for a couple minutes until the peanuts are coated well with the oil and the seasonings.
  • Finally add the 1 1/2 – 2 Tsp of Idli Molagappodi and mix well.
  • Crunchy Peanut Sundal packed with protein and nutrition is a very tasty snack and an easy Neivedhyam for Navarathri as it involves no prior soaking.
  • On days when your green vegetable is less, add Peanut Sundal as an extra protein source.


Sweets

Fruit Kesari (Semolina Halwa with fruits and nuts)


IMG_4683

Think of the word “Sweets” and my mind flashes to the variety of Indian sweets that have been adapted and modified and borne out of the so many different cuisines and regions in India…Since Sugarcane has been growing in India for thousands of years, the art of refining sugar was invented there. From its simplest most unrefined form, to the pure refined crystallised forms available in branded packets, we have come a long long way. No other country has the multitude of sweets like the way India does. Milk based sweets like Gulab Jamun, Rosgullas, to the ones made with all purpose flour, made with khoya, with urad flour, condensed milk, besan, milk powder, coconut, the list is simply endless.

My personal favourite has been the most easiest of them all – Rava Kesari. My all time favourite has been the Pineapple Kesari served at weddings and at Sangeetha Restaurants. This one is a variant of the rava kesari and is also served at south indian tamil weddings. Fruit Kesari has a distinctive flavour as it does not have edible camphor or the cardamom powder. The aroma of the fruits in it, itself endears to the flavour of this sweet. This is a version by Revathy Shanmugham, which I had seen in a TV show long ago and noted it handwritten in my little recipe diary. This month for the Shh Cooking Challenge, my secret ingredients given by Priya Suresh, was a fruit and a nut. My secret ingredients were Green Grapes and cashew nuts. Try it and you will love its simple yet robust flavours.

INGREDIENTS:

1 Cup Rava Fine.

2 Cups Sugar.

2 1/2 Cups Water.

1/3 Cup Finely chopped pineapple.

1/3 Cup Finely chopped apples.

1/3 Cup Finely Chopped Grapes (Green).

3 Tbsp  Oil.

2-3 Tbsp Ghee.

A pinch of salt.

1 Tsp Pineapple Essence.

8-10 Cashew Pieces.

10 Raisins/ Sultanas.

PREPARATION:

  • Chop the pineapple, apple and green grapes in to really small pieces and place them in three cups. Add a tbsp of sugar on to each of the cups and mix it in. This will coat the fruits with sweet and also remove the undesirable tartness in certain fruits. Keep it that way for about 30 minutes.
  • Take a wide mouth heavy kadai and add the oil and a tbsp of ghee. Fry the raisins and cashews until the raisins get plump and the cashews fry to a golden colour. Drain out the excess oil and remove the raisins and cashews.
  • In the same kadai, add the 1 cup of rava and roast on a medium low flame for a couple minutes until the raw smell is gone. Remove from kadai.
  • Add the 2 1/2 cups water to the kadai and allow to boil.
  • When it comes to a rolling boil, slowly tip in the roasta rava and stir it with a whisk/ladle on a medium low flame until the rava gets all mixed in.
  • The rava absorbs the water and rapidly cooks to resemble upma. At this point, add the measured 2 cups of sugar.
  • As the sugar melts, the rava gets watery and slightly lumpy. Keep stirring and dissolving the little lumps until the mixture gets smooth.
  • Add the chopped fruits – pineapple, apple, and green grapes to the mix, pineapple essence, any food colouring if needed and a small pinch of salt.
  • Add a spoon of ghee now and then and keep stirring until the kesari reaches the desired consistency.
  • Garnish with fried cashew nuts and raisins and serve Hot!

IMG_4682


Side Dishes for Rotis/Dosas/ Naan.

Saravana Bhavan Vegetable Kurma. ( Vegetables in spicy coconut fennel gravy)

IMG_4672

Vegetable Kurma is a popular accompaniment for Chappathi , Parotta, Aappam and Phulkas. Generally, a kurma is a coconut based stew, with vegetables and whole spices. The very first time I ever had kurma was when my mom made it for us one day to go with rotis. I was floored by the aroma of fennel in a gravy, as it was the first time that she had ground up fennel and coconuts to use as a base for the steamed veggies. I was hooked. After marriage, TH loved parotta and kurma and his favorite was the version available at Saravana Bhavan. I was working in Chennai at that time and during lunch, there was the usual talk about recipes, and swapping notes on making them. One of my colleagues, was unarguably the expert in making this particular kurma. She was kind enough to share this with me and I remember scribbling it behind a payment counterfoil and had assumed to have kept it safely…It was too safe that I could never recollect where I had kept it before trying it even once. Many years later, after many moves, and many more homes, I found this counterfoil. safely stuck to the inner pocket of my diary! I made certain modifications referring to this page, and tried this out over the weekend. The aroma of hot kurma and parottas at home, really reminded me of Saravanaa Bhavan, back home in Madras!

INGREDIENTS:

 Vegetables:

1 Carrot Diced in to cubes.

1 Cup Beans diced in to 1 inch long pieces.

1 Cup Cauliflower Florettes.

1/2 Cup Peas.

1 Onion Diced FIne.

1 Tomato Diced.

1 Tsp Freshly Grated GInger.

1 Tsp Freshly Grated Garlic.

2 Tsp Dhania Powder/ Corriander Powder.

3/4 – 1 Tsp Red Chilli Powder.

1/4 Tsp Turmeric Powder.

1/4 Tsp Garam Masala Powder.

2 Tsp Lemon Juice.

Salt to taste.

Seasoning:

2 Bay Leaves.

2 Mace Pieces.

Handful Curry Leaves.

2 Tbsp Mint Leaves. ( If using dried mint limit to 1 Tbsp).

Grind to a Smooth Paste:

1/2 Cup Coconut Grated.

8-10 Cashew

1 tsp Poppy Seeds/ Khus Khus.

1 Tbsp Fennel Seeds/ Somph.

2 Green Chillies.

3 Tsp Pottu Kadalai/ Chutney Dhal.

1 Inch Cinnamon Piece broken in to pieces.

1 Tsp Cardamom Powder or 2 Cardamom Pods.

PREPARATION:

  • Half cook the diced veggies in water, adding a spoon of salt. Drain the veggies and save the water.
  • Grind all the ingredients under ” Grind to a Smooth Paste” , adding little water. The paste should be completely pulsed and smooth.
  • In a wide mouthed kadai or wok, add about 2-3 tbsp oil and pop in the seasonings – Bay Leaf, Mace, Mint, Curry Leaves and allow to saute in the oil. The aroma of the mint getting fried is unmistakably fresh and inviting.
  • Add the diced onions, ginger paste, garlic paste and allow to saute well.
  • When its well done, add the chopped tomatoes and saute for a couple minutes. After a few minutes add the ground paste.
  • Now add the dry powders – Red Chilli Powder, Dhania Powder, Turmeric Powder, and Garam Masala and mix in well.
  • Keep stirring the kadai,  until they are well done and  there is no raw smell from the spice powders.
  • Add the lemon juice and keep stirring.
  • At this point, care should be taken to make sure that the gravy does not burn or stick to the bottom of the kadai. Keep the flame on medium and contuinue sturring until yuou see the oil slightly leaving the sides if the gravy.
  • Add the half cooked veggies, as well as the water in which the veggies were cooked.
  • Adjust the water content, depending on the consistency of the kurma thats desired.
  • We dont prefer it to be too thick, or too runny.
  • Garnish with finely chopped corriander leaves and serve it piping hot with Hot Parottas/ Garlic Naan!

IMG_4676


Chutneys / Thogayals & Podis.

Peerkangai Thogayal ( Spiced Ridge Gourd Chutney).

IMG_4601

Did you know that the botanical name of the Ridge Gourd/ Peerkangai/ Beera Kaya is actually Luffa Acutangula??? Awesome, coz  I did`nt! And that the vegetable is the unripe form of the fruit itself? And the mature ripe fruits are used to make natural cleaning sponges??? That’s how the Loofah was born I guess. The Ridge Gourd was never used in my maternal home as a vagetable and I never even knew its existence.  I have seen a couple of my friends use it in chutneys, thogayals, kootu and even pickles. I loved this version by Kaveri and adapted it to my own recipe for a regular thogayal.

A normal boring everyday meal can get totally zinged up by just adding a Thogayal/ Pachadi.  Every time I make Keerai Molagootal or Pumpkin Molagootal , I love to spice things up with a Vendakkai Thayir Pachadi or a Sweet and Tangy Kathirikkai Pachadi. On lazy summer afternoons, just adding a couple tender mangoes or Maavadu to left overs, makes a comforting meal in itself! I always try to use vegetables in these thogayals as they add to the nutritive quotient at the same time almost rendering an effect equal to having Spicy Lemon Pickle etc. This is one of my husband`s absolute favorite and in recent days mine too. It`s the same formula just as in the Onion Thokku – saute the vegetable, slow roast dry ingredients in oil, throw in some tamarind for some zing, pulse, season!

INGREDIENTS:

1 Big Long Peerkangai / Ridge Gourd.

2 1/2 Tbsp Urad Dhal.

2 Red Chillies.

A small ball of tamarind.

1/3 Cup Coconut.

1/4 Tsp Hing.

1 handful Corriander Leaves.

Salt to taste.

Seasoning/tempering:

1 Tsp Gingely Oil.

1 Tsp Mustard Seeds.

Curry Leaves.

Hing.

PREPARATION:

  • Wash, peel and chop the ridgegourd in to cubes. Set aside.
  • In a kadai add about 2 tsp oil and slow roast the urad dhal and red chillies until the dal turns a dull brown colour. Transfer to a mixer jar after it cools.
  • In the same kadai, add the chopped ridge gourd and the tamarind and saute until cooked.
  • Once the ridge gourd is cooked, add the salt else it will release water and reduce in volume.
  • Pulse the dry roasted ingredients in the mixer for a couple turns.
  • Add the cooked ridgegourd, tamarind, salt, coconut, corriander leaves and a little hing and pulse until smooth. You will not require water as the ridge gourd would be soft, but add a few drops if too dry.
  • Transfer to a serving dish.
  • Season in gingely oil with mustard seeds, curry leaves and hing and pour over the thogayal.
  • Excellent accompaniment with Idlis or Dosa.
  • Mix with hot rice with a dollop of gingely oil and enjoy Peerkangai Thogayal Sadam.

IMG_4606


Brisk Breakfast

Soft & Fluffy Rava Idlis from scratch.


IMG_4373

 I remember the very first time I had Rava Idlis at a small Idli Kadai in Madurai, during my post graduation days. Those were the days of terrible hostel food, no canteen in the college and crazy study schedules. After a tiring day at business school, we would come back home to a terrible canteen that seemed to be suspiciopusly out of vegetarian food at all times. We were forced to look outside for better food, and Madurai, being the best place in the whole world to find all kinds of south indian food at any time of the day ( or night)!  On one such occasion, a group of us had gone for getting dinner and the joint was out of Idlis. He asked us to come back in twenty minutes and had steaming hot Rava Idlis ready for us!  Served piping hot with spicy coconut chutney, it seemed Godsent! With time, I learnt the art of making fluffy soft Rava Idlis at home and add vegetables for added nutrition. This is an easy way to whip up dinner for times when your refrigerator is near empty, and you need to make a wholesome breakfast or dinner. The best thing I love about these Idlis are they are super easy to make and they use the ingredients that are almost readily available in your pantry. Pop in the vegetables you have – Peas, Grated Carrots, chopped beans etc and the kids will actually love it.

INGREDIENTS:

2 Cups Roasted Rava.

1 Medium Onion Chopped fine.

1/2 Cup Finely Grated Carrots.( I have not added this time)

1/2 Cup Peas.

1/4 Cup Chopped Cilantro.

1/2 Tsp Baking Soda or Eno.

2 Tsp Salt.

2 Cup  Curd/ Thick Buttermilk.

Seasoning:

2-3  Tsp Oil.

1 Tsp Mustard Seeds.

1 Tsp Urad Dhal.

1/2 Tsp Channa  Dhal.

6-8 cashews broken.

Curry Leaves.

Hing.

PREPARATION:

  • Pour out the oil for seasoning and allow a couple minutes before adding mustard seeds. urad dhal. channa dhal, cashew, curry leaves and hing.
  • When its well roasted, add the chopped onions and allow to saute until light pinkish brown.
  • Now add the measured 2 cups of rava and stir it in for a couple minutes.
  • Switch off the flame and transfer to a mixing  bowl.
  • Add chopped beans, peas, grated carrots , cilantro, and salt, using a ladle incoporate them well.
  • Add the curd/ buttermilk to the rava mixture little by little until you get a thick batter consistency.
  • Dust in the baking soda and mix. The rava mixture would rapidly start using the moiusture in the curd and thicken.
  • Add a little more of the curd to enable the batter to loosen up a bit.
  • Allow to sit on the counter top for about 10 minutes.
  • Grease the idli plates and fill the depressions with the rava idli batter.
  • Cook for about ten minutes and when there is a strong steam, simmer and switch off in ten minutes.
  • Else cook like how you would with regular Idlis.
  • Serve HOT with Andhra Style Tomato Till Chutney.

IMG_4379