Today being the very first day of Navarathri and also the first saturday of the tamil month of “Purattasi”, it was an auspicious day completely. Today`s Neivedhyam was:
Navarathri – The name itself conjures to me years and years of tradition locked safely in trunks and cardboard boxes and handed down from generations. My earliest memory of Navarathri was in Madurai in my grandmother`s home near the Perumal Temple. They had this lovely red oxide floor that I oh so love. Madurai amma used to store her lovely dolls in a heavy trunk in the loft.
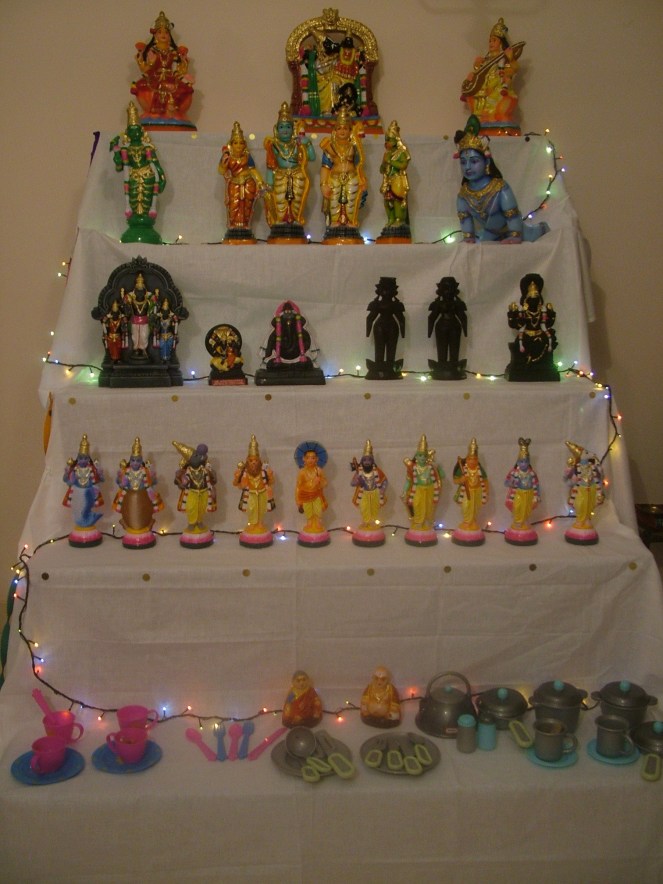
Every year Madurai amma and appa would lovingly bring down all the dolls, wrapped up completely in clean cotton clothes, wipe them down and then set them up on the floor ready to adorn the steps of the “Golu”. We would then “construct” the shelves of the Golu with various things in the home – Singer Merit Sewing machine table would be the central table. Ovaltine Tins preserved from the earlier years on which a plank would support on, would form the highest shelf. The third one would be constructed from two aluminum biscuit tins one on each side, on which would run a heavy wodden plank.The fourth would be from smaller Tang Tins and of course the lowest would be constructed with a brick and some books. Madurai amma would have a clean bleached and starched white bedspread from Co-optex ready and we would drape it around the 5 shelves and I would , help her secure the sides with little pins. Madurai amma would place the Lakshmi and Saraswathy dolls on the top shelf and then slowly arrange the other dolls in a specific order.The red oxide floors would be resplendant with “maakolams” all the way from the foyer to the altar.
When we moved to Madras, to an apartment, the tradition continued unflinchingly. Only this time. Madurai amma and me alone would do everything that needed to be done. My sisters S and D would stand a few feet away, helping us with cleaning the dolls and the like. as I grew older I would go out and buy some craft paper to make little paper decorations on the sides. When I started earning, I bought little lights for Madurai amma`s Golu. Of course, dolls were slowly added over the years, bought from Mylapore , Khadi Gramodyog Bhavan etc. Although the new dolls were bright and lovely, we still loved the old clay dolls treasured over the years and stood them side by side. We also re-painted some of the old dolls in the local market.
There were the traditional Lakshmi, Saraswathy and Durga. Then there was the Dashavatharam set consisting of the ten dolls of the avatarams of Lord Vishnu. Lord Rama, Sita , Lakshmana and Lord Hanuman were of course a favourite. The other dolls were Lord Shiva and Godess Parvathi, Sage Agasthya, Lord Buddha, Lord Krishna, Lord Muruga, and of course the traditional “Marapachi Dolls”. They were always in a pair. These dolls are decked up in silk and adorn the golu shelves.
Flowers in the Terracota Uruli.
What is the significance of this wonderful festival???
Navarathri means nine nights. Darkness is associated with night. What is this darkness? It is the darkness of ignorance. The purpose of the Navarathri celebration is to enable man to get rid of the nine types of darkness which have taken hold of him. When a reference is made to Devi, it signifies the unified form of Durga, Lakshmi and Saraswathi. The three together represent Shakthi. Shakthi is the energy that accounts for all the phenomena of Prakruthi (Nature). Nature
is energy and the controller of that energy is the Lord.
The Navarathri has been divided into three parts the first three days being dedicated to the worship of Durga, the next three days to the worship of Lakshmi and the last three days to the worship of Saraswathi.
Outwardly Navarathri signifies truimph of good over evil.Dussera can also be interpreted as “Dasa-Hara”, which means the cutting of the ten heads of Ravana. So,it`s a resolve to cut the ten heads–passion, pride, anger, greed, infatuation, lust, hatred, jealousy, selfishness and crookedness–of the demon, Ego, and thus justify the celebration of Dussera.
Lovely colourful rangolis
Various Neivedyams are prepared every day of the nine days and offered to Devi. Devotees chant the following:
Colourful Rangolis / Maakolams are drawn in the homes and in front of the Golu Dolls. Little girls dress up in all their festive clothes, and sing songs in praise of Devi. It is very auspicious to offer Tamboolam in the form of Betel Leaves, supari, Kumkum, turmeric, flowers, coconuts, bangles, mirrors etc to little kanya girls and to women. Many homes perform Kanya Poojas.Temples have special poojas for Devi and chant shlokas for general welfare. The final day is the Saraswathi Pooja, devoted to the worship of Godess Saraswathy – to enrich us with knowledge as the greatest wealth.
Maakolam.
When I got married, I started my own little tradition. My mother added to my collection of dolls and my daughter enjoyed the festivities of the season. Now, here in the U.S, I miss many of the dolls, but it`s a tradition I do not want to miss at all. I do have a little of my own dolls, but the rest are from the stores here and its hardly as grand as the one that we have had in India. Nevertheless, the spirit is there, to spread goodness, cheer and righteousness in all our actions.
Every year we loved and enjoyedVinayaka Chathurthias it was always the first of the many hindu festivals. It heralded the onset of the other religious festivals likeSri Krishna Jayanthi, Navarathri, Saraswathi Pooja, Vijayadasami, Deepavali, Karthikkai Deepam, Thiruvadharai etc. Every festival was important in it`s own right and had its own religious significance. When we were little kids, collectively the festival season excited us for many small reasons – the family gets together and everyone celebrates, new clothes are bought for one and all and of course the great eats….the “Bhakshanams”, the multitude of sweets and savories that the women of the family get together and plan to make for the festivals. Sometimes, friends would also join in and synergise efforts and share the results.
Some of the more important festivals are Navarathri and Deepavali. These two festivals are both joyous in their celebration of good over evil and in its bringing together people to unify as one, in front of the Lord. Boondhi Ladoo has always been a favourite of mine as I used to watch Madurai amma make it every Deepavali. The most important utensil required for this is the Boondhi Making Ladle- or Boondhi Jaranior Boondhi Karandi , and madurai amma had hers made in heavy iron. I love all her utensils – boondhi karandi, appa kaaral, kadai , all of them heavy and solid and gleaming from the loving washes over the years with soaked tamarind and lemon.
I saw my Boondhi Karandi at Patel`s on Devon Avenue in Chicago, and I had to make it mine. I was waiting to try it out and see if the Boondhis were coming out ok and it was pretty good. A great buy for $7.99 I would say!!!
INGREDIENTS:
2 cup Besan.
1- 11/2 cup water for the Besan.
2 cup Sugar.
3/4 cup water for the syrup.
Chopped Cashews.
Powdered Cardamom.
Pinch of Edible Camphor (Pacha Kalpooram)
A little bit of milk for making Ladoo Balls.
A pinch of saffron soaked in warm milk.
4 or 5 Cloves.
1 Tbsp Ghee
PREPARATION:
For the first time ladoo makers I have tried to provide a lot of little tips, where I found I used to make mistakes.
The first step in the preparation of Boondhi for the ladoos is making the besan batter. It`s important to “try” to make boondhis or drops which are spherical without a “tail”. The tail would come if the water content in the besan is a little more then necessary.
The second point to be noted is that the boondhis should not be fried to a point where they are too crisp. This would also not render the easy making of ladoo balls.
Take a bowl and add the seived besan making sure that there are no clots.
Add about 1-1 1/2 cup water and using a whisk, stir it all in briskly. The whisk also helps in the uniform mixing without clots. If needed you might have to add 1-2 tbsp of water more. This is how it should look like. The consistency should be smooth but not too runny. it should be a pouring consistency.
Gently take a spoon of the besan batter and pour on to the perforated Boondhi Ladle, holding it over the hot oil. The little drops of boondhi fall on to the oil by itself through the slotted ladle.
Boondhi in hot oil.
When the boondhi hits the oil, it will immediately hiss and get fried. As soon as this sound stops, gently ease out all the boondhis from the oil, drain and set aside.
Repeat and complete until all the besan batter is used up.
the same time keep a heavy bottomed vessel on the stove. Add the 2 cups of sugar and the 3/4 cup water. Give it a quick stir and keep it on medium on the stove.
Use a spatula and keep stirring and all the sugar is dissolved and the mix starts boiling.
Stir the sugar syrup now and then until it reaches “One Stick” consistency. This means when you take a little of the syrup in your index finger and lightly tap it on the thumb, it should pull to a single string.
This would vary depending on the size and thickness of the vessel you use for the syrup, LPG/Electric stove, and the kind of appliance, different kinds of sugar etc. I used C&H White Sugar from the store.
Switch off the heat. Add 1 tbsp of ghee, cashews, raisins, edible camphor, cloves and food color if required.
Now add the fried boondhi and mix all these well in to the sugar mixture.
Allow to rest for 30 mins.
Take a large ladle of this mixture and gently pulse grind this in a mixie jar and add this back to the boondhi mixture. This helps with the binding.
Now spoon a ladle on to your hands and gently shape in to a ball. I use a little milk to wet my hands before I mould them in to firm ladoos.
This quantity of besan yielded around 25 medium sized ladoos.
Soft and succulent Boondhi Ladoos.
HINTS:
Try out the boondhi ladle with the batter to see how the batter falls. You can keep the boondhi ladle on the mixed besan batter itself to see results. Then adjust the consistency of the batter.
Do not allow the boondhis to fry for too long as this would make them too crisp. I did this once and I had to be satisfied to eat plain sugared boondhis as I could not bring them to have any cohesiveness to make balls!!
The sugar syrup has to be a syrup consistency, which is slightly thicker than water. Making it too thick would mean , difficult times ahead. Simply add a little more warm water and thin out the consistency as required.
Do not add too much of cloves or edible camphor as this would spoil the taste and aroma of the ladoos.
Ladoo is not a difficult sweet to make, if you follow these simple hints. Try them out at least once before the festival, to note down the timings and results in your kitchens.
Sending these soft and sweet ladoos to WYF – Festive Treats Event happening at SimpleIndianFood.
Pudina has been an ingredient that was never used in my mom`s family. On the other hand, this was one herb that was one of my favourites. When I started cooking on my own, I sought ways and means to cook with this wonderful herb. Since I had a chance to work with people from multiple cultural backgrounds, I learnt this recipe from my colleague`s wife who was an excellent cook. They had Idlis for breakfast every single day, but the accompaniments in the form of thogayals and chutneys were so many. I guess this would kind of make up for the monotony of idlis every morning!!!
INGREDIENTS:
20-25 leaves of Pudina.
1 Medium Onion.
1/4 cup of Grated Coconut .
1 spoon of Urad Dhal.
1 inch tamarind piece.
3-4 Tbsp of Light Coconut Milk.
Salt
PREPARATION:
Keep the pudina cleaned and dry.
Take a kadai and put 2 spoons of oil. When hot, roast urad dhal and red chillies until the dal browns. Put in the mixer.
In the remaining oil, add the sliced onions and saute well.
When the onions turn pinkish brown, add grated coconut and the tamarind and saute for a few more minutes.
Add the pudina leaves and switch off the stove. The heat in the vessel is enough to lightly saute the pudina leaves.
Getting roasted.
After they cool off, add these also to the mixer and blend with a little bit of light coconut milk and the requisite salt . The coconut milk is only for added richness and is completely optional.
Grind to a smooth paste and serve with hot Idlis orMasala Dosai.
The Green Blog Project had set me thinking on my own little contribution to taking this world, in to little baby steps towards a greener tomorrow and a pesticide free tomorrow. I had planted little methi seeds in my own little patio garden in my apartment and I got lovely green tender methi leaves. I had been wanting to use those tiny leaves and this was my chance. I had some leftover rice from dinner and I decided to make Alu Methi Pulav as an express preparation for my husband`s lunch for the morrow.
All the ingredients would ber definitely available in your pantry at all times. The only two spices that are a must are Star Anise and ShahiJeera or Somph. These cant be substituted as they constitute the base flavour for the whole pulav, of course apart from the methi.
INGREDIENTS:
1 medium onion sliced long.
2 Potatoes chopped to fine pieces.
3-4 Star Anise.
Small piece of Cinnamon.
2 cloves.
1 tsp of Shahi Jeera or Somph.
1 Bay Leaf.
Turmeric
1/2 spoon Red Chilli Powder.
Garam Masala to taste.
Freshly chopped Methi seeds or 1 Tbsp of Kasuri Methi.
4-5 Cashews sliced in to halves.
Salt to taste.
Ghee for garnish.
PREPARATION:
Pop the chopped pieces of potatoes in to the microwave after sprinkling a little salt on them. Cook for 3 mins on HIGH. Set aside.
Take a wok or kadai and add 2 spoons of oil. Add the Star anise, shahijeera, cloves, cinnamon and cashew and allow to saute for a couple of seconds. The jeera and the anise give out a very delectable aroma.
Now add the chopped onions and saute for a few minutes until the onions turn a little pinkish brown.
Now add the semi cooked potatoes, turmeric, red chilli powder, salt, garam masala and stir it all in quickly.
Allow a few more minutes for the spices to sink in to the potatoes.
Now add the chopped fresh methi/ kasuri methi and stir in well.
After a few more minutes, add some chopped cilantro and mix well.
Now add the cooked rice , more salt as required and gently mix it taking care not to break the rice particles.
Finish off by dolloping a spoon of ghee.
Serve HOT with raitha. Excellent option for LUNCH along with Raitha or just plain curd.
Every morning when its time to decide the day`s menu, I promise you I really get stumped. It`s the same story everyday….I decide on Vazhakkai Podimasand then to my dismay realise that I am out of Dhania for the spice powder. Then I think why not Pavakkai Pitlae, but the pavakkai is in a very pitiful state. Dunked in to the trash can. Then again…Adai? no way I got to soak for at least 3-4 hours….Back again to the open fridge….Capsicum Pulav? Well….capsicum yes, but not enough curd or sour cream for a good serving of raita…and me cannot have pulav without raitha…Blah….how much more can one dwell on a simple culinary decision?
Today the only thing I had loads of was fresh ginger preserved in a paper towel Ginger!!! Aha…suddenly dawned on me Bharathi`s Inji Kuzhambu…The only thing that bothered me was I had to throw in some thing in the gravy. I never prefer plain sambars with no vathals or vadagams or veggies!!! I could not pair even a single veggie in the fridge with this one, so I decided to modify it to a Sutta Appalam Inji Kuzhambu redolent with its flavours and aromas. So here we go…
INGREDIENTS:
2 Appalams fire roasted and broken in to big pieces.
2 Tbsp roughly chopped Ginger.
1 Tbsp finely chopped Ginger.
Salt
Hing
Turmeric Powder.
1 1/2 cups of tamarind water extract.
Curry Leaves.
Roast in Oil Individually:
2 1/2 tsp Dhania.
1/2 Tsp Methi Seeds.
2 Tsp Toor Dhal.
7-8 Red Chillies. (Kindly alter the red chillies according to personal taste).
The 2 Tbsp of roughly chopped Ginger pieces.
Tempering:
Mustard, Curry leaves, Gingely Oil.
PREPARATION:
As already mentioned take any appalam of your choice and slowly roast it over direct fire. If you have leftover Vadams or Vethals you can use those too. Fire roasted appalams are a personal favourite of mine. Break in to slighly bigger pieces and set aside.
Roast in gingely oil all the specified ingredients and pop them in to a mixer. Grind to a smooth paste with water. Keep aside.
In a kadai, add 2 spoons of gingely oil and when hot add mustard, curry leaves, ginger and saute for a few seconds.
Add immediately the tamarind water, ground paste, salt, hing and turmeric powder.
Now add the broken pieces of appalam also to the gravy.
Let them all simmer on a medium low flame for about 25 minutes or so.
You will see that the oil seperates fromt the gravy and all the raw smell is gone.
Switch off the stove and garnish with chopped corriander.
In my opinion, any of the varieties of tamarind based gravies, always taste better after a day or two later. By afternoon, the kuzhambu was smelling so awesome with the flavours and spices soaking up really well.
There are so many different varieties of red chillies and ginger, so re-adjust the quantity of both depending on personal preference. The end result does not reek of the ginger flavour. It`s just a mild after-thought flavour.
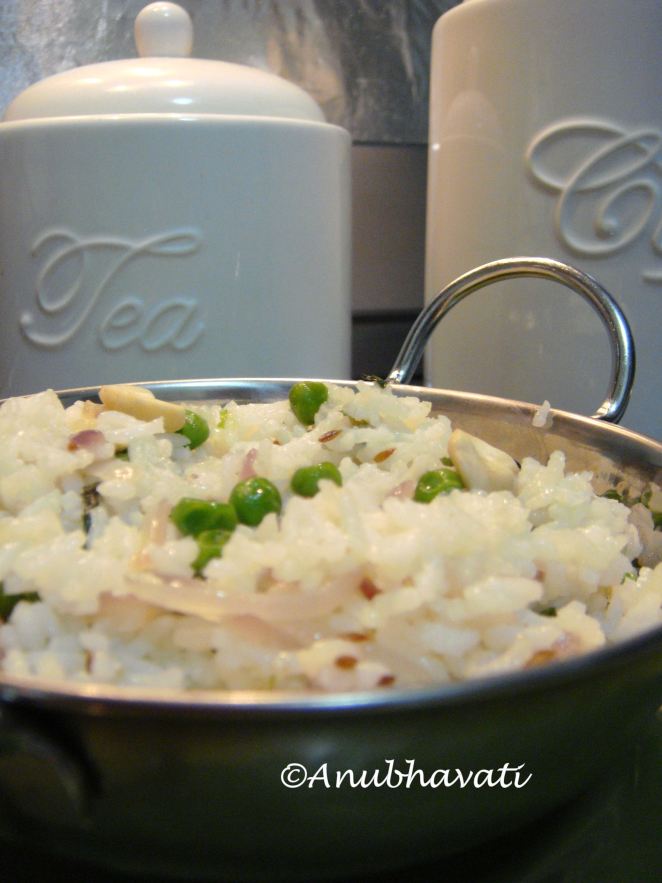
Planning lunches for my husband everyday is a task in itself. Although he is very non fussy, it becomes important to fix a lunch with servings of vegetables, protein, fruits etc, which needs to be easily prepared and filling, nutritious and tasty, interesting and non repetitive. This basic Pulav can be made even with left over rice, as long as its not cooked too mushy. Many times, when I have a lot of leftover rice from the morning, or basmati rice which is too much for a single serving, I put away a little in an air tight container to make my quick fix pulav with whatever vegetables I have in the pantry. The best thing about this is that, depending on the veggies, the taste of the pulav also varies, so It almost makes you feel its a different delicacy.
This morning, I had frozen peas, and some onions so this is what I used to make this rice dish.
INGREDIENTS:
1 cup cooked Basmati Rice.
Frozen Peas.
1/2 of a Red Onion or one regular sized onion sliced long.
6-7 mint leaves chopped.
Chopped cilantro.
A pinch of ground cinnamon clove powder.
Seasoning:
Jeera/Shahjeera, Bay Leaf, Cashews, Star Anise.
PREPARATION:
If preparing rice for the pulav, cook the rice with a spoon of coconut milk and a bay leaf.
Take a kadai and add 2 spoons of ghee in it. Add a bay leaf, star anise and shah jeera/ jeera and then the cashew.
In a couple of seconds add the cinnamon-clove powder and the sliced onions.
Saute them till the onions begin to sweat. Add the peas and salt and saute again.
Now add the chopped cilantro and the chopped mint leaves and mix well.
After a few more minutes switch off the gas and add the cooked rice and salt.
Mix well until the ghee/oil is coated on the rice.
Serve with Aloo Dum , Paneer Butter Masala or Cucumber Raitha.
HINT:
Substitute the same recipe to include cauliflower and peas, capsicum and carrots, carrot and peas, beans, carrots and peas etc.
You can add a pinch of garam masala but the cinnamon clove powder, and the chopped mint provide the aroma and flavour that`s needed.
In case the side is just raitha, you can add more garam masala. When the side is a heavy masala gravy like Aloo Dum etc, keep the rice simple.
For a wholesome lunch box, pack with a side of grapes/strawberries and a kosumbhari salad.
Sesame seeds have been one of the most commonly available ingredient in our pantry. It has been a very deglamourised spice in my home. Since I assosciate the spice with one served in the “Shradham” offerings, I never had much of an interest in it anyway. The ICC gave me an opportunity to relook at this sweet with a whole new angle. I have to thanks Srivalli for the same. I had never known it would be offered as Neivedhyam for Vinayaka Chathurthi. I also looked up the health benefits and found that it is a rich source of copper, manganese and calcium.
Since the sesame seeds are high in oil content its important to store them properly else they turn rancid . This is the reason why sesame seeds are sold in small quantities. One has to make sure that there is no water content at the time of purchase. Once the cover has been opened for use, its is better to store in an air tight container inside the refrigerator.
This has been the easiest of the sweets to be prepared for Neivedhyam to Vinayaka. Here is the simple illustration.
INGREDIENTS:
100 gms of Black Sesame Seeds.
3 Tbsp of Grated jaggery.
PREPARATION:
Take a dry kadai and roast the sesame seeds until you get the aroma of the sesame. They will also start to crackle.
Set aside to cool.
Grate 3 tbsp of jaggery and keep aside.
In a mixer add the dry roasted sesame and the grated jaggery and give it a quick spin.
The resulting aroma is very pleasant and sweet.
Transfer contents to a plate and make little balls with your hands. The oil emanated from the sesame and the slight warmth itself assists in the shaping of the balls.
Offer to Lord Ganesha and enjoy delicious Ellu Urundai.
Eggplants have always been my husband`s favourite vegetable. He loves it in any form. I know a lot of people who are allergic to eggplants because of the seeds in it.In addition to featuring a host of vitamins and minerals, eggplant also contains important phytonutrients, many which have antioxidant activity. Phytonutrients contained in eggplant include phenolic compounds, such caffeic and chlorogenic acid, and flavonoids, such as nasunin. Nasunin is believed to protect cell membranes from damage. Its also rich in dietary fibre and known to also promote cardio vascular health.
How to Select and Store: (Courtesy – Whole Foods)
Choose eggplants that are firm and heavy for their size. Their skin should be smooth and shiny, and their color, whether it be purple, white or green, should be vivid. They should be free of discoloration, scars, and bruises, which usually indicate that the flesh beneath has become damaged and possibly decayed.The stem and cap, on either end of the eggplant, should be bright green in color. As you would with other fruits and vegetables, avoid purchasing eggplant that has been waxed.
Place uncut and unwashed eggplant in a plastic bag and store in the refrigerator crisper where it will keep for a few days. If it is too large for the crisper, do not try to force it in; this will damage the skin and cause the eggplant to spoil and decay. Instead, place it on a shelf within the refrigerator.If you purchase eggplant that is wrapped in plastic film, remove it as soon as possible since it will inhibit the eggplant from breathing and degrade its freshness.
I always prefer cooking with the Japanese Eggplant as its very soft, has minimal seeds and cooks extremely fast. I use the Indian Eggplant only when I would reequire to make stuffed brinjals etc.
This time around my husband wanted Yennai Kathirikkai Kara Kuzhambu and so I was inspired completely by Viji`s method and have made a few changes to her version to incorporate a few of my inputs. There is no grinding of masalas or spices and once you put it on the stove to simmer, you can forget about it. The resulting gravy was tangy, spicy and completely out of the world taste. Since it combines the stuffing of the brinjals with spice powders and then simmering it in the tamarind gravy, the combination of best practises was heavenly.
INGREDIENTS:
5 Baby Brinjals.
1 large organic sour tomato or 2 medium sized tomatoes.
Curry Powder to stuff the brinjals.( I once used store bought Puliyodharai Powder/Vangibath Powder etc)
2 tsp Sambar Powder.
1/2 tsp Red Chilli Powder.
Tamarind Juice extracted from a gooseberry sized tamarind.
Wash and clean the brinjals and dry them with a paper towel. Slit them three times across with a knife keeping the calyx intact. Take a few drops of coconut oil and slide it in to the slit brinjals.
Brinjals slit and filled with drops of oil and salt.
Now sprinkle some salt from a salt shaker and place it in the microwave for 3 min on HIGH.
The brinjals come out a little cooked with the salt sticking to their sides. Keep aside for a few minutes to cool.
Brinjals with salt, curry powder filling.
Meanwhile slit the side of a tomato with a cross and pop it in boiling water for 5-6 minutes.
Remove from water and when slightly cool, puree it in the mixer. Keep aside.
Combine the tomato puree and the tamarind water.
Now slowly fill in the vangibath powder/curry powder/puliyodharai powder into the moist brinjals and set aside. Since there is some oil inside, the powder would stick to the sides.
Take a kadai, add 2-3 spoons of gingely oil and when hot, add mustard, urad dhal, curry leaves, hing and slowly the stuffed brinjals.
The stuffed brinjals will slowly get shallow fried in the oil in the kadai. Turn them around every few minutes to make sure that they are cooked on all sides.
Now add the tamarind tomato water and bring the flame to medium low.
Add salt, hing, turmeric, sambar powder, red chilli powder and some torn curry leaves.
Keep the flame on medium low and allow to simmer for some time until the raw smell is gone.
When the oil starts to separate, switch off the stove and garnish with chopped cilantro leaves.
Sometimes its a nice feeling to flip back a few pages in your own handwritten journal, to watch wedding DVD`s of a few years before, take out an old album, look at your family where all of them are a few years younger, smile at a lovely moment caught frozen for a lifetime….I always love doing that….Going over and over a past memory, a card, an old crumpled letter, again and again. Today I was doing just that with my own little creation – my website…and I suddenly realised that I was on my 149`th post. This award from Indu of Kaipakkuvam took me way over the clouds….and with what perfect timing???
Incidentally, this afternoon, I was looking for authentic Kerala Recipes and stumbled on Ginger and Mango`s blogsite which had an interesting link – The Green Blog Project.
The aim of this project is to cook up something as the main ingredient, right from our garden without those harmful pesticides and fertilizers. It could be anything small, a creeper, a herb, a root, etc. The aim is to try growing at least one vegetable for summer and another one for winter and keep on trying a new vegetable every season, so it will be really interesting. Many of us are limited on space because of living in apartments and in cold places. But I guess, a little help here, a little trial there would really help in making this planet more greener, less pesticide dependant, and our foods more wholesome. My suggestion is to start with little herbs, basil, mint, methi etc and gradually start on tomatoes, okra etc.
A Sweet Pea Creeper in my patio garden!!!
My aunt has a little garden at her home , and she has the tallest curry leaf plant you ever saw…almost as tall as a human! She started out with mint, tomatoes, jasmine, roses, hibiscus, and hey even the banana tree. All summer she gets basket full of fragrant jasmine. She never buys curry leaves from Florida doling out 1.99 for a pound, and every festival she goes in to the yard and cuts banana leaves for them to have their special feast. In fact many days, when she hosts little gatherings for chanting shlokas etc, she distributes “Neivedyam” on little banana leaves. The leaves dry out when they stay on the plant for too long. So she cuts them in to little squares and uses them for serving food. I guess its a small way, but a very commendable way of a greener planet. There is absolutely no plastic, no paper, no recycling.
Curry Leaves Plant in my aunt`s home.
Another blogger friend Mriganayani has just harvested her first home grown tomatoes.
Jay & Bee are my all time favourites on this front. They grow peas, strawberries, raspeberries, onions, okra, cherries, lavenders,roses and just about everything under the sun. I take my time to drool at those awesome pics clicked on the Mark 5D and the patience and devotion put in to their gardening passion!
A close friend of mine living in Phoenix, AZ has tomatoes, curry leaves, mint, cilantro, okra, jasmine, sweet peas, banana plant and even a tender Drumstick Tree. In summer, spring and winter, they get different vegetables and much of their cooking is self sufficient on the pesticide free veggies right out of their home garden.Imagine how tasty and fulfilling that must be??
A lovely Jasmine Shrub..
I realise I have not mentioned some thing, one has never waxed eloquent about before. Its just that, at this time and place, as I was inspired by GingerMango`s blog, and I felt, if I could reach out to even a handful of people through my blogsite, I have achieved my goal in to making this world a better place. Yes its an effort to buy out the pots, fill it with soil, tender to the plants, move them inside during winter, and out again during summer, but the joy in reaping the benefits of one`s own labour can never be fulfilled with a couple of leaves stashed in a plastic ziploc cover out of a refrigerator!!!