Naivedhyams/ Festival Offerings. · No Need of Onions!!! · Snacks & Tiffin Items

Mini Kozhukattai – Ammini Kozhukattai (Steamed mini rice balls spiced with seasonings).


IMG_4505

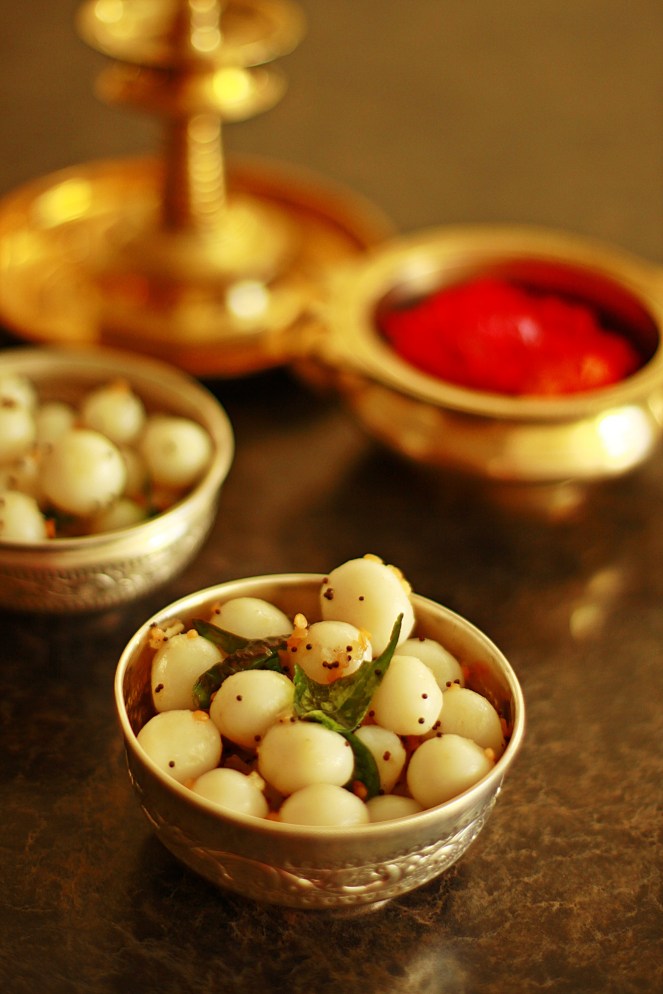
Ammini Kozhukattais – I have no clue about the origin of that name and how we came about calling that delicacy that. I know that whenever we set out to make Uppu Kozhukattais and Vella Kozhukattais, we would normally have the outer dough leftover and so amma would always make these mini delicacies!!! In my heart, I am guessing she would purposely have more of the outer dough so we could make this !!! We have this scooped up in a little container, and eat them just like that. Many times I also love to have it as a side for curd rice along with pickle. The preparation is hardly more than 2-3 steps so here goes.

INGREDIENTS:

Kozhukattai Outer Dough.(Please refer my earlier post)

Salt.

2 Green chillies cut in to small pieces.

Curry Leaves,.

Hing.

Mustard.

Broken Urad Dhal.

Oil to season.

PREPARATION:

  • The outer dough of Kozhukattais have negligible salt. So take the dough and add sufficient powder salt and mix it in by kneading well. If you feel the dough is a little dry, add a few drops of coconut oil to your hands.
  • Make a smooth ball.
  • Greasing your hands, shape it in to smaller balls, say, the size of naphthalene balls and keep covered in a bowl.
Balls rolled ready for steaming.
  • Complete the dough by making small balls and arrange on greased idli plates.
  • Steam them in the pressure cooker without weight for 10 minutes on high. As they have already been cooked once, it will cook in steam pretty fast.
  • Once the cooker is switched off, wait for a few minutes and collect all the balls on the serving bowl.
  • In a seasoning kadai, add 2 spoons of oil. When hot, add broken urad dhal, mustard, green chillies, hing and curry leaves.
  • Drop over the kozhukattais and mix well.
  • Delicious Mini/Ammini Kozhakattais are ready to be served.

Serving Suggestions & Hints:

  • It`s a great dish to make along with your kids, as they love to roll the dough in to small balls.
  • Since it does not need a filling, there is no hard and fast rule on the shape.
  • Easy to make with rice flour and hence a very healthy fast preparation.
  • Cooked twice so its healthy for the toddlers as well as for older people.
  • These kozhukattais are best eaten plain all by themselves.
  • Another option is to soak it in steaming hot rasam and serve them as Rasam Balls or with Molagapodi and Gingely Oil.
  • YUM anyway!!!

Sending cups of steaming hot Kozhakattais to Shruthi`s Steamed Treats Event at her blogsite.


Naivedhyams/ Festival Offerings.

Kozhukattai Outer Dough for Preparation of Modhakas.

My little Silver Ganesha with a cocktail umbrella.

Every year Vinayaka Chathurthi is celebrated all over the world as the day on which Lord Ganesha, the son of Lord Shiva and Goddess Parvathi bestows his presence on this earth. Vinayaka Chathurthi in my home essentially marks the beginning of good times and of course all other festivals. In Madras, the entire shopping streets are filled with colourful umbrellas and lovely colourful statues of Ganeshas in all sizes and colours. Many people also prefer to buy the plain Ganeshas made of clay and decorate it with flower garlands. Amma and me used to go to PondyBazzar and she would let us choose the idol and the accompanying umbrella to go with it. One time I had a foldable umbrella that I had got during the chathurthi celebrations and refused to part with it for months!!! We would also get as assortment of fruits like wood apple, jamun fruit, apples etc and the signature pooja element which was a lovely green banana leaf, filled with “Arugampullu” and pink flowers. Laden with all this, we would come home excited to set up the mandal for the Lord.

Amma would have already cleaned and decorated the spot with lovely “maakolams“. Maakolam is different from the regular kolams that we use everyday outside out homes. Its simply rice soaked and ground to a fine paste and used to decorate the floors during weddings and festive seasons. The Kolam would be dry and Madurai amma would first place a wooden platform and cover it with silk. She would then gingerly place the Lord on the platform, decorate his neck with little garlands made of flowers and then place a dhoti around him. We would then finally position the colorful umbrella and the stage would be resplendent with his form. The naivedhyam would be Vella KozhakattaisUppu Kozhakattais and of course Ammini Kozhakattais. The fruits would be offered to him and Madurai amma would then start the pooja.

In the evenings, we would some times watch the procession of the Ganesha moving towards the beach. Many times, we would visit the nearby temples and get his blessings. Last year I made my own umbrella for the Lord, using sticks and colorful yarn. I also decorated my little silver Ganesha, in my pooja room with a cocktail umbrella!!!

There are essentially two ways of making the dough…One is by soaking the rice and grinding it, which is pretty elaborate but very tasty, and the other is using rice flour. I shall explain both the procedures below.

KOZHAKATTAI DOUGH BY SOAKING RICE:

1  cup  of raw rice.

A pinch of salt.

Coconut oil.

Water as required.

PREPARATION:

  • Soak the raw rice for 2-3 hours and grind in the mixer or grinder to a smooth batter. It does not matter how much water you use as it gets cooked in it finally.
  • Pour the batter in to a kadai. Make sure that there are no clots and add 1/2 -3/4 spoon of salt and a spoon of coconut oil.
  • Switch on the stove setting it on medium low  and keep stirring to avoid clots.
  • After a few minutes, you will find that the water content is rapidly used up to cook the rice batter, and it slowly thickens.
  • After a few more minutes, it will thicken and be cooked. The signs for that is you will find that when you stir, it comes together as a ball.
  • Also the whiteness of the raw rice will give way to a very slightly off white cooked rice ball.
  • Immediately transfer to a bowl and add a spoon of coconut oil.
  • With your hands, knead the ball inside the bowl by smoothing it and bring it together. This step is very integral as this is what binds the dough and takes away the stickiness.
  • This is a VERY IMPORTANT step and many people fail at this point not doing this. Please use gloves if needed and keep kneading the dough until you feel its a pliable dough that can be shaped easily with no dryness and no cracks.
  • At this point, the dough should be able to  seamlessly shape in to a ball.
  • Set aside in the bowl and cover with a lid.
Kozhakattai Outer Dough.

KOZHAKATTAI DOUGH USING RICE FLOUR:

1 cup Rice Flour.

2 cups of water.

A pinch  of salt.

2 -3 Tsp Coconut Oil.

Gloves if required to knead slightly hot/warm dough.

Bowl to knead the dough.

Ktchen Towel/ Damp Paper Towel.

PREPARATION:

  • Please measure all ingredients ahead and keep everything required close at hand.
  • In a kadai, pour the water, add coconut oil and salt and allow to boil.
  • On spotting the first boil, immediately, simmer the stove and add the measured 1 cup of rice flour in to the water.
  • Use a whisk and remove all the clots quickly. This step is very helpful to act quickly so you have no clots.
  • With a spatula, rapidly stir in the mixture as if will thicken using the water to cook the rice.
  • As before, keep stirring until you see that the water is all gone and the entire batter scoops up in your ladle as a single mass.
  • Stir for a few more minutes until you are satisfied and the batter does not stick. This would happen ONLY if the water is not used up so do not fret.
  • Transfer to a bowl, add 1-2 Tsp  of coconut oil and knead well to form a homogeneous ball.
  • This is a VERY IMPORTANT step and many people fail at this point not doing this. Please use gloves if needed and keep kneading the dough until you feel its a pliable dough that can be shaped easily with no dryness and no cracks. Add 1-2 Tsp oil if you require.
  • Keep this dough  covered  with a damp kitchen towel and cover  the bowl with a lid. This is required to keep the dough moist and not dry out.
  • Now you are ready with the outer dough to start making Sweet and Salty Kozhukattais.

Use this smooth outer dough to make delicious Vella Kozhukattai, Uppu Kozhukattai and Ammini Kozhukattais.

Milk Shakes

Coffilicious Cold Coffee – A must for all Coffee Lovers!!!

Cold Coffee
Cold Coffee

Coffee – The name itself conjures up the word “comfort”  and all thats nice …Love for coffee has been something that runs in my family. When I was in school, my mom had barred me from having coffee as the staple drink in the morning. When I was into  higher secondary,  I started on having coffee in the mornings. Maduraiamma would  scoop out coffee from the sole coffee canister and press it in to the coffee filter. Thereafter pour piping cups of water and drain out the precocious decoction and collect it in an air tight container vessel which would lock the flavour of the decoction until the next morning. Her coffee was something awesome, the kind that wakes u up and prepares you for the day ahead…. Thick decoction poured in to milk boiled on the stove to perfection with just the right amount of sugar in it. I have never felt the need to add more sugar or to alter the prepared taste of her coffee.

My husband is also a coffee lover and had been wanting to have cold coffee as he was on liquid diet because of teeth extraction. I used to love cold coffee from Geetha Cafe, in T.Nagar. They have a way of making it so deliciously coffeeish with the right amount of ice cream and milk and sugar. They serve in their tall glasses with a lot of cream on top!!!

INGREDIENTS:

3 scoops of Trader Joe`s Coffee  Ice Cream (Vanilla Ice Cream should do too).

1/8 cup of Coffee Decoction from percolator.

1 spoon of Sugar.

1/2 cup of milk.

Low fat Cream for topping. (Optional).

1/3 spoon of Arabica Instant Coffee Powder for topping.(Optional).

Cold Coffee1

PREPARATION:

  • In a blender add the 3 scoops of Ice Cream, Decoction, sugar and half of the milk.
  • Give it a quick pulse and also make sure that the contents of the blender do not splash out.
  • This is the reason we are not adding all the milk upfront.
  • When the contents are well whisked, add the remaining milk and give it a quick pulse.
  • Pour in to a serving glass and top with whipped cream and sprinkle coffee powder.
  • Serve CHILLED.

HINT:

If you are using the plain Vanilla Ice Cream then you would need to increase the Coffee Decoction to be added or in turn, add a spoon of Instant Coffee Powder, to the blender,  for that coffee flavour.

Uncategorized

The First time ever….

Last week was the first time ever that I actually tried my hand (literally) at the art of mehndi decoration!!!!  Henna has been used from the olden days as a natural coolant for the body. It stimulates blood circulation and its also used in the hair for conditioning the scalp and to restore body, bounce and colour. There was a reason why this was a  custom in our country.Mehndi/henna has always been something I loved since when I was a little girl. I remember we had this lovely Henna tree , growing with slender branches in my aunt`s home in Chennai. In the summer, we would patiently pick out all the leaves that were tender and fresh, and the maid would grind it for us, in the stone mill, and collect it in to a little ball and hand it over to Amma. Amma would wait for all of us to have dinner, finish the day`s household chores, ask us to change to dark clothes, so we would`nt stain our dresses with the dye in the henna.

All of us cousins would be extremely excited that it was going to be mehndi night. That meant that we were all going to sleep together in the living room, under the gentle breeze from the fan, stretched out lazily on straw mats. We could chat all night about the whole school year, about our friends, annual day functions, studies, excursions, music lessons, card games,latest books read,  anything and everything under the sun that had been kept untold throught the whole school year. Those were of course the days before the cell phones, e-mails and extreme telecom fixation. Cousins would take time off to write to each other and tell each other about their small and interesting lives…Mums would be happy and encourage the kids….It was a slower life, much more enjoyable, with hardly any time for TV or Nintendo…..And yes, those were the best days of my life….

My first Mehndi Application.

DSC02270

These days as I watch the precision and creativity that has crept in to this beautiful art of mehndi application, there has always been a side of me that wanted to try it out. On my recent Chicago trip, I found a good brand of Mehndi at Patel`s and set about making my own little cone. I spliced a small Ziploc cover(1/2 Gallon) and split it in to two parts.  I rolled it in to a small cone, sealed it with cello tape and filled it with mehndi paste from the bigger cone. After removing all the air I gently sealed the edges with a thin rubber band. Splicing a teeny weeny hole in the end, my mini cone was ready for trial.  I opened my palm and allowed the lines to flow as they wished. With the right consistency of fresh paste and the right size of the aperture, the lines flowed, smooth and easy. It was far easier than holding an awkward store bought cone and trying to be creative. I was happy with the results, at least with my maiden attempt. I also attempted on my daughter S and she loved it!!! It`s more of a longing now, to try and be better, more creative, better lines, better clarity and overall a highly satisfactory feeling. I know I have a long long way to go, but just the smile on my daughter`s face as I tucked her in that night….and  my day was made!!!

My little one`s hand decorated with Mehndi.
Sambar / Rasam / Kuzhambu Varieties.

Quick N Easy Garlic Rasam – For those cold rainy days!!!

Garlic Rasam
Garlic Rasam

Garlic Rasam was not something that we would make at home a lot…In fact Maduraiamma would never ever have garlic. Over the years Amma used to make her version of this Rasam and my sister D would love it. I make two versions of this Rasam – One with Toor Dhal and the other without. Although not even adding Toor Dhal would rob the Rasam essentially of the protien, on those lazy days when you want to finish cooking as soon as possible and curl up to have it watching a nice movie or read an absorbing book….I make the quick version of it!!!

INGREDIENTS:

2 cups of Tamarind Water Extract.

1 tomato

5 Garlic Pods

Salt

Turmeric

1 Spoon Rasam Powder.

Seasoning:

Mustard Seeds, Jeera, Hing, Curry Leaves, 3 Red Chillies, and 1 spoon of Ghee.

PREPARATION:

  • In a mixer jar, add a tomato, 2 pods of garlic  and some tamarind water and give it a quick pulse. Pour this in to the vessel with the tamarind water and place on the stove on medium low.
  • Add salt, turmeric, rasam powder,hing and curry leaves to the tamarind water.
  • In a small frying pan add a spoon of ghee and when its hot, add jeera, mustard, 3 mashed garlic pods, 3 red chillies, and curry leaves and add this to the tamarind water.
  • Allow this to boil for 20 minutes or until the raw smell is gone.
  • Switch off and garnish with chopped corriander and curry leaves.
  • Enjoy Hot Garlic Rasam with Alu Fry or Carrot Subji.
Kid Friendly Recipes.

Jackfruit – Sweet and fragrant dripping with honey!!!

Ripe Jackfruit.
Ripe Jackfruit.

Jackfruit has been a fruit that I have always loved since my childhood. Whenever Amma used to take us shopping in T.Nagar, and I would get the aroma of ripe jackfruits, neatly arranged on plantian leaves, covered with wire mesh, I would beseech her to buy it for me. Amma used to tell me stories of her childhood, when Maduraiamma would get an entire jackfruit for Vishu. It used to be an elaborate procedure to oil your palms and patiently take out the ripe fleshy parts encased so delicately between rows and rows of fibers. But the labor would be well worth the wait just to take a bite of the succulent fruits.

Jackfruit is definitely high in sugar and carbs but eating it once a while is definitely not a problem. It`s said to be rich in potassium and lowering blood pressure levels. It`s also believed to cure ulcers and rich in anti-oxidants. The seeds of the jackfruit is also edible and used in many preparations .  I had been craving for this fruit for a long long time and when I saw this fruit stocked in Patel`s in Chicago, I had to have it. I enjoyed its sweetness and aroma everyday over the last week. almost felt I was in Madras !!!!

Side Dishes for Rotis/Dosas/ Naan.

Sumptous Masala Cabbage Subzi.

Masala Cabbage Curry

One of the most misunderstood vegetables over the years  has been the Cabbage. It almost sends kids scurrying away from the dinig tables, as many children do not particularly find the smell of cooked cabbage palatable or even bearable.Cabbage is a sturdy, strong and abundant vegetable. Hardy and easy to grow, it is almost universally available in all countries and cultures. Cabbage belongs to the all important family of cruciferous vegetables. The members of this family of vegetables are so named for their cross shaped (crucifer) flower petals. Rich in nutrition and fiber, cabbage is an absolutely phenomenal source of Vitamin C. Even more impressive is that cabbage is famous for a specialized, naturally occurring, nitrogenous compound known as indoles. Current research indicates that indoles can lower the risk of various forms of cancer.

I always cook cabbage in south indian preparations like Cabbage Molagootal, Cabbage Kootu and easy Cabbage poriyal. But employing this in a subzi as a side for rotis was something that Ive always liked. This one is very tasty and delicious and completly negates the unacceptable aroma of cabbage cooking. Try it and your family would be hooked. In fact, they wouldn`t even guess that cabbage is the main ingredient.

INGREDIENTS:

1/2 a  cabbage sliced long and thin.
1 Potatoe sliced long.
2 carrots sliced long.
1 big tomato chopped in to small pieces.
A handful of peas
1 onion sliced in to thin crescents.

1 – 1 1/2 spoons of Corriander Powder.

Pinch of Garam Masala Powder.

Salt to taste.

Seasoning:

Oil

Jeera

1 tsp Ginger Garlic Paste (I make this fresh).

PREPARATION:

  • You can pre-cook the potatoes, carrots and cabbage in the microwave for 3 minutes so it saves time on the stove. Keep aside.
  • In a kadai, add 2-3 spoons of oil and for seasoning, the jeera, ginger garlic paste and allow a couple of minutes for the seasonings to saute in the oil.
  • Now add the onions and allow to saute till they are cooked.
  • Add Potatoes , Peas, carrots and cabbage to the kadai and mix in well.
  • Sprinkle enough salt, turmeric,garam masala  and the corriander powder and incorporate the flavours together.
  • After 5-6 minutes, make a small hole in the middle of the kadai and add the finely chopped tomato.
  • I guess this is done as the tomatoes do not make the subzi mushy but use the heat of the vegetables around it to slowly cook and add flavour.
  • Cover the kadai and cook on a medium low flame until the vegetables are done about 80%.
  • Cooking the vegetables completely makes the dish mushy but we need them be seperate and a little crunchy.
  • Garnish with chopped corriander and serve Hot with Parathas or rotis.
Brisk Breakfast · Kid Friendly Recipes.

“Cool” Eats for Kids – Honeydew Cantaloupe Scoopables.

Fruit Scoopables.
Fruit Scoopables.

The best thing about summers when I was a little girl was the fact that I had unlimited supply of books to read, time to play, helping amma in the kitchen, shopping walks now and then, cutting veggies, and most importantly, mmy favourite cousins would visit us for 2 whole months!!! Reading in my opinion is the best way to spend lazy summer vacation afternoons….Summers also remind me of juicy Banganapalli Mangoes, fragrant in their aroma from miles away and of course the water fruits like watermelons and the tender cucumbers. The footpaths would be lined with mounds of green watermelons stacked one on top of the other. We would buy a big one, get it home, and make little crescents for all of us to eat. At the end of it, we would be so messy with the watermelon juice and seeds, that amma would send us right in to wash up and have a bath!!!

This summer, my daughter S was also excited to see watermelons and honeydew and cantaloupes. She loves to help me in the kitchen so I got this little Melon Scooper from Walmart which is a really creative way of scooping out little rounds of fruit. We both do that  and pop them in to a large glass bowl, covered with cling film , ready to be served chilled.

We scoop out entire fruits which are firm like  apples and bananas and refrigerate them so you have little cups of mixed fruit ready for your little ones when they come home from school or from a tiring evening at the park.

  • Kids love the variety of the shape and the infusion of colour which makes this a healthy and interesting snack.
  • Add a scoop of ice cream for a lovely after dinner dessert!!
  • Add custard to have a whole new taste. Pop a few in your morning cup of cereal for your fruit serving for the day.
  • Use as a topping over oats.
  • Pack a boxfull for an easy  travel snack.

The simplicity of the shape renders them easy for kids/toddlers  to scoop and eat!!!