Naivedhyams/ Festival Offerings. · Snacks & Tiffin Items

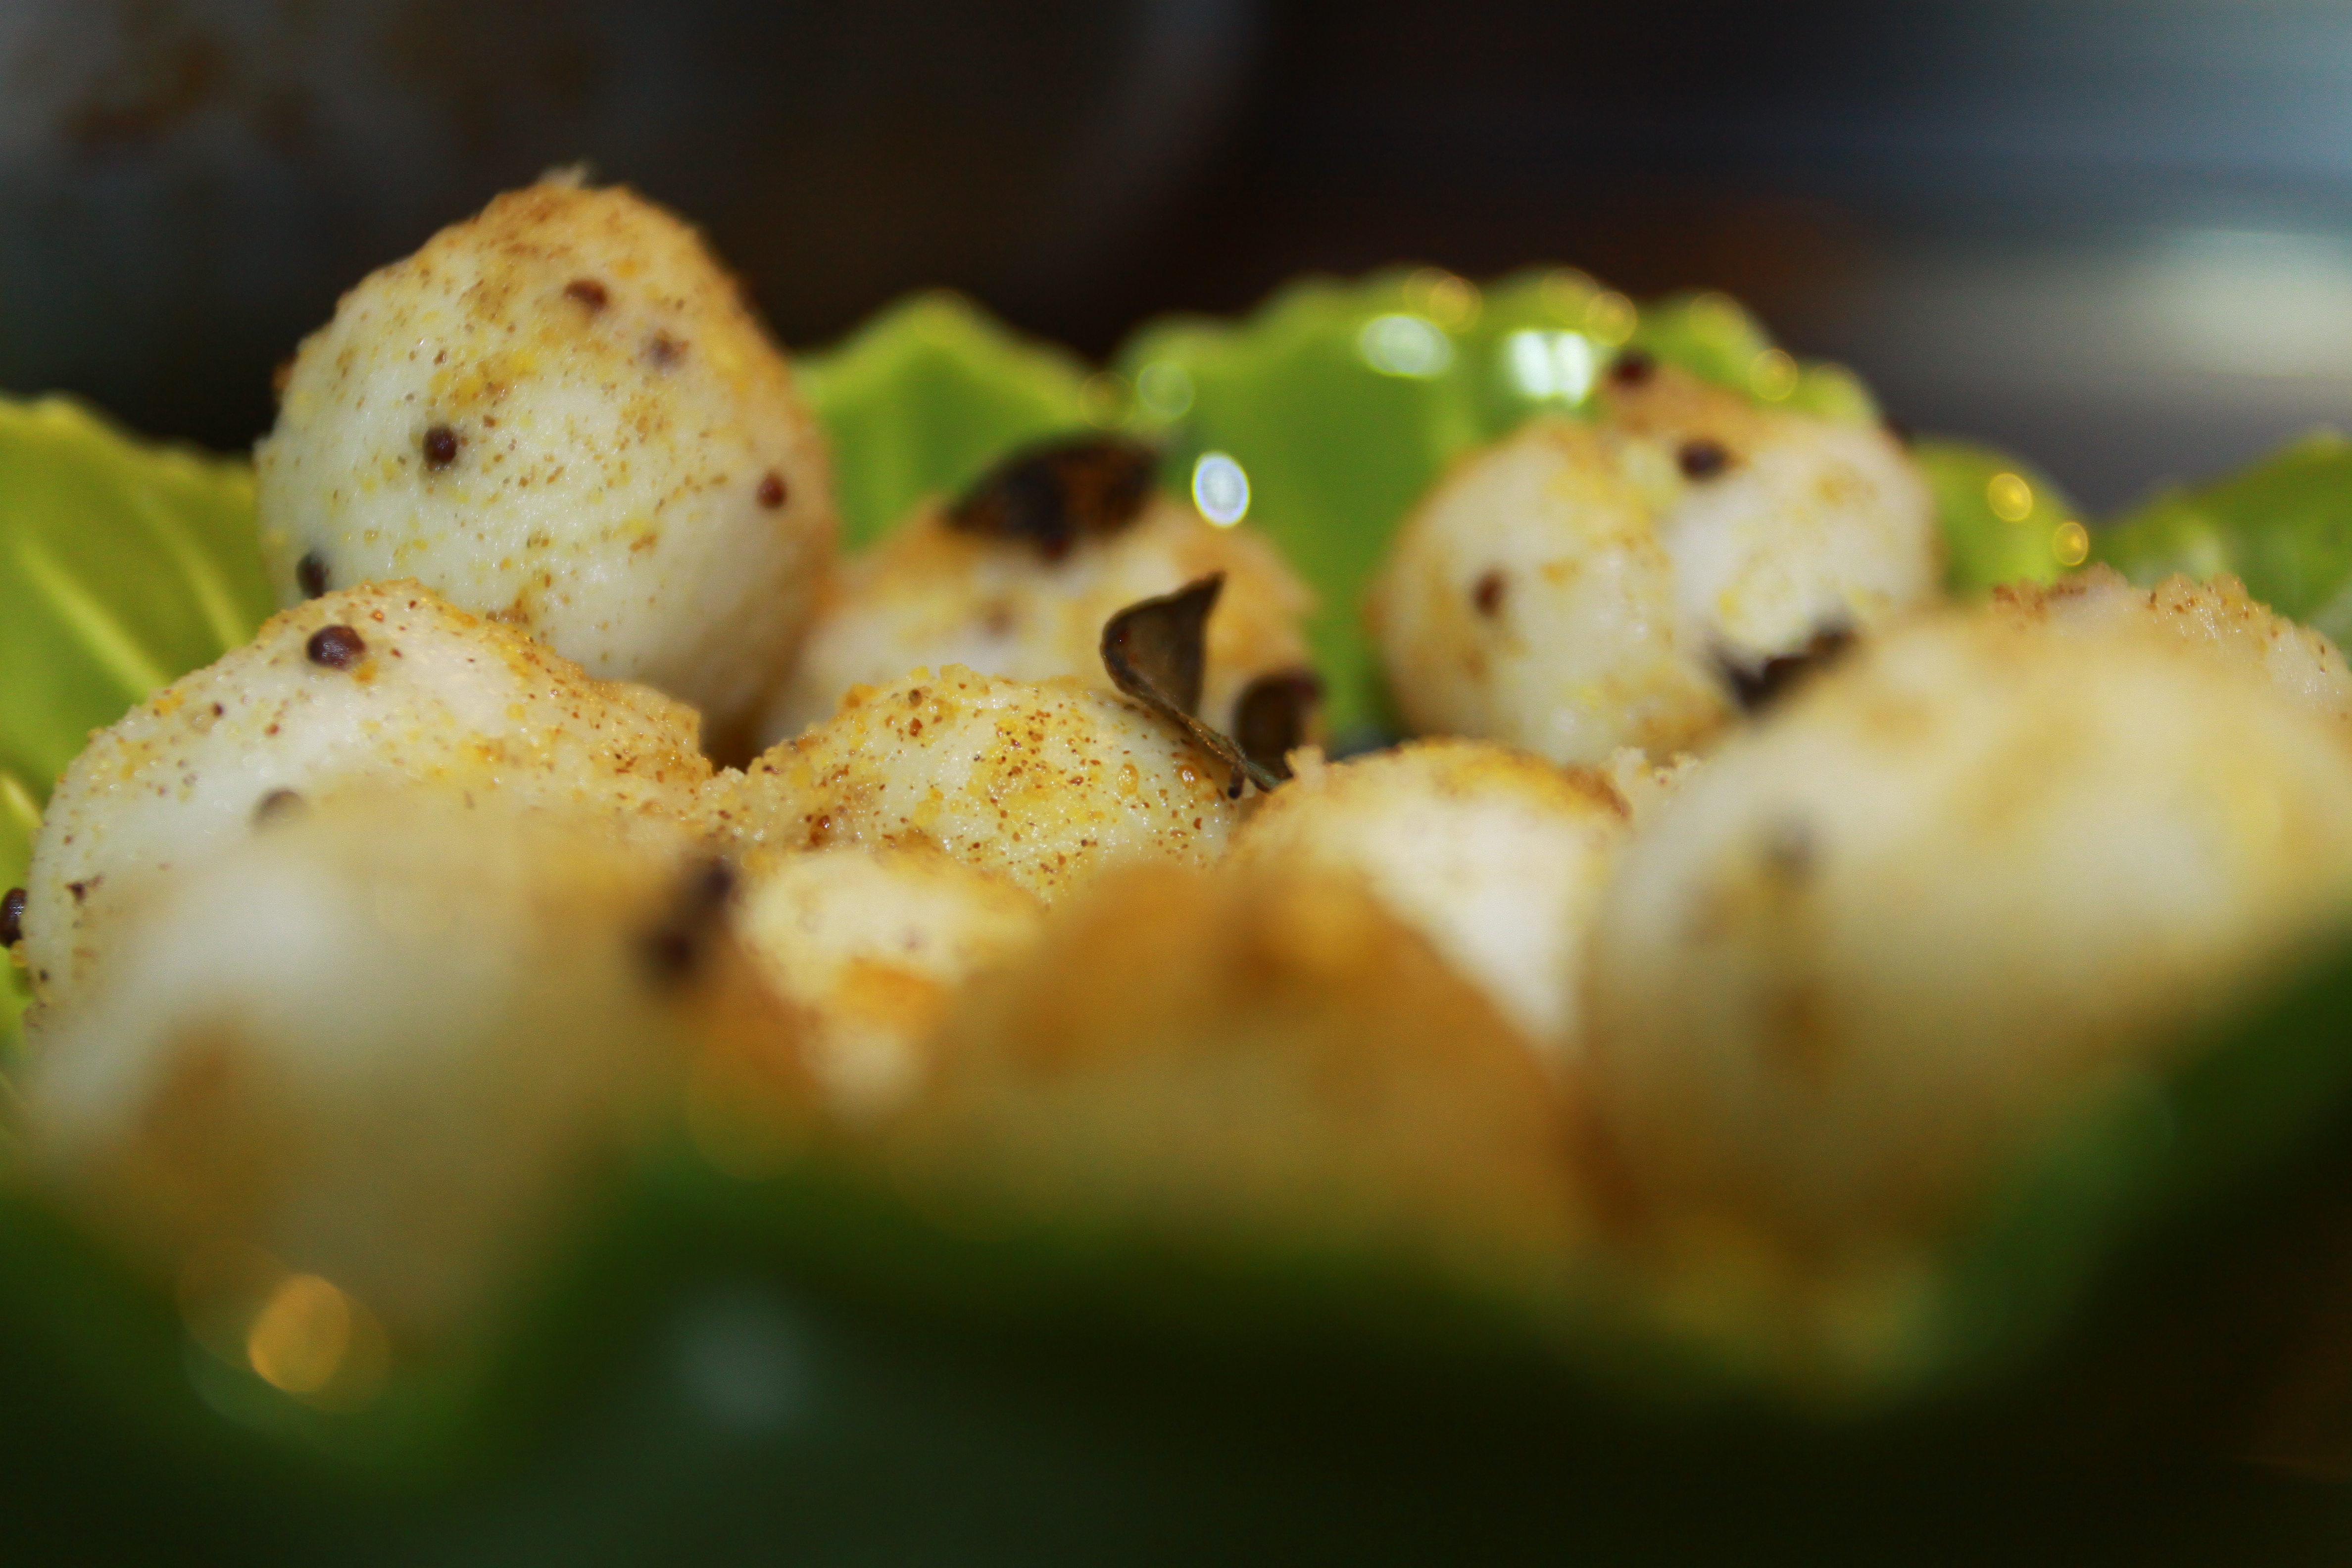
Festival Neivedhyam – Uppappam – (Spongy Balls of Rice & Urad Dhal spiced with chillies and ginger and shallow fried in oil.)

Nei Appam and Uppappam are always welcome preperations in  my mothers home. Somehow there is always an extra servings for the savouries, than the sweet version. Since I have a 6 year old, I always assumed she would like the sweet version, and so had soaked for Krishna Jayanthi, some rice for grinding and  making Nei Appams, but she  somehow was of the opinion that she preferred the salted version and the Lord would definitely like it too, as he was getting way too many sweets!!!

This used to be a favourite evening tiffin at my grandmother`s home, when she would make it, the aroma of chillies and ginger mingled with the aromas of the oil and hing etc would be simply awesome!!!

INGREDIENTS:

1 Cup Raw Rice soaked for 3 hours.

1/3 Cup Whole Urad Dhal soaked for 2-3 hours.

1 Inch Ginger shredded to very small pieces.

3-4 Green Chillies slit in to small pieces.

1/4 Cup of Fresh Coconut sliced in to very small pieces.

Handful of fresh curry leaves.

Hing.

Salt to taste.

PREPARATION:

  • Wash the soaked rice well and grind in the mixer until its a smooth batter. Transfer to a bowl.
  • Grind the urad dhal until its well done and you get a smooth batter. Add it to the ground rice batter. Mix well.
  • Add sufficient salt to taste.
  • Add the chopped ginger, green chillies, coconut slices, torn curry leaves and hing and whisk lightly in to the batter. The consistency should be not too runny yet not too thick.
  • Take the Appa Karal and pour out enough oil in to all the little depressions.
  • When they are hot enough ladle out enough batter which would fill 80% of the depression. If you fill it all the way, the batter would seep out when its getting cooked/fried in the oil.

  • Allow it to fry well on one side and tip it over using a knife and a spoon to pry it out.
  • When it cooks well on both sides, use a knife/skewers to remove and place on a tissue to drain out the excess oil.
  • Tastes wonderful when accompanied with Tomato Thokku or Coconut Chutney, but I like it plain with the flavours of the ginger and green chillies, combined with the crunchiness from the little coconut pieces.

    HINTS:

    Sometimes, leftover Appams can harden a little so I serve it up by dunking it in fresh TOmato Rasam almost like Rasa Vadai.

    The Urad Dhal provides the air and the sponginess in the Uppappam so its important that the urad dhal is soaked and ground well or you might not find the desired sponginess in the Appam once they are fried.

    Brisk Breakfast · Snacks & Tiffin Items · Travel

    Instant & Healthy Oats Masala Idlis. (Savoury Steamed Cakes made with Oats, Semolina, Carrots & Spices)

    Idlis are always a welcome breakfast at home as both my daughters love to have them, steaming hot and with a generous spill of  ghee melted to a sunshine golden yellow, and some sugar sprinkled on top of that. YUM…is the only word she keeps re-iterating again and again. When she was smaller, and hadnt started talking, she would simply finish off the idlis in minutes, and sometimes, lick the little  bowl clean of all the ghee and sugar…only moments after my head is turned to wash my hands and pick up the little one to wash and wipe her face!!! She is almost 7 now and she still loves them. The other day I had made Rava Idlis, and she simply refused to touch them. I had added peas, carrots and onions but it was of no use. She wanted white soft plain idlis and that was that. This weekend, I tried my oats idlis with the added incentive that I would flavour it with yoghurt/buttermilk. She was willing to give it a go. I used the same method as I would for the Rava Idlis, only I substituted most of the rava, with oats. No rice…at all, no fermenting, and pretty much on the go. Give it a try and you`ll realise just how delish it is. My daughter thought so too..

    INGREDIENTS:

    2 Cups Old Fashioned Oats.

    1 Cup Rava.

    1 Carrot Grated.

    1 Onion finely diced. (Optional).

    1 Tbsp Coconut Powder/ Fresh Grated Coconut.

    3 Cups Diluted Buttermilk. (The more sour, the  more tastier).

    1 Tsp Baking Soda.

    Salt to taste.

    Hing.

    A handful of finely chopped cilantro.

    2 Tsp Flax seed powder.

    Seasoning:

    Mustard.

    Curry Leaves.

    Cashew Nuts Chopped.(Optional).

    Hing.

    2 Green Chillies chopped finely.

    PREPARATION:

    • Roast the 2 cups of old fashioned oats in a dry and hot tava for 4-5 minutes on medium low flame. Set aside.
    • Roast the 1 cup of rava/semolina for 3 minutes until you get the aroma. Set aside.
    • Powder the oats coarsely in the mixer, take care that you don`t powder it too fine. The coarseness adds a lot of character to the final dish, in my opinion.
    • In a mixing bowl add powdered oats, rava, salt, hing, coconut powder, flaxseed powder and finely chopped cilantro.
    • In a kadai add a spoon of oil and when hot add cashew nuts, green chillies, curry leaves,mustard seeds and hing. When it comes together toss it in to the bowl along with the other ingredients.
    • Add the 2 cups of  buttermilk and with the third cup, add it little by little so that the batter does not become runny. The consistency should be like the batter of rava idlis. You should be able to pour and it will fall slowly.

    • Mix in all the ingredients well and allow to sit for 5-10 minutes as this works on the baking soda and airs the batter a little.
    • Grease idli plates and pour out the dough , steam in pressure cooker WITHOUT WEIGHT for 10-12 minutes.
    • Switch off the cooker and after 2-3 minutes remove the plates.
    • Splash a few drops of water on the idlis and using a spoon dipped in water, slowly scoop out the Oats Idlis.
    • Serve piping hot Oats Idlis with Tomato Peanut Chutney.

    HINTS:

    1. I used diluted buttermilk as I wanted the Idlis to be light and fluffy. Feel free to use regular buttermilk or beaten curd diluted with water.
    2. Onions are completely optional. I used it for an extra zing on the taste.
    3. Cashew Nuts and flax seed powder  are also an optional additions. I use flax seed powder mainly for the fibre content.
    4. The consistency largely depends on the kind and brand of rava, oats and other ingredients. Take the water measurements as a benchmark and experiment on the kitchens!!!


    Cakes / Pastries / Cookies/ Bread/Muffins. · Kid Friendly Recipes. · Snacks & Tiffin Items

    Bangalore Iyengar Bakery Style Tutty Fruity & Coconut Dilpasands. (Puff Pastry Sheets filled with sweet coconut and tutty fruitty and everything thats nice!)

    All my childhood memories of snacks simply bounce back to Bangalore Iyengar Bakery and their sweet smelling Dilpasands chok filled with crunchy coconuts flakes and tutty fruity, redolant with the aroma of a tingling cardamom and sugar and everything sweet. Whenever we had a slice of Dilpasands, we would be transported to heaven and back!  Every summer, when all my cousins would meet at my grandmother`s home in Madras, special occasions would come by when an aunt or uncle went shopping to R/Street and an unwritten rule would be to buy the Iyengar Dilpasands for the kids at home. Biting in to the crunchy flaky dilpasands and tasting coconuts, tutty fruity at once, would bring forth a burst of sweetness in the mouths and our days were made.

    Recently I had really started craving for this Iyengar Dosa, as we would call it back then!! As I was in the baking aisle yesterday at the grocers, I saw the coconut flakes and tutty fruity and bulbs flashed in all directions. I grabbed them and I already knew I had puff pastries in the freezer at home. I decided to put an end to my craving once and for all…I also got some direction from here for this…

    INGREDIENTS:

    2 Puff Pastry Sheets thawed.

    1 cup tuitty fruity.

    1 cup Sweetened Coconut Flakes. (Please increase the measurement of sugar to 1/2 cup if using regular fresh coconut).

    1/4 cup Fresh Grated Coconut.

    1/4  cup Brown Sugar.

    1/4 cup Water.

    1 Tsp Crushed Cardamom.

    Melted Butter for brushing the puff pastry sheets.

    PREPARATION:

    • In a sauce pan add the 1/4 cup water and add brown sugar and allow to melt completely for a couple of seconds.  Switch off the flame and add crushed cardamom, tuitty fruity  and all the coconut flakes.
    • Use a ladle and mix it all completely. The consistency would be a mixture that`s very lightly holding to each other, on account of the brown sugar.
    • Preheat the oven to 350F and butter the cookie tray. Set aside.

    • Flour the surface and open the thawed puff pastry sheets. Using a vessel, make a big circle on one sheet.
    • Make a slightly smaller circle on the other sheet. Use a sharp knife tip to make the circles. Save the corners.

    • Place the bigger circle on the buttered baking tray.  Using the melted butter, brush the pastry sheet. This would help the stuffing to stick to the sheet.
    • Spoon out the coconut-tuitty fruity filling on to the puff pastry sheet and gently spread it leaving a small border around the stuffing.

    • Now place the smaller sheet cut in to a circle over the stuffing and close the edges and seal them using the melted butter.
    • Brush the melted butter all over the top to help in baking to a lovely golden brown colour.

    • Using the remaining pieces, I made smaller little pockets of pastry holding the stuffing and sealed them.
    • The pastry sheet that I used to make the smaller circle, had a little more dough left on the corners. I collected them and kneaded them in to a firm ball.
    • Using my rolling pin, I rolled that in to a circle. Buttered the circle, spooned out the filling, brought the corners together and sealed it by pressing with a fork.
    • Once the oven is pre-heated, bake the Dilpasands at 350F for about 12-20 minutes depending on the strength of the oven.
    • When the dilpasands swell in size and bake to a golden colour, its time to take it out and cool it.
    • Enjoy the Sweet and aromatic Dilpasands which bring forth the flavour of coconuts and sweet somethings all in one  burst …..

    HINTS:

    • With the leftover dough, use your imagination to fill it with savory fillings – Alu Mutter, Sandwich fillings, Cheese & Spinach fillings etc.
    • Using brown sugar makes the filling a little more dense because of the higher molasses content in the brown sugar . Also helps the filling to stay together.
    Italian Cuisine. · Snacks & Tiffin Items

    Bruschetta topped with Roasted veggies,Arugula and Pecorino & Parmesan cheese – Super Healthy & Yum!!!

    I have always loved ciabatta bread in any form as I simply adore rustic variations of bread and bread alone! Every time I peek in to Trader joes my favourite store in the neighbourhood, I never fail to pick a Ciabatta and my favourite Pizza Dough made with whole wheat.

    Ciabatta is an Italian white bread  made with wheat flour and yeast. The loaf is somewhat elongated, broad and flattish. It’s name is the Italian for slipper. There are many variations of ciabatta. Like many artisan breads, ciabatta bread tastes best when it is fresh. People should try and purchase it freshly baked on the day they intend to use it, although wrapping it in plastic can help it to last longer. However, plastic wrapping will tend to make the bread slightly soggy, which can be an undesirable or unacceptable trade-off. To refresh ciabatta bread which is slightly stale or soggy, it can be sprinkled with water and toasted in an oven immediately before serving. Otherwise, stale ciabbata bread can be allowed to go truly stale and turned into croutons. I simply love the lightness of this bread when toasted because of its airy texture. Ciabatta in its grilled form can also be used to make sandwiches / Paninis.

    INGREDIENTS:

    Half Loaf Ciabatta Bread.

    1 Medium Red Onion diced thin and long.

    1/4 Cup chopped Cremini Mushrooms.

    1/4 cup chopped chinese eggplant.

    1/4 cup chopped red peppers.

    1/4 cup diced olives.

    1/4 Cup Tangy Arkansas Tomatoes or Hierloom Tomatoes/ Tomatillos.

    Bunch of Arugula Leaves. (Substitute with baby spinach leaves)

    Handful of shredded Fontina cheese.

    Handful of shredded Pecorino Romano Cheese.

    Marinate Ingredients:

    3-4 Cloves of Garlic.

    1/3 cup of Extra Virgin Olive Oil.

    1 Tsp Fresh/ Dried Basil.

    Pinch of salt.

    Fresh Cracked Pepper as per taste.

    Chopped Cilantro Leaves.

    PREPARATION:

    • Chop the veggies, mushrooms,cut the olives in to halves and set aside.
    • In a small bowl, add the ingredients for marination and toss it over the veggies. Allow to marinate for half hour at least.
    • Pour on to a baking tray and spread all the veggies all over the tray with your hands. This coats all the ingredients with the oil perfumed with the spices.
    • Roast in the oven preheated to 350 F for about 7-10 minutes or until the veggies are nicely roasted. Set aside.
    • Cut the Ciabatta bread lengthwise in to thin long strips. Line a tray with parchment and arrange all the slices on the tray.
    • Sprinkle each bread with salt and pepper and brush with extra virgin olive oil.

    • Bake at 400F for 7-10 minutes until almost crisp. Set aside to cool.
    • Peel a garlic clove and rub it all over the slightly roughened surface of the bruschetta bread. This perfumes the freshly baked bread with the garlic and gives it an extra flavour to the brischetta.
    • Now, place all the bruschetta slices on a baking tray. Line each of their surface with a spoon of marinara sauce. If not available, line with simple Tomato ketchup. This helps the topping to stick to the bread.
    • Now neatly place the roasted veggies over the bread smeared with marinara sauce.

    • Top the veggies with fresh arugula and finally sprinkle pecorino romano and delicious parmesan cheese.
    • Pop in the oven for a few minutes until the cheese melts and holds all the veggeis firmly.
    • Enjoy delicious Bruschetta topped with roasted veggies, arugula and cheeses with a bowl of your favourite Tomato Soup.
    • Sweet Heaven!!!

    Kid Friendly Recipes. · No Need of Onions!!! · Snacks & Tiffin Items

    Yummy Mango Slices sprinkled with niceness!!!! – Street Foods & Snacks.

    dsc00755

    I really dont know whats with me and mangoes. I find gazillion ways and including mangoes in my dishes now and then. I remember, as a child in our earlier home in Chennai. my dad had planted a mango sapling when I was a baby!. By the time I was in high school, the mango tree used to give lovely green mangoes in the summer. They were not the greatest variety or the best tasting, but there is a certain pride in going in to your own backyard and plucking mangoes from a tree laden with them. There is an aroma to this freshness – the mango perfect and tight, with the milk oozing from the stalk, at the point where it has been severed from the tree. Amma used to make Avakkai pickle, Maavadus from the little ones and of course the regular Mangaa Curry. Summers in Chennai….beyond the heat, had so many memories for me…

    One such recurring memory is the regular shopping visits to Nalli, Kumaran Silks etc in T.Nagar. All these store, entice you with their innumerable lovely breathtakingly woven silk sarees, but the mango vendors outside these stores, enticed me to go shopping!!! Amma would give me a firm look as if to say, “Come on, we`ve come all this way to finish Diwali shopping in such short time, and all you can think about is mangoes???” The shopping would be over and we would rejoice and run to the vendors. They would cut the mangoes in to lovely slim long slices right in front of your eyes and then cut out little patters on top to resemble a little crown made of sticks…..the mangoes would be so tender, they would bend in his arms. He would then roughly pull out a newspaper, dash a little of his secret-ingredient spice powder, and then swathe the mangoes over the powder and hand over the paper to us. Ditto treatment for the pineapple slices. There cannot be a word to describe the taste of those mangoes, wrapped in spice powder,shared with cousins, standing spell bound, in a crowded shopping area……

    My effort to recreate the T.Nagar magic was pretty limited, although it does take me on those trips some times. The ingredients are simple and clear – loads of mangoes…

    INGREDIENTS:

    2 Mangoes cut in to thin slices.

    1 spoon salt

    1 spoon red chilli powder

    A dash of hing

    PREPARATION:

    • Combine the powders and set aside. Please alter the red chilli powder levels, if you think its soo spicy.
    • Arrange the sliced mangoes on a plate.
    • Sprinkle as desired and serve fresh.

    Spiced Mango Slices are an anytime snack over at my place. Picnics are always a fun place to make them since they are so easy to assemble. They serve as a very simple yet novel starter snack, favourite among the kids and the adults alike…. Its our favourite movie time snack!!!

    ENJOY!!!

    Sending yummy mango to Shaheen`s favourite snack food event at her blogsite @ www.funandfoodcafe.com.

    Reposting for this event.


    Cakes / Pastries / Cookies/ Bread/Muffins. · Snacks & Tiffin Items

    Delicious Spinach & Cheese Savoury Muffins.

    Muffins have always been a very Quick Fix snack for me , as all one needs to do is to decide whether its going to be a sweet or a savoury muffin. Once that hair plitting decision has been made, all that has to be done, is to quickly take a once over into the pantry to see the week`s leftover vegetables/ fruits. …and there the decision is made. In this case however, I wanted to incorporate spinach in my everyday menu, and hence the decision on the star ingredient. Everytime, spinach is paired best with some sort of cheese, t hat brings out the flavour of this leafy vegetable. I hd picked out a sharp cheddar cheese at Costco`s this weekend. I also has some of the medium spicy Monterey Jack Cheese left over from last time.  I wanted some more spice, and decided on adding some onions too…I love the smell of bread, pizza or anything baked with the goodness of onions…This was really a trial run, but I was very very happy with the results….and my daughter almost finished all the muffins, at our little  picnic by the lake. This post is specially for my good friend Priya…Here goes…

    INGREDIENTS:

    1 1/2 Cups All Purpose Flour.

    1/2 bunch spinach

    1 onion

    1 tsp salt

    1 Tsp Dried Basil.

    1 cup flour

    1/4 cup sharp cheddar cheese.

    1/4 cup shredded Montery Jack Cheese.

    Parmesan Cheese to Garnish over the Muffins.

    1/2 cup margarine.

    1 tsp Baking Powder

    1/2 Tsp Baking Soda

    Dash of Pepper.

    PREPARATION:

    • Wash the half bunch of spinach clean and pat dry with a cleam kitchen towel. Chop roughly.
    • In a mixer add the  roughly chopped onions first and then the roughly chopped spinach  and puree. Add minimal water only if needed.
    • As always, we start our process of baking with the wet ingredients. Melt the margarine and pour in to the mixing bowl.
    • Simultaneously power up your oven to “BAKE” at 375 F.
    • Use butter/margarine/oil to grease the muffin pan.
    • To the mixing bowl add the pureed spinach mixture and give it a whisk.
    • Add salt, dried basil, pepper and whisk again. If at this point, you feel that the mixture is way too thick, add a little water, say about 1/8 – 1/4 cup depending on the consistency.
    • In another container measure out the flour and add baking soda and baking powder. Mix it well.
    • Slowly add the flour to the puree in the bowl little by little.  When completely done, incorporate all the ingredients with a whisk by slow movements. Brisk stirrng would rob the batter of all the air, which is important to impart a spongy consistency to the muffins, in the absence of eggs.
    • Finally add the grated cheese. It could be simply cheddar, or a mixture of whatever cheeses you have on hand. The taste of the muffins, would be influenced by the taste of the type of cheese added.  let it be one with a medium sharp flavour like the Monterery, Sharp Cheddar, Provolone etc.
    • The final consistency of the batter should be almost like idli batter which does not run, but is not too firm.

    • Pour out equal amounts of batter on to the greased muffin plates, garnish a little parmesan cheese over each muffin  and pop in to the oven.
    • Bake for 12-18 minutes depending on the strength of the oven and the amount of batter poured in to each cup.

    • Enjoy the aroma of onions, herbs and cheese wafting in your entire kitchen.
    • Delicious and simple Spinach & Cheese Savoury Muffins are ready.

    HINTS:

    1. Substitute the cheese with paneer for a vitamin and protien packed snack. Paneer has no inherent taste of its own, so you might miss out the original intented taste.
    2. For a sharper flavour, you could use half of spinach and half of arugula. Arugula has a peppery taste, so tone down the type of cheese used. Use a cheese thats more milder like mozarella, parmesan, or light cheddar.
    3. Leftover Muffins, could be cut in to circles crosswise and used as patties in sandwiches, panninis etc.
    Snacks & Tiffin Items

    Easy Breezy Vegetable Cutlets –

    Cutlets have always been fancy food for me even when we were little kids. I guess we all love fried foods and I was no exception. Whenever there used to be a chance to eat out, which used to be few and far between, my favourite orders would always be “cutlets” in a fast food restaurants, and Veggie Fried Rice for dinner or lunch. I never even  thought about altering it even once at any point of time in my life. I guess there were things that mom would never make at home, so it held its fancy for a long long time, as long as I got married and had my daughter!!!  My all time favourite cutlets were at Balaji Bhavan in T.Nagar and at Woodlands Drive In Restaurant on T.T.K Road, Chennai.

    Recently, I realised the pleasure in cooking and serving food made at home, to our loved ones and decided that I had to make vegetable cutlets at home. Made with clean and fresh vegetables, and pure cooking oil, it is an unmistakably delicious fried treat, to be had with hot piping coffee on cold and rainy days!!! The list of ingredients could be long and winding, but it needs instant and quick assembly…more so with the help of modern day conveniences like microwave, food processor etc .

    INGREDIENTS:

    4 Medium Potatoes Boiled

    1 small onion chopped

    5 Green Chillies Chopped

    1 Tsp Red Chilli Powder

    Pinch of Turmeric POwder

    1 Beetroot Grated

    2 Carrots Grated

    1/2 cup peas.

    1/2 cup tender green beans.

    4 garlic pods finely chopped.

    Ginger grated.

    Fennel

    Jeera

    2 Tbsp Maida

    Oil.

    Handful of cashew

    Pinch of Sugar

    1 Tsp lemon Juice.

    Bread Crumbs to completely coat the patties.

    Cilantro Chopped.

    PREPARATION:

    • Boil the potaotes for just one whistle with salt. Set aside.
    • Chop onions, garlic, ginger and chillies finely.
    • Grate carrots, beetroot and keep aside.
    • Take 2 bread slices and pulse it for a couple of seconds to get smooth bread crumbs.
    • Take grated  beans and peas and boil in microwave  for 4 minutes.
    • In a kadai add oil somph, jeera, green chillies, onions and saute.
    • Then  add turmeric, red chilli powder, salt and stir well.
    • Now add the boiled veggies,broken cashew pieces  and maida  and saute for a few minutes.
    • We do this to completely remove all moisture from the cutlet batter.
    • Now take the mashed potatoes in a abowl  and add the veggies that have been sauteed.
    • Add lemon juice and chopped cilantro.
    • Incorporate the mixture with your hands and make it to a homogenous consistency.
    • Make in to balls and pat it in to the bread crumbs mixture so it sticks on both sides.

    • From then on, one option is to deep fry in hot oil until the cutlets are well done.

    • Another healthier option is to shallow fry in the dosa pan until both sides are crisp and golden brown.
    • Serve HOT with sweet and tangy tamarind chutney or with Tomato Ketchup.

    Snacks & Tiffin Items · Travel

    Spiced Mini Kozhukattais. (Mini Kozhukattais spiced with Spicy Dhal Powder)

    Mini Kozhukattais are an easy anytime quick fix snack. With the advancement in recent years, one can get clean rice flour which chops away many laborious steps in preparation of many delicacies having this flour as the base. In earlier days, one had to clean the rice, wash it well and painstakingly dry it on a clean white cloth to absorb all the extra moisture. Then one had to have it crushed to a fine powder in the local rice flour mill. Right after this process, one  had to make sure that the ground flour is not kept closed as this might cause condensation inside the vessel, which in turn would bring the moisture back in to the flour. Now all one has to do is to drive by to the local indian store and pick up a packet of Rice Flour. Agreed, that there is a definite loss in flavour with the short cuts, but at least it makes life a lot more easier.

    My daughter and husband love the Ammini Kozhakattais that I so often make on the spur of a moment. I wanted a quick fix filling snack last sunday evening and I was tempted to make Bhajjis. But, with the consideration to the ever expanding waist lines, I decided against it. Then my mind came back to Ammini Kozhakkatais. My daughter loves to roll the dough in to little bite sized balls. Once the balls were steamed, I wanted to give it a little twist. I must tell you that they were downright delicious and  novel. This is for you to try too…

    INGREDIENTS:

    1 cup Rice Flour.

    2 cups of water.

    1 Tsp levelled of Salt.

    2 Spoons of Coconut Oil.

    Mustard, Curry Leaves, Chopped Green Chillies, Broken Urad Dhal for seasoning.

    3-4 spoons of Home Made Dhal Powder.( Paruppu Podi).

    PREPARATION:

    • In a kadai, pour the water, add coconut oil and salt and allow to boil.
    • Immediatly, simmer the stove and add the measured 1 cup of rice flour in to the water very slowly stirring at all times with a whisk.
    • Use a whisk and remove all the clots quickly.
    • With a spatula, rapidly stir in the mixture as it will thicken using the water to cook the rice flour.
    • As before, keep stirring until you see that the water is all used up and the entire batter scoops up in your ladle as a single mass.
    • Switch off the gas and transfer to a mixing bowl.
    • Add 1-2 spoons of coconut oil and knead well to form a homogenous ball. This is the most important step in the whole process as this removes all the cracks and makes a smooth dough.
    • Greasing your hands, shape it in to smaller balls, say, the size of naphthalene balls and keep covered in a bowl.
    • Complete the dough by making small balls and arrange on greased idli plates.
    • Steam them in the pressure cooker without weight for 10 minutes on high. As they have already been cooked once, it will cook in the steam pretty fast.
    • Once the cooker is switched off, wait for a few minutes to open.
    • In a kadai, add 2 spoons of oil. When hot, add broken urad dhal, mustard, green chillies, hing and curry leaves.
    • Drop the kozhukattais and mix well.
    • Then pop in 3-4  spoons of Dhal Powder. Mix well.
    • Delicious Spiced Mini/Ammini Kozhakattais are ready to be served.

    HINTS:

    • I dabbed the mini kozhakkattais with home made Dhal Powder.
    • You can also use Puliyodharai Powder which is store bought.
    • Another variation in taste can be achieved with Gun Powder or Molagai Podi/ Curry leaves Powder.
    • Sprinkle your favourite curry powder and enjoy the delicious taste it lends to the Mini Kozhakattais.
    Eggless Cakes · Kid Friendly Recipes. · Snacks & Tiffin Items

    Festive Eggless Zebra Cake – Vanilla & Choclate.

    Delicious Eggless Zebra Cake

    After my really long blogging break, my daughter really started missing  my unforeseen delicacies that I make at home for her now and then. She has become so used to my blogging that this morning when I made her a peanut butter nutella sandwich and passed on her little pink plate, she threw a quizzical look at me.  “Mom” she queried, “Arent you taking a picture???”  I could`nt help smiling….”No sweety”, I quipped….go ahead and have your sandwich…She had been wanting to have my eggless cakes in a long time. So this afternoon, I decided to surprise her with a Zebra Cake, which I know had been making its rounds in the foodie blogsphere. I guess the name really hit off with her,  I decided, as she came back for second and third helpings….

    I did not have dark chocolate, but I generously used Hot chocolate Mix, specially made and packaged in tin containers, for the holiday season,  that I found at Costco. I guess I can say that it was delicious and spongy, at the same time not too sweet.  We all enjoyed it with a hot cup of tea and saved some for snack the following day.

    INGREDIENTS:

    2 cups All Purpose Flour / Maida.

    1 3/4 cup Whole Milk .

    1/2 cup Oil.

    1 1/4 – 1 1/2  cup Sugar ( Preferable a little more than 1 1/4 and a little less than 1 1 /2!!!)

    1 tsp  vanilla essence.

    Cocoa Powder / Dark chocolate Powder / Ground Bournvita as needed.

    1 Tsp Baking Soda.

    1 Tsp Baking Powder.

    PREPARATION:

    • Preheat the oven to 350 F and line your cake pan with butter spray, butter, oil  or flour.
    • In a bowl, measure out the dry ingredients – Flour, Baking Soda, baking powder. Mix and keep ready.
    • In another mixing bowl, start with the milk and add oil, sugar,  and whisk well to dissolve any lumps. Take caution NOT to over mix as this may rob the cake of sponginess.
    • Slowly add the dry ingredients little by little and incorporate them together.
    • Remove half of this prepared batter and put in another vessel.
    • To one portion, add 1 tsp of vanilla essence and mix it in.
    • To the other half, add 3-4 spoons of dark chocolate powder or dark cocoa powder. The darker the powder, the better the chocolate rings.

    Cake batter - Vanilla & Choclate Rings.

    • Now take the greased ake pan and add exactly one ladle of chocolate batter.
    • Next take a ladle of plain vanilla batter and add it to the centre of the chocolate batter.
    • Repeat now again with the chocolate batter, to follow with the vanilla batter.
    • The repeated layers of alternate batters spread slowly to fill out to the ends of the cake pan.
    • Complete both the batters and sprinkle some broken cashew/almond nuts on the top of the batter.

    • Set it inside the pre-heated oven for 35 minutes or until a toothpick thats inserted comes out clean.
    • Remove from the oven and allow to cool and enjoy delicious Zebra Cake with your family!!!

    Sending this cake to SHOW ME YOUR CAKE event hosted by Divya of Dil Se. Wishing everyone a Merry Christmas and a wonderful and prosperous new year.


    Kid Friendly Recipes. · Snacks & Tiffin Items · Travel

    Back after a Break – Simple Steamed Jumbo Peanuts & Memories!!!!

    Hot Steamed Jumbo Peanuts!

    It has been a very busy break for me, having another baby after 6 years!!! I have almost forgotten the simple and joyous , yet difficult times of having a newborn in the home!  Sleep times and wakeup calls are completly regulated by her and so are the schedules of the rest of the day. Yet, when I see her face, calm in her sleep, a smile now and then,  I realise its worth every pain I have gone through…a million times over!!!!

    Last night I was browsing the aggregator, and found Srivalli`s posting for MLLA – 18. And I realised that I had the perfect yet simple post for for her event!!! Steamed Jumbo Peanuts….Memories of this goes as back as when we were little toddlers and Madurai amma used to steam them in the cooker for us to have when we get home in the evenings. It would always be a pleasure to sit with my siblings, chat up about the happenngs of the day and catch up with each other.Summer vacations are never complete without all the cousins, sharing a plate of steamed peanuts!!!

    INGREDIENTS:

    Raw Jumbo Peanuts.

    Water

    Salt.

    PREPARATION:

    • Wash the raw peanuts well and pop them in to the pressure cooker with just enough water to cover them.
    • Add salt to the peanuts and give it a good stir.
    • Switch on the gas and when there is enough steam, put the weight.
    • In India, the raw peanuts  have a thin skin, so all it needs is just one whistle.
    • Here, the peanuts have a thick skin and so I allow three whistles.
    • Switch off and when ready, open the cooker and have juicy salted soft steamed peanuts.
    • Healthy snack for kids when they are  back from school and a great idea for picnics and weekend drives.

    Sending loads of steamed peanuts to MLLA – 18`th helping event at Srivalli`s Cooking4AllSeasons, brainchild of Susan of The Well Seasoned Cook.