Chutneys / Thogayals & Podis.

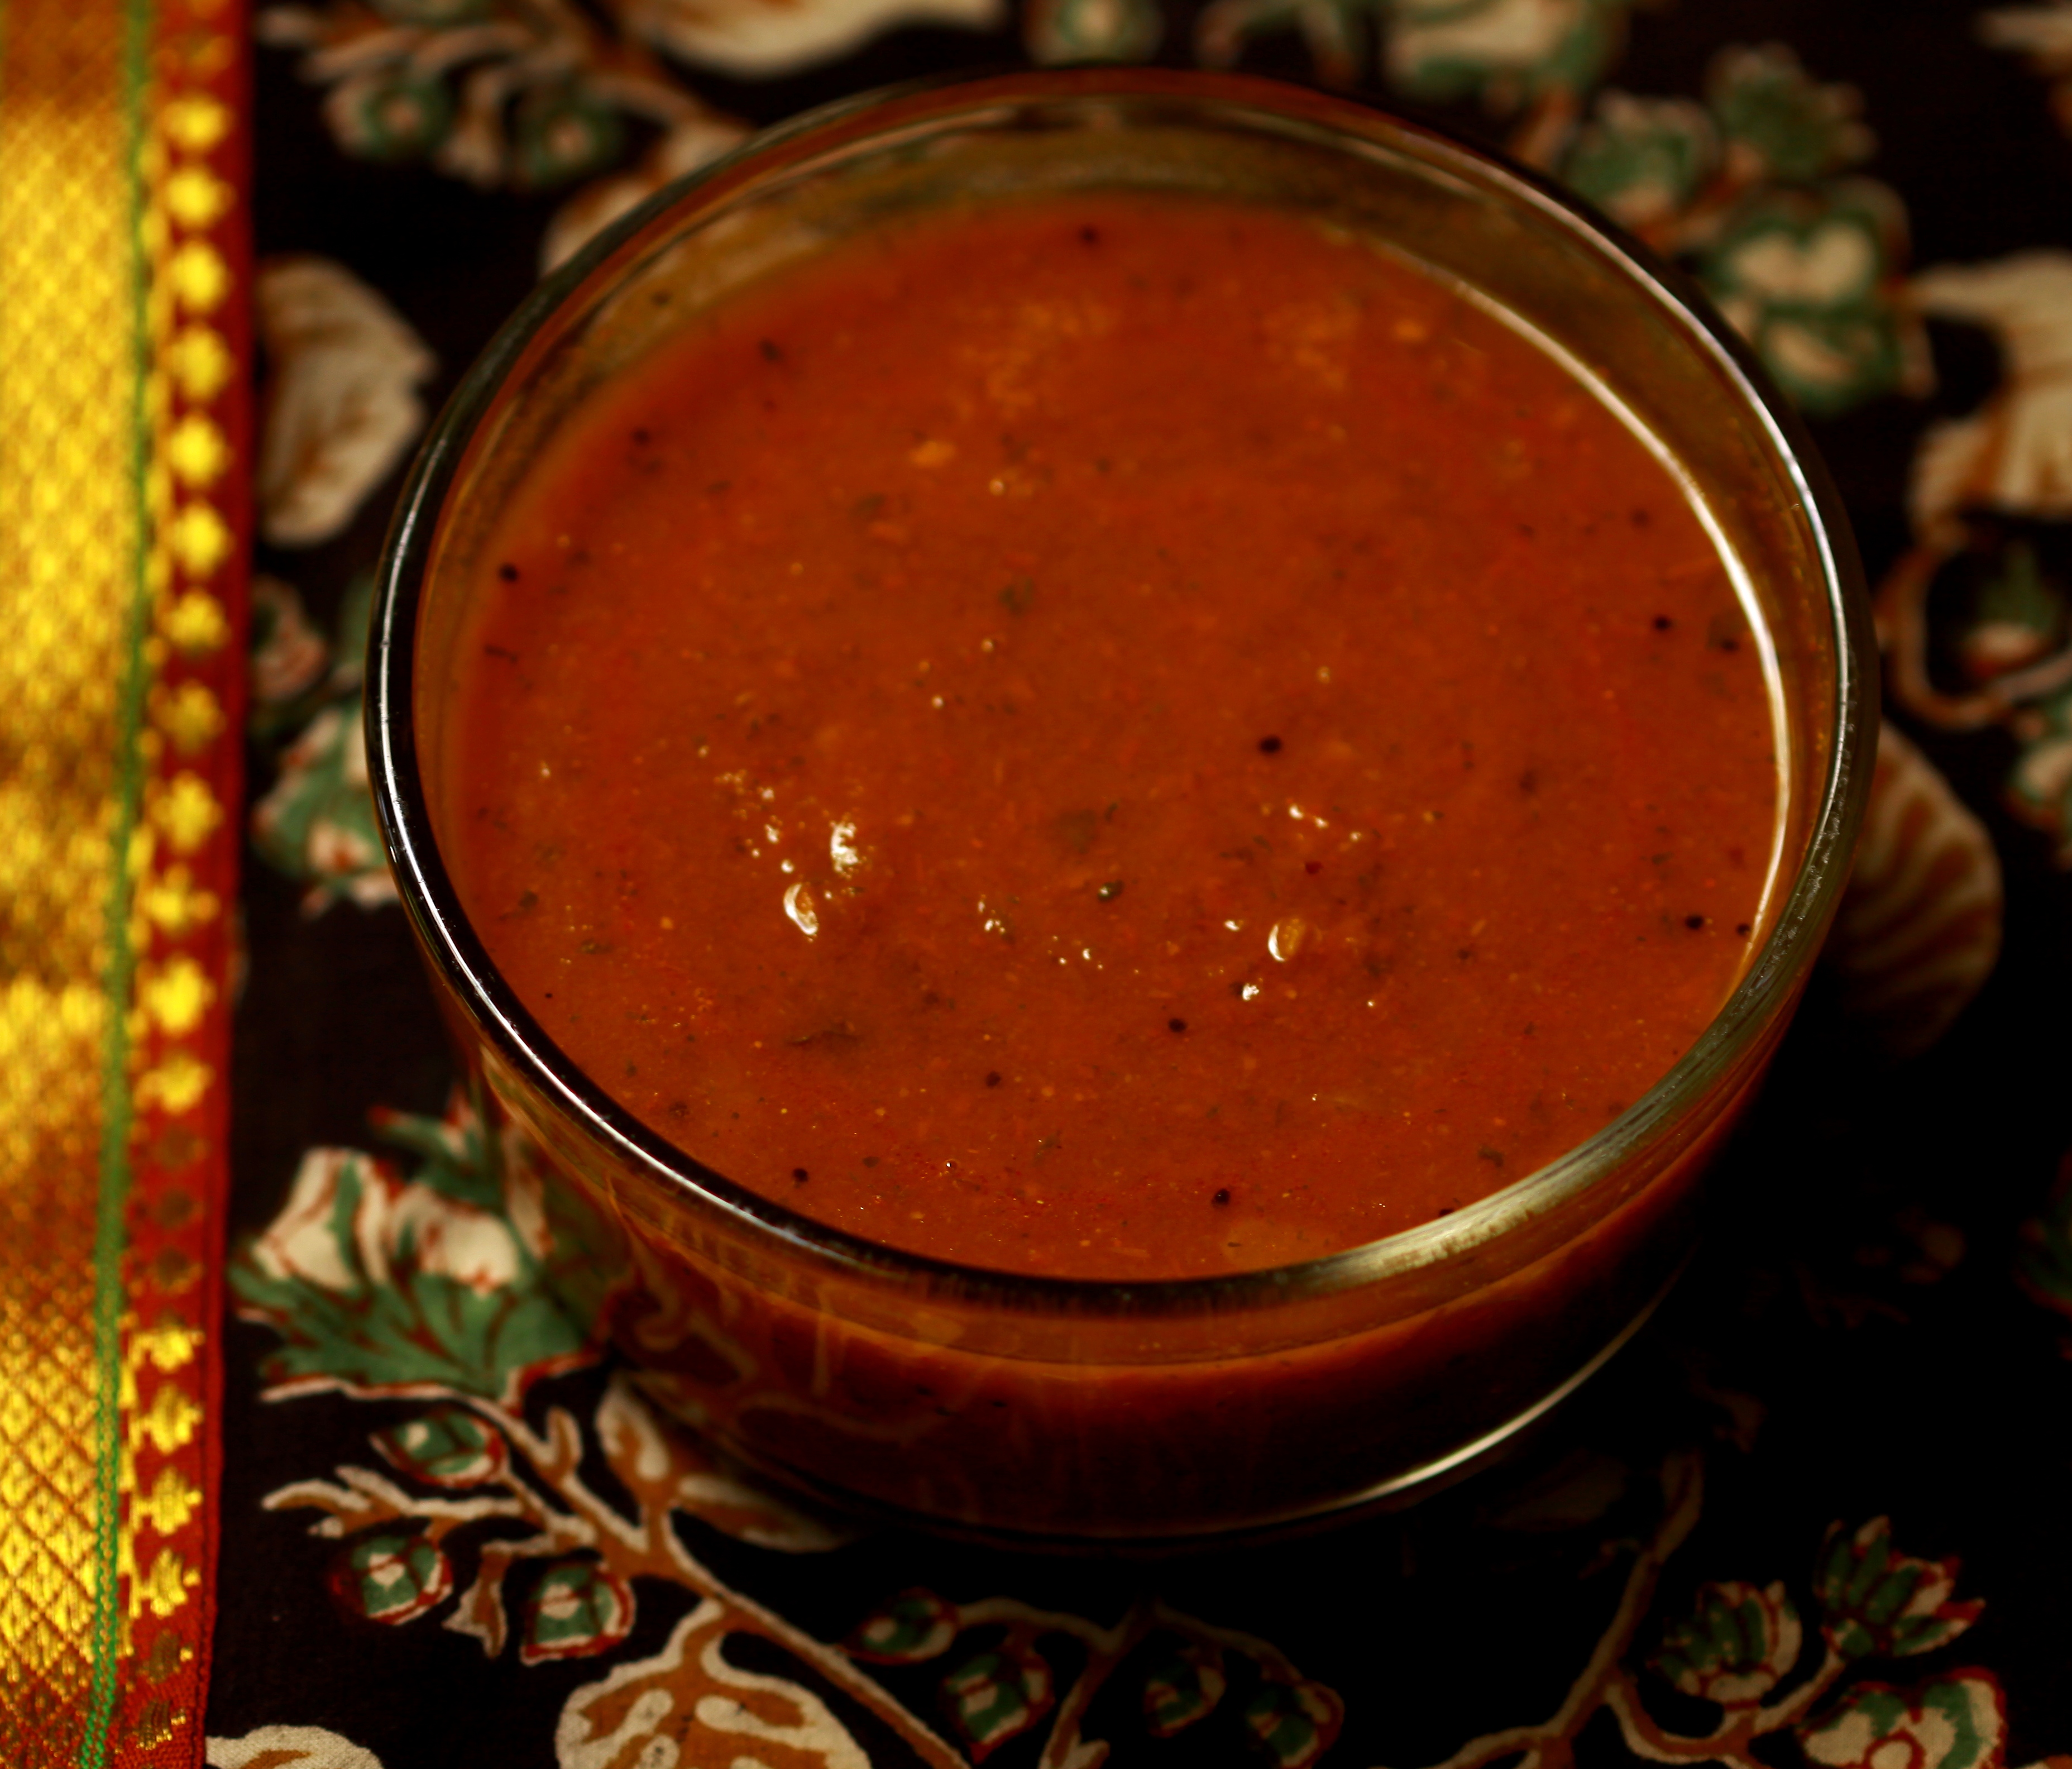
Tomato Chutney with Sambar Powder?

193

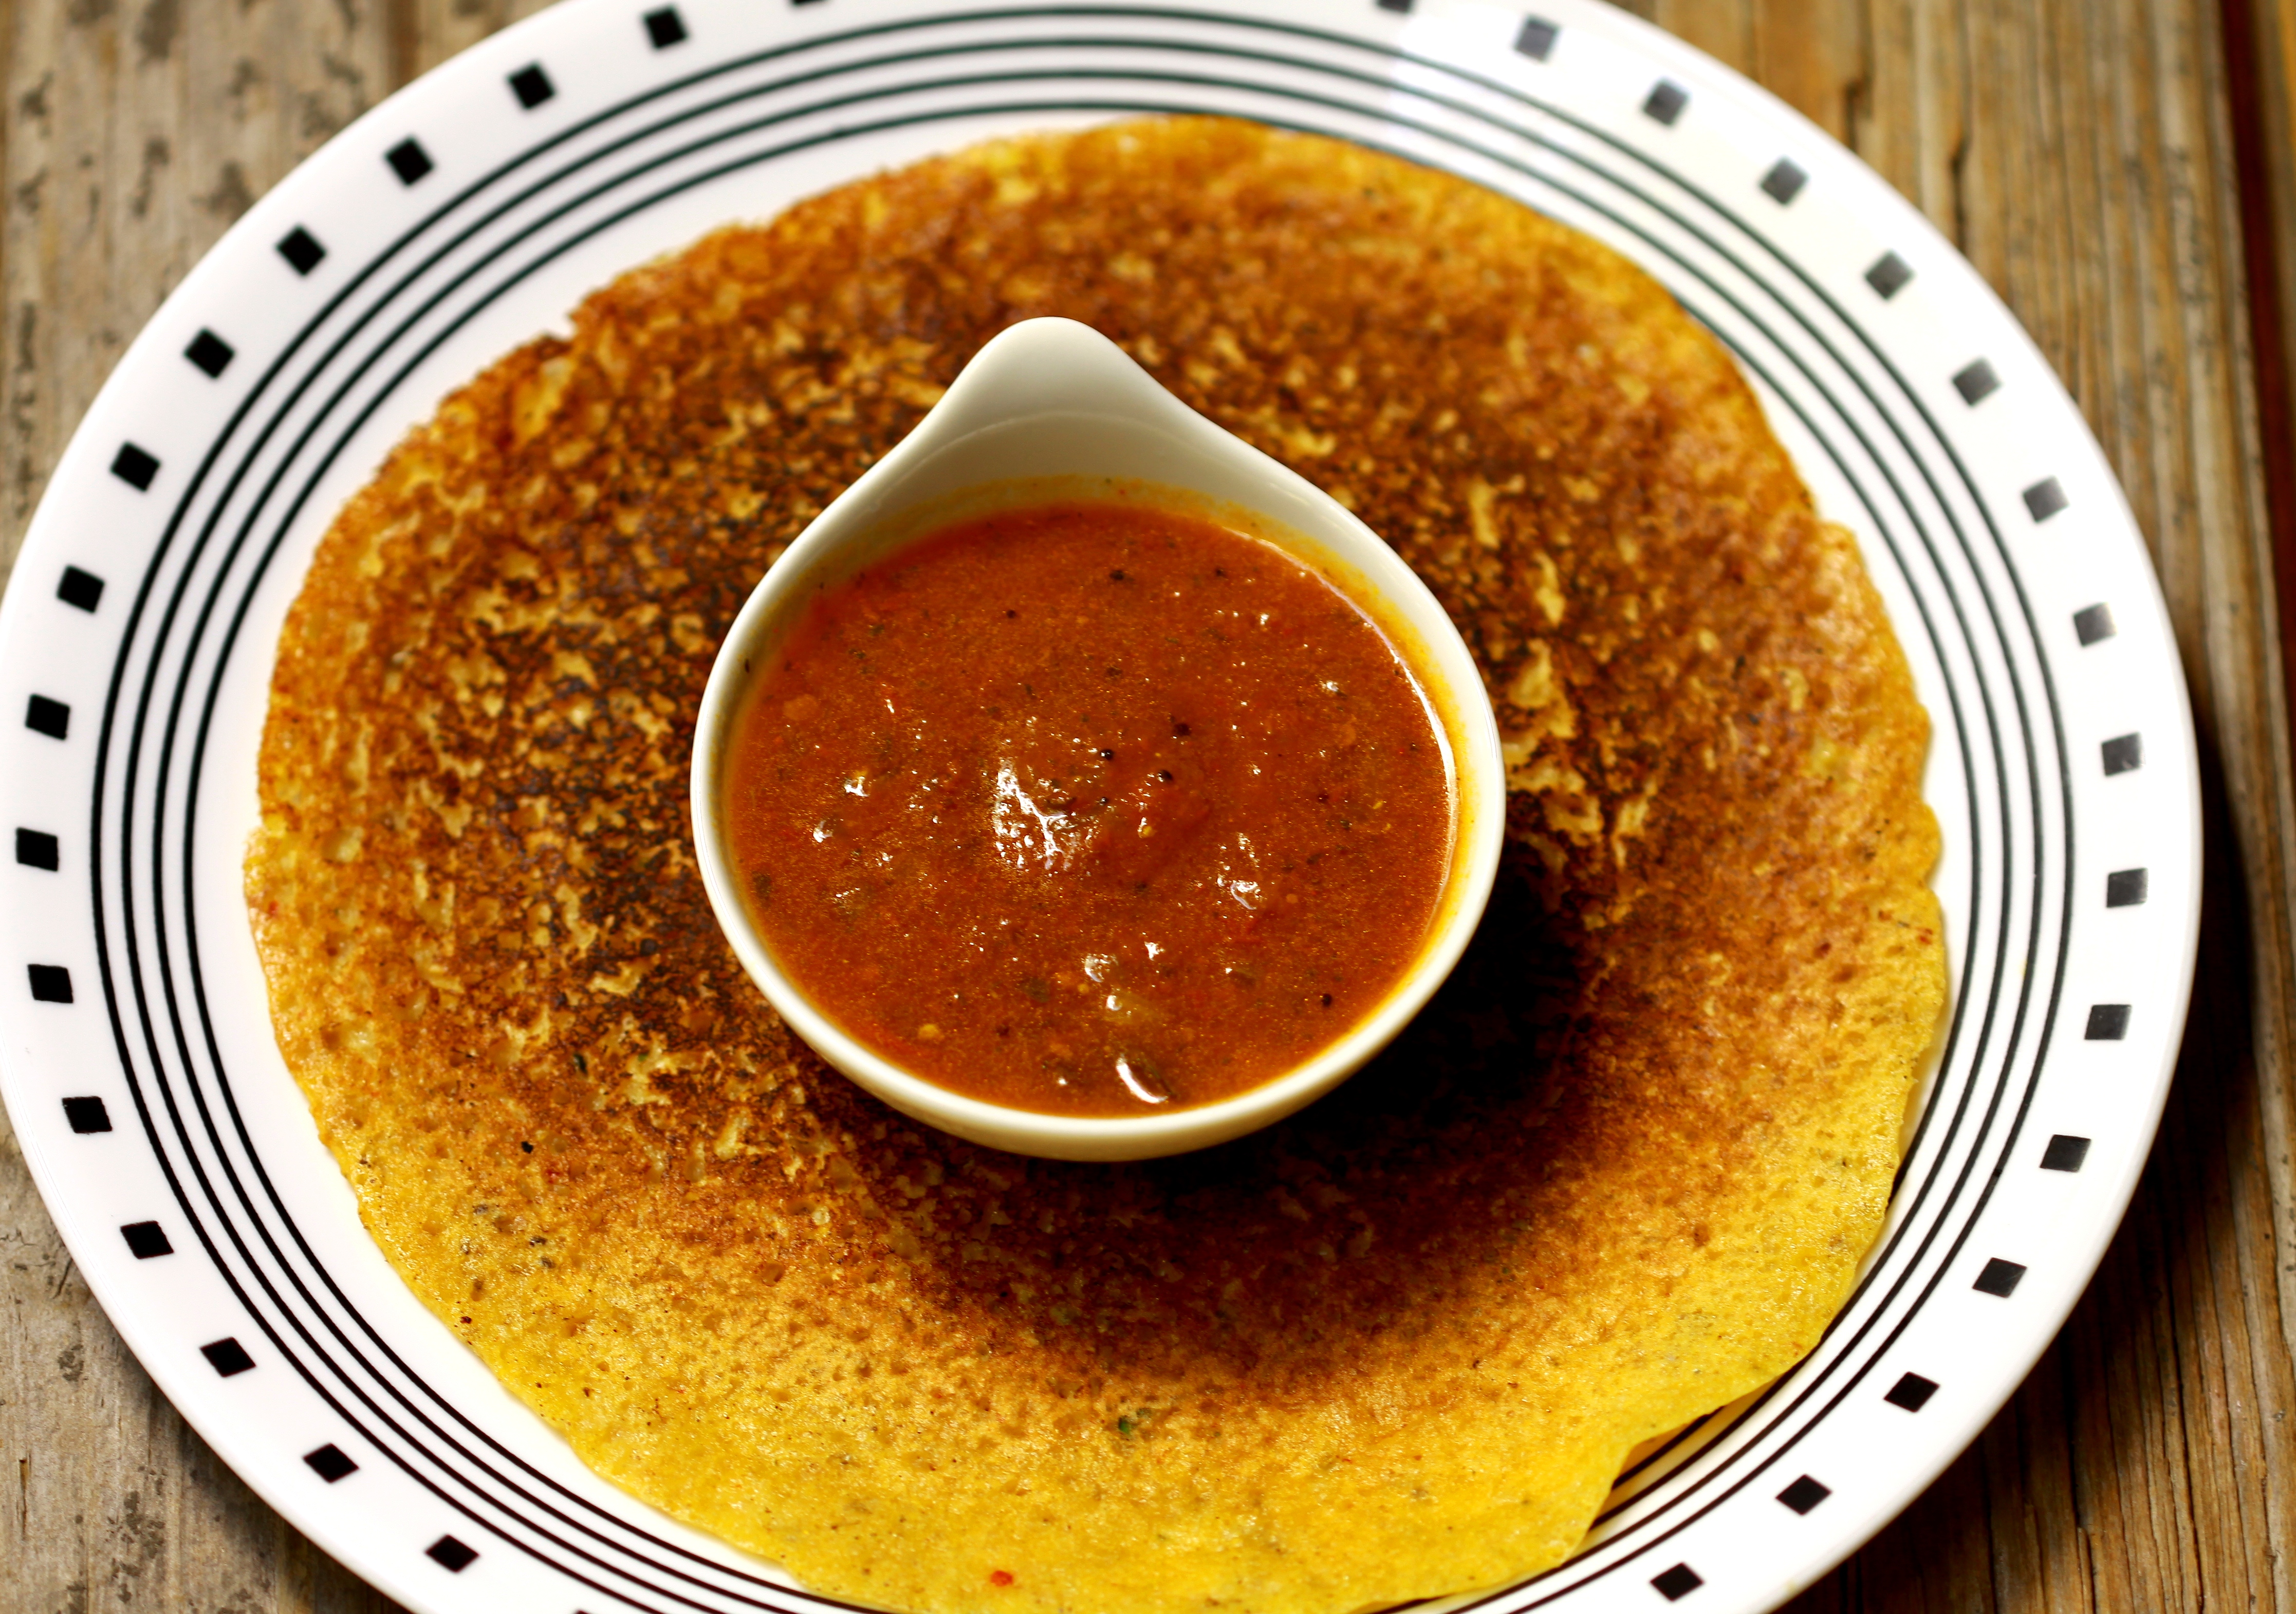
This has to be one of the most easiest of all the tomato chutneys posted ever as it holds its taste on its own.  Its your regular tomato chutney with tomatoes and green chillies and onions, only its rehashed with a big spoonful of Grand Sweets Vethakuzhambu Powder. If you dont have the Grand Sweets Sambar Powder, add your home made sambar powder. It should still give it a very different spin! It`s super tangy from the tomatoes and there is a slight heat that hits you, as an afterthought. This chutney is made slightly watery and not so much like the ones that have coconuts or daliya. I served it with Healthy Oats and Flax Adai.

INGREDIENTS:

1 Medium Red Onion.

3 Ripe Slicing Tomatoes.

1-2 Green Chilies.

1 Tsp Salt.

Hing.

1 Heaped Tsp Vethakuzhambu Powder.

1/2 Tsp Red Chilli Powder.

Seasoning:

1 Tsp Mustard.

1 Tsp Broken Urad Dhal.

Curry leaves.

Hing.

PREPARATION:

  • Chop the onions and the tomatoes roughly as they are going to get pureed in the blender/Mixer.
  • Start with about 1 tsp of oil in a kadai and season with chillies and a little hing.
  • Now add the chopped onions and allow to saute until pinkish light brown.
  • Add the chopped tomatoes and follow with turmeric powder, red chilli powder and Grand Sweets Vethakuzhambu Powder.
  • Allow to saute well and when its almost done, add the required salt.
  • Its not needed to saute until all the tomato juices have completely dried up. It can still be a little watery.
  • Allow to cool and puree in food processesor/blender with a 2-3 Tbsp of  coconut milk (optional)/water until required consistency is reached.
  • I like mine to be a little coarse with the texture of the onions and the tomatoes, so i don’t go all the way.
  • Season in oil with mustard seeds, broken urad dhal, hing and curry leaves.
  • Serve with Idli, Dosa or Adai, and yes,  let me know how it went!!!

197

Cakes / Pastries / Cookies/ Bread/Muffins.

Candied Orange Peel and how to make more Orangey Goodness with it…

IMG_4165

It`s difficult to explain my love for Oranges….I love them in every form possible…their sweet juicy fleshy fruit, the juice from the oranges, the fragrant zest and even its peel!!!  As a little girl, it was a pleasure to open the sweet orange peel, and see perfect fleshy oranges tightly packed, preserved in their little casings,  and enjoy its juiciness in every bite. Oranges are a great source of Vitamin C which is an excellent anti0xidant for the human body. I remember seeing baskets of Oranges sold in trains when they stop at Nagpur, India. Everytime we would buy a basket and start peeling away orange skins. I remember my sister and me used to dunk the orange slices in salt before the tastes mingled in our senses – the sweetness from the ripe oranges and the saltiness bursting through. Now when I see the navel oranges here, I miss the humble “Santra” Orange that we used to have in my childhood. But the stories of those days keep the kids enraptured through these story telling sessions…

I made a huge batch of the Candied Orange Peel last week to use for my Eggless Christmas Cake and also as a reserve for salads and soups. I hope you enjoy making them as much as I did!

INGREDIENTS:

2 Oranges.

1 cup sugar.

1 cup water.

A shallow tray with 1/3 cup sugar.

PREPARATION:

  • The first step for making these candied goodies, is to peel the orange with your fingers or a peeler.  When you peel oranges with your fingers, they come off with the whitish pith inside. This part is a little bitter so it has to be pre-treated before making candied orange peel.
  • Collect all the orange peels and pop them in to a shallow saucepan. Pour about 2 cups of water and let it sit on a medium flame for about 6 minutes or so. Discard the water and refill the saucepan with more fresh water.
  • Pop it over the stove for another ten minutes or so and discard the water once again. This helps remove most of the bitterness from the orange peel.
  • Add equal quantities of water and sugar in a container and place over a medium flame in the stove.
  • When the sugar has melted and little bubbles start to form in the sugar solution, add the pre-cooked orange peels and let them simmer in the simple syrup for about 30 minutes or until you see that the orange peel has cooked well and is slowly getting transparent.

candied peel


  • Prep up a shallow tray with 1/3 cup sugar and spread it in to a thin layer.
  • Remove the orange peels and drop them on to the sugar crystals and roll them  in to the sugar to coat them well.
  • Transfer to a wire rack to cool.
  • Store in an air tight container for weeks.

IMG_4162


Ah yes what more can you do with it???

  1. I always used Candied Orange Peel every year during christmas to make my favourite Kerala Eggless Plum Cake.
  2. How about making Orangettes by dipping one end of the candied orange peel in melted chocolate and let it sit until it cools down. Makes a great after dinner refreshment!
  3. Or use the candied orange peel ground to a powder as an excellent garnish in an Orange salad or a crunchy garnish over ice cream.
  4. Add powdered candied orange peel to soft butter to along with a  little orange zest, to spread over warm bread or cookies. Double yum!
  5. Candied Orange Peel can be added with any fresh fruit juice that has oranges for that extra zing!
  6. Combined with extra virgin olive oil and orange zest, candied orange peel makes a great salad dressing!
  7. The simple orange syrup that is left behind after making the candied orange peel can be used instead of honey in cakes and instead of maple syrup over pancakes and waffles…
  8. I did use it in a simple vanilla cup cake with orange cream frosting as a crunchy garnish for that oomph!
  9. I am guessing it can also be used to make Pachadis and Vetha Kuzhambu too…
Continental Fare · Salads/ Recipes for the Calorie Conscious.

Ratatouille / Confit Byaldi – The favourite dish of a rat with a whisk and a dream!

Ratatouille

When this Disney Pixar movie was released I was astounded at the very thought that was the centre of the entire movie – Remy`s burning passion for cooking inspired by his Chef Gusteau and his astounding sense of smell. He always cooked with his sense of smell and that was something very magical and endearing about it. The expression of the famous food critic Anton Ego when  has a bite of the Ratatouille whipped up by Remy is  one of extreme happiness as he is immediately reminded of his mom`s cooking.  The movie ends on a happy note with the food critic Anton Ego funding a new bistro run by Remy the rat and some more of his friends. The climax of the movie is by far my favourite, where Remy patiently slices all the vegetables in the mandoline, splatters sauce on the base of the dish and arranges all the sliced veggies in the baking dish. I had never noticed that she does cover the dish with parchment paper which is what the recipe calls for. The movie has been outlined with such tremendous detail and capture new details every time I watch the movie!

Since I day I watched the movie, I had been wanting to taste the original version of this dish and I must push that dream to a little later until I can visit my dream destination – the City of Love – Paris. This weekend I found myself with all the ingredients I wanted except of course the eggplants. I still decided to go with my heart and made it yesterday for my family and they loved it. Every bite was filled with the bite of the crunchy veggies baked in the aromatic tomato sauce and pillows of cheese ravioli! Bon Appetite!!!

INGREDIENTS:

FOR TOMATO SAUCE:

5  Medium Tomatoes.

1 Garlic Pod.

1 Medium Onion.

1 Small Carrot.

1 Tsp Salt.

1 Tsp Brown Sugar.

1 Tbsp Balsamic Vinegar.

1 Tsp Dried/ Fresh Basil.

For the Ratatoiuille Base Sauce:

1 Onion.

1 Garlic.

1 Tsp Oregano.

2 Tsp Parsley.

1 Bay Leaf.

2-3 Cups of the Prepared Tomato Sauce.

For the Vegetable Layer:

1 Zucchini  sliced in to thin circles.

1 Yellow Squash sliced in to thin circles.

1 Japanese Eggplant sliced in to thin circles.

1 Carrot Sliced into thin circles.

1 Red/Yellow/Green Peppers for colour. ( I did not have them so my version was made without them.)

Salt & Pepper to season the veggies.

PREP WORK:

  • Arrange all the sliced veggies on a large tray and season them with salt and pepper.
Veggies lined up for seasoning!

PREPARATION:

  • Take the first six ingredients and make a slightly chunky basic tomato sauce. Add your favourite herbs – Basil / Oregano etc.
  • Simmer the chunky tomato sauce over a medium flame for about 20 minutes until  some of the water evaporates and it becomes slightly “saucy”!!!
  • In another wok, add 2 tsp of extra virgin olive oil and then pop in the herbs listed under “Tomato Base” – bay leaf, parsley and some oregano. When they fry  in the oil, add t he garlic and the onions.  Allow to brown only slightly and then add your prepared “Ratatouille Base Sauce”. Give it a quick stir and let them all come together.
  • Take a shallow baking dish and firstly add a layer of the prepared Ratatouille Sauce.Spread them around the base of the dish.
  • Arrange the sliced veggies atop the sauce concentrically alternating each of them with the other . This does give it a dash of colour and symmetry! You might be left with a few more of the sliced veggies, but that’s fine.

IMG_3322

  • Make sure that the slices peek out from the sauce and they are not dunked in it completely.
  • Season one last time with a twist of your pepper mill and sprinkle a few drops of balsamic vinegar over the top.
  • Preheat the oven to 375F in the mean time.
  • Before placing the Ratatouille inside the oven, many recipes call for  lining the inside of the dish with parchment paper  but I didnt have any.
  • I went ahead and popped it in the oven for about 35-40 minutes until the veggies are well cooked but not limp. They should not be allowed to brown.
  • I served my Ratatouille as a side for Cheese Ravioli in Tomato Sauce.

IMG_3324

Pickles & Thokku.

Manga Thokku

Some of the best days of our lives are really when we were much younger in school with no cares or worries about  life and its guile! It does not really matter about the quality of life, or whether we walked to school, took the bus, had a hard time growing up…Every one`s life at that point still seems so happy and carefree! The best part of my childhood was always summer months filled with buzz and activity at Madurai amma`s home. All my cousins would visit us and the home would be filled with at least fifteen members of the family. Everyday cooking itself would be 2 hour chore with all of us helping here and there. Summers would also be time for pickles. vadams and vathals. Time to bite in to juicy ripe Banganapalli mangoes  and Dilpasand from Bangalore Iyengar Bakery in T.Nagar.

Madurai amma would always make Avakkai Pickle, Manga Thokku and Mahani Kizhangu. We all would pitch in and grate about 10 mangoes on to a large newspaper and trnasfer them to large plates for her to make the pickle. By afternoon the aroma of the pickle would be wafting throughout the home and that night everyone would volunteer to sample the pickle. As I make this every summer, I recount those beautiful days of my childhood and pass on the memories to my little ones…

INGREDIENTS:

2 Big Mangoes or 3 Medium Mangoes.

2 Tsp Red Chilli Powder.

1/8 Tsp Turmeric.

1/8 Tsp Hing.

2 Tsp Salt.

1/2 Tsp Fenugreek Seeds.

1 Tbsp Jaggery.

A pinch of tamarind.

Seasonings:

1 Tsp Mustard Seeds.

Few sprigs of curry leaves.

PREPARATION:

  • Wash the mangoes and wipe them down with a clean kitchen towel. Peel out the skin and using a grater, grate all the mangoes until you reach the seed.
  • In a dry kadai roast about 4 tsp of fenugreek on a low flame until it emits an aroma. Switch off and when cool, grind to a fine powder. Store in an air tight container.
  • In a heavy bottomed kadai add 4-5 tbsp of oil and when its hot enough season with mustard seeds and curry leaves.
  • When the mustard seeds splutter, add the grated mangoes slowly in to the kadai.
  • Add turmeric powder, hing and red chilli powder and give it a quick saute.
  • After a couple minutes, add salt, a pinch of tamarind paste (optional if the mangoes are tart by themselves), fenugreek powder  and the jaggery.
  • Keep stirring the kadai now and then and make sure it does not stick to the bottom.
  • In about 20 minutes you should see the oil seperating from the pickle.
  • Now its time to switch off the kadai and allow to cool.
  • Transfer to a glass pickle jar and store air tight in the refrigerator.
  • Mango Thokku can be used as a side for rotis, idli, curd rice and dosa.
Pickles & Thokku.

Kothamalli Podi

Anybody who is a constant visitor to my blog, would know by now, my love for Corriander Leaves. I love it in any form and the aroma it exudes, is simply inexplicable. It instantly adds so much zing and character to any dish to which its added. Imagine rasam without corriander leaves, or Mushroom Mutter Masala without the green garnish. Imagine salsa and any mexican cooking without this herb. I always love the transformation to the dish, cause by the addition of corriander leaves. Iamgine a dish where this is the star ingredient???  This is an excellent compliment to curd rice, dosas and even Morkuzhambu and Molagootal.

INGREDIENTS:

1 Large Bunch of tender cilantro/corriander leaves. (2 bunches in India).

1/2 Cup Broken Urad Dhal.

6 Red Chillies.

2 Tsp Home Made Idli MolagaiPodi/Gunpowder.

Gooseberry Sized tamarind ball.

1 – 11/2 Tsp Salt.

A pinch of hing .

PREPARATION:

  • Take the large bunch of corriander leaves and wash them well in a collander. Allow them to air dry for about 2 hours.
  • Now remove the stems that are thick and fat. If they are thin, simply remove only the root part and set aside. Pat dry to remove any moisture.
  • Soak the tamarind in 2 spoons of water and warm in the microwave. Set aside.
  • In a small wok, add a spoon of gingely oil and add in the urad dhal and the red chillies.
  • Fry on medium flame, until its golden brown. Finally add the softened tamarind piece alone, without the water. When its sauteed well, set aside.
  • Take the medium container of your mixie jar and add the  fried red chillies,  urad dhal  and tamarind at the very bottom.
  • To this add salt, asfoetida, and idli molagapodi and  give it a quick pulse.
  • Now toss in the dried corriander leaves and give it a quick pulse.
  • Frequently you would have to use your spatula to ease out the portions that are stuck to the jar and will not grind.
  • Pulse on and off to get a coarse mixture. Add a couple drops of gingely oil instead of water, to aid in lubrication.
  • When done, check for salt and trnasfer to a clean dry bowl.
  • Using your hands, roughly shape them into balls and store in the fridge.
  • Kothamalli Podi is an excellent side for curd rice, and idlis.

HINTS:

The beauty of this corriander podi is that its an instant home made pickle/side for curd rice.

When you have sudden guests, take out a ball and grind with some coconut and water to get Corriander Chutney.

Add a little to home made thick curd and mix it in for aromatic pachadi!

Naivedhyams/ Festival Offerings. · Sweets

Kaju Katli – Deepavali Sweets Series.

One of the most favourite sweets growing up, has always been the Kaju Katli. I guess I fell for its pillow like softness, sweet thats not to much nor too little, but just right, and the little bite sized goodness coming in such small packages! I dont remember when they started getting really famous, but I still loved them a lot! The other sweet that I really really loved was the Sweet Sev from Gomathy Sankar Sweets & Savouries near Ranganathan Street in T.Nagar. Madurai Appa would always get a small quantity of about 250 gms, and we would all get just a couple to savour. But I loved the slightly salty sev inside coated thickly with layers of hardened sugar!!!  Its always a pleasure to reminsce about little memories from our childhood, blasted in to the present!

The first time I ever made this sweet was about 2 years ago when my little one simply loved it so much. She said they were thin and tiny, and so they were hers!. And that was why I could never find good ones to shoot! It`s almost tradition to make it for Deepavali since then, and quite a few of my readers had requested for this recipe!  Happy Deepavali you guys. This recipe is specially for my reader Ramya!!!

INGREDIENTS:

1 Cup Cashew Nuts.

1/2 Cup Sugar.

1/4 Cup Water.

1-2 Drops Rose Essence.

1 Tsp Ghee to grease your hands before kneading .

PREPARATION:

  • The first step is to pulse room temperature  cashews in to a fine powder. In many places, people store all their nuts in the fridge or freezer to prevent it from becoming rancid. In such cases, keep the cashews out for at least an hour so they come down to room temperature. When they are ground cold, the heat from the mixer causes them to stick together and the powder is not as free flowing and fine.
  • Take the measured quantity of cashew nuts and pop them in the mixer jar. Grind them steadily until it becomes a fine powder.
  • The next important step is bringing the sugar solution to “single string” consistency. This is needed for Boondhi Laddoos, Kaju Katli, Badushah, Mysore Pak  and some other sweets.
  • Take a wide mouthed heavy bottomed kadai and add a heaped 1/2 cup of regular white sugar. Top it with 1/4 cup of water and set it on the stove on medium flame. Keep stirring the mixture on and off and after about 5 minutes you should see it bubbling and frothing. Slowly the sugar solution moves to a single string consistency.  To check if the sugar solution has reached the required consistency, take a little of the syrup in the back of your ladle and try stretching it between your index finger and thumb. If this forms a fine string, then the required consistency is reached. This is a very important step and the coming together of the katli rests on the single string consistency.
  • Lower your flame to SIM and tip the ground cashew powder in to the kadai and keep on stirring until it reaches a slightly thicker mass. It would be still a little sticky but will the sugar will start hardening rapidly, so do not worry. It should look like sticky chappathi dough.
  • Switch off the gas and remove from the heat. Wait for about 4-5 minutes.
Cahsew Dough after kneading!
  • Clear a clean surface to work on and grease it with a little ghee.
  • Now transfer the cashew dough to the greased surface and knead it gently with greased palms. This step is important to get a shiny smooth pliable dough. It just needs a little time to work on the dough. If you feel its still sticky, try adding a few drops of ghee and continue working on it. You could use disposable gloves if you feel its too hot to handle.
  • The dough should get smooth and shiny on the outside and get in to a pliable round ball.
  • Take a large piece of parchment paper and place this dough on it. Fold it over the ball as shown and press with your palm to make a flat disc. Now using the rolling pin, smooth the dough in to a thin chappathi. It can be as thin as you want your katli to be. Make sure that the surface is uniform.
Cashew Dough pressed thin in parchment paper.

  • If you do not have parchment paper, you could use two ziploc bags or the back of a cookie sheet and a ziploc bag. You need to hold the dough in a non stick surface and roll over another non stick surface.
  • Open the paper and immediately mark in to diamond shapes. All this should be done when the dough is moderately warm.
  • Decorate each diamond with a string of saffron.
  • When cool, transfer to an air tight container.
  • Kaju Katli with absolutely no ghee or no oil is ready!


HINTS:

  1. There are little tips and tricks that are part of any cooking process and they sometimes can make or break the dish. In this case, having room temperature cashews are important.
  2. For first timers, the sugar solution sometimes can get tricky, Its better to make this over a medium low flame when there is more time to check and react.
  3. The last tip is to make sure that the dough gets smooth and pliable. IF the sugar solution is single string then this should not be a problem. Knead the dough well with a few drops of ghee when its still warm.
  4. Please leave your comments on this post, with your observations and here`s to wishing you a Happy Deepavali.


Italian Cuisine. · Kid Friendly Recipes.

Lemony Dill Pesto.

Dill has been a relatively new herb to me as I have never tasted it growing up. There are certain fruits and vegetable that we have always kept away, never knowing why. I am guessing dill was one such herb. I do remember seeing bunches here and there in Chennai, some years back, but I have never tried to cook with it!  In the US, dill is pretty much a common addition to dips and sauces. Last year when I went to India, my sister made this amazing Dill Dhal, and I was a sucker for it. When I came back I pretty much started finding ways to add it to my weekly grocery shopping. When I had to decide on a lunch menu for my 9 year old, I decided to make a pesto with the dill, almost similar to the one we make with basil. Well, and why not?  I didnt have pine nuts and I was always looking for excuses to sneak in walnuts in my little one food, so I decided to use the walnuts instead. ..Yes, you could never make out! The pesto was aromatic, flavourful, lemony, garlicky and yummy!  I used cheese ravioli as the base and dressed it pretty with the green pesto! Go on and try it!

INGREDIENTS:

2 Cups Dill.

12 Almond Pieces/Walnut Pieces.

1/4 Cup Olive Oil.

6 Garlic Pods.

Salt to taste.

1/2 Lemon Juice.

1 Tsp Lemon Zest.

PREPARATION:

  • Take a food processor jar and pop all the walnuts/almonds and the garlic pods in to the jar. Give it a quick pulse.
  • Now add the chopped dill, salt, lemon zest and pulse again.
  • Continue pulsing until roughly chopped and slowly add the olive oil until the desired consistency is reached.
  • Refrigerate for at least 2 weeks.

TO USE LEMON DILL PESTO AS A SAUCE:

  • Cook the desired pasta until its al-dente and save a little of the salted pasta water.
  • In a wok, add some extra virgin olive oil, herbs de provence, and then the dill pesto.
  • After a light saute, add the cooked pasta and the pasta water.
  • Swirl in and toss.
  • Serve hot with a garnish of your favourite shredded cheese.

TO USE LEMON DILL PESTO AS A DIP:

  • Combine lemon dill pesto with a spoon of cream cheese/ mascarpone cheese and some sour cream/hung curd.
  • Adjust salt to suit your taste.
  • lemon Dill Pesto makes an earthy  dip filled with tons of flavour and zest.
Kerala / Palakkad Recipes. · Side Dishes for Rotis/Dosas/ Naan.

InjiPuli (Tamarind Chutney spiced with ginger and spices)

Ginger root  is a very very tricky spice for me. It is a warm spice, that adds a lot of warmth to many dishes, but one that cannot stand up by itself as its way too over powering. Another such spice is the nutmeg. I love love adding ginger to hot tea, or in piping ginger rasam. Its an important ingredient in indo chinese cooking, specially the Indo CHinese Fried Rice, which is a favourite of mine or the GInger Capsicum Fried Rice.  I hate ginger in cakes or icing or even in a warm pumpkin bread. I cannot eat even a pinch of the candied ginger that is supposed to aid in digestion. No thank you. I can have the tums or digene any day!!! The only only dish where ginger is a star ingredient which I love to have is the Inji Puli.

I remember hostel days when my friend Rose, used to bring jars of Inji Puli  from her home town of Trichur when she would return from her vacation. After that we would have Inji Puli over bread, along with Maggi, as a side for chappathis, idlis or even dosas. Dinners would be awesome with all of us sitting together, discussing college gossips, eating piping hot dosas with sweet and spicy Inji Puli. At that time, I remember asking Rose how to make this and vaguely remembered the procedure. She kept telling me it was important to fry the ginger for that authentic taste. This was almost 13 years ago but then I decided to try it out from memory and with help from online sources, I perfected the recipe for Inji Puli.

INGREDIENTS:

2 Cups Tamarind Water.

4-5  Tsp Brown Sugar.

1 Tsp Red Chilli Powder.

1/4 Cup Finely chopped ginger.

salt to taste.

i Tbsp Coconut oil.

Seasoning:

1 Tsp mustard Seeds.

Curry Leaves.

Pinch of  Hing

4-5 Fenugreek Seeds.

PREPARATION:

  • Chop the ginger after peeling it and set aside.
  • In  a wok add 2 tsp of coconut oil and when its hot, add the chopped ginger. Shallow fry on low flame for abour 2-3 mins  until the ginger is light brown. Set aside.
  • In the tamarind water, add brown sugar, turmeric powder. salt,  and red chilli powder, and mix them all in.
  • Set over medium flame until the raw smell is gone add the fried ginger and allow to simmer.
  • Place a kadai on the stove and add a spoon of coconut oil. Season with curry leaves, mustard seeds and fenugreek seeds and hing. When they splutter add it to the tamarind gravy.
  • Set the flame to medium low and allow the gravy to simmer down until its slightly thick. If needed that this point you could add 1 tsp of rice flour dissolved in 2 tbsp of water and add this to the inji puli, as this helps in instantly thickening the gravy.
  • Remove and store airtight  in a glass jar, which will preserve for weeks.

HINTS:

Coconut Oil is a very important and essential ingredient to achieve the authentic taste of the Inji Puli. Please do not substitute with gingely or canola oil.

Frying the ginger on medium low flame until the ginger brown imparts the dish with a unique flavour of the ginger without the sense of overpowering the entire dish. It pllays along nicely with the tamarind and the brown sugar/jaggery.

Using brown sugar was option for me. You could also use about 3 tbsp of jaggery. Please use a little less and depending on the strength of the ginger. tartness of the tamarind, play with the quantoties of the jaggery. There should be a sweetness that is not too sweet nor too less.


Brisk Breakfast · Easy LunchBox Series. · Snacks & Tiffin Items

Aloo Pohe/ Aloo Poha

Aloo Poha was one of my favourite dishes growing up. Poha was one of the most tastiest  yet easy lunch items that my grandmom used to make. Just the aroma was enough to make us go for seconds whenever she makes it. A couple of my readers have been requesting for Aloo Poha for quite some time and this was reason enough.  Today I had no cilantro, and no peas, yet I longed for recounting those beautiful memories, growing up!!!

INGREDIENTS:

1 Medium Onion.

3 Cups Thick Poha.

2 Potaotes steamed and cubed.

1 Tsp Sugar.

1/4 Tsp Turmeric Powder

1/2 Tsp Garam Masala Powder.

Salt to taste.

1 Tsp Lemon Juice.

Chopped Cilantro to garnish.

Seasonings:

1 Tsp Mustard Seeds.

1 Tsp Cumin Seeds.

A handful of peanuts (raw or roasted).

2 Green Chillies slit.

Curry leaves torn.

Hing.

PREPARATION:

  • Beaten Rice is a dehusked rice which is flattened to dry flakes. When added to any liquid like water, milk or buttermilk they swell up in size and volume.
  • Whenever I work with beaten rice, I am always reminded of Sabudhana which I use in making Delicious Sabudhana Khichdi.
  • Take your measured quantity of beaten rice and wash it in cold water. Drain away all the water by pouring the moist beaten rice on to a collander.
  • Add the required salt and mix it in lightly so as NOT to break the delicate grains of beaten rice. Sprinkle salt over the poha, mix and set aside until required and keep covered lightly.
  • Take a kadai and add 2 tsp of oil and allow to heat. Add mustard seeds and when its crackling, add jeera, slit green chillies, hing and the curry leaves.
  • Now add the handful of peanuts and then the finely chopped onions. Allow to saute and when its just beginning to brown add the cubed potaotes.  If the potatoes are raw, chop them in to small pieces  and pop them in the microwave for 3-4 minutes. This would speed the time spent on the stove and  quicken the total time taken to prepare the poha .
  • If the potatoes are cooked and then cubed, add them to the onions, add peas if needed  and then follow with turmeric powder and salt.
  • Cover and cook for a couple minutes and then add a spoon of sugar and mix it well.
  • Now add the moist poha and mix the onion masala to mix with the beaten rice. The beaten rice already has enough salt so if needed adjust this quantity.
  • Add 1/2 tsp garam masala powder and cook for a couple more minutes.
  • Finish off with squeezing fresh lemion juice and incorporate it in, Garnish with finely chopped cilantro.
  • Cover for at least 5-10 minutes before serving. Sometimes If I make this for kids, I add a dash of ghee and I must say I have been rewarded with requests for seconds!!!
Side Dishes for Rotis/Dosas/ Naan.

Bihari Aloo Baingan (Potatoes and Eggplant in a Garlic Chilli sauce)

Baby potatoes are always a pleasure to cook with as they are cute and tiny and cook so fast and most importantly they dont have to be peeled and they hold their own ground. They dont get too mushy unless you dont treat them properly. I enjoy so many recipes with baby potatoes some of my most favourite being, Aloo Dum, Baby Potatoes in Tomato Gravy and of course this Bihari Aloo Baingan. I love combining such contrasting veggies, as I feel they compliment each other…Plantains and long bean Mezhukkuvaratti is of course another favourite but we shall keep that speciality for another post. This is is inspired by one of my favourite chefs – Raghavan Iyer…I love his cook book andd the little anecdotes that he adds to the story behind his learning the recipe and its roots….

INGREDIENTS:

1 Pound Baby Potatoes.

1 Japanese Eggplant.

4 Large Cloves Garlic.

3 Red chillies.

1 Tsp Jeera.

1 Tbsp Ginger thinly sliced.

1 Medium Onion sliced lengthwise thinly.

2  Tsbp Canola Oil.

1/2 Cup Firmly Packed Cilantro Leaves.

PREPARATION:

  • Wash the potatoes and the eggplants. Pop them in the rice cooker, add salt  and cook them until they are half done. Alternatively use the microwave or stove or you need not cook them now but you can finish up the entire cooking of the potatoes and the egplant in the gravy itself.
  • In the little mixer jar combine cilantro, red chillies, ginger  and  garlic and pulse until they are well ground. Do not add water. Set aside.
  • In a pan or kadai, add a spoon of oil and when the oil is hot enough, add the cumin seeds. They will splutter and sizzle for a couple seconds. Imediately add the sliced onions and fry them until they turnn in t a dull brown colour and they carmelize. This should take about 4-5 minutes.
  • Add the pulsed cilantro garlic blend and saute for a couple more seconds until the raw smell is gone. This should be in about 45 seconds. Do not let the pulsed mix burn in the pan. Keep mixing and marinating them in.
  • Toss in the potatoes and the eggplant and mix with the rest of the ingredients.Now add a cup of water and scrape the pan to deglaze the bits of spices sticking to hte base of the pan.
  • Stir in another cup of water and add salt to the pan. Now bring the heat down to medium low and allow to reduce for a about 15 – 20 minutes until the veggies are well cooked and the gravy comes together.
  • Serve hot Bihari Baingan with soft phulkas or Peas Prathas…